Activating Additional LANs
Your primary LAN should already be configured, enabled, and passing traffic. You can use one LAN for your whole home network, you have the optionality to add additional LANs using the Ethernet ports on your network card. Some benefits of adding additional LANs is that you can separate different devices to different networks for different purposes. For example, you can have a WiFi access point connected to LAN-1 and allow your family and guests to connect to that for reaching the wide open internet. Then you can configure LAN-2 for all your ASICs, and configure LAN-3 for your security cameras. There is no limit to the possibilities.
This section will demonstrate how to activate additional LANs.
- Navigate to the
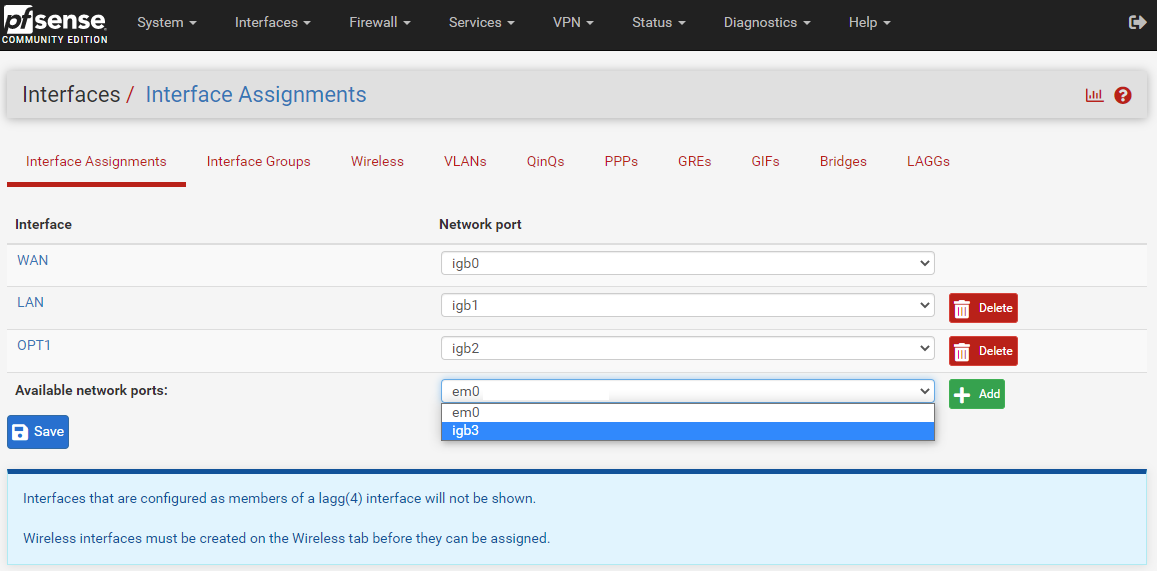
Interfaces>Interface Assignments, you will see all of your available network card ports. They should be labeledigb0,igb1,igb2, etc. Now, simply add the one you are interested in by selecting it from the drop down menu and clicking on the green "Add"box.
-
Then click on the hyperlink on the left-hand side of the interface you just added to open up the
General Configurationpage for that interface. -
Click the
Enable Interfacebox. -
Then change the
Descriptionto something that helps identify it's function, likeLANhome, for example. -
Then set the
IPv4 Configurationtype toStatic IPv4and assign a new IP range. For example, if192.168.69.1/24is your primary LAN, you could use a sequential IP range and make this LAN192.168.70.1/24. -
You can leave all the other settings on their defaults, click
Saveat the bottom of the page and thenApply Changesat the top of the page.

Now you need to setup some firewall rules for this new LAN.
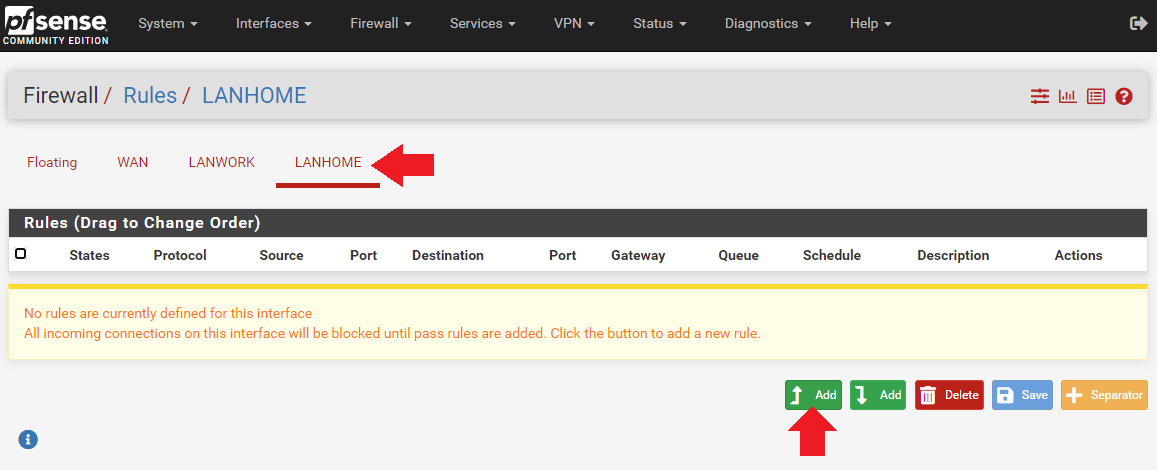
- Navigate to the
Firewalltab thenRules. - Click on your newly added network,
LANhome, for example. - Then click on the green box with the up arrow and the word
Add.
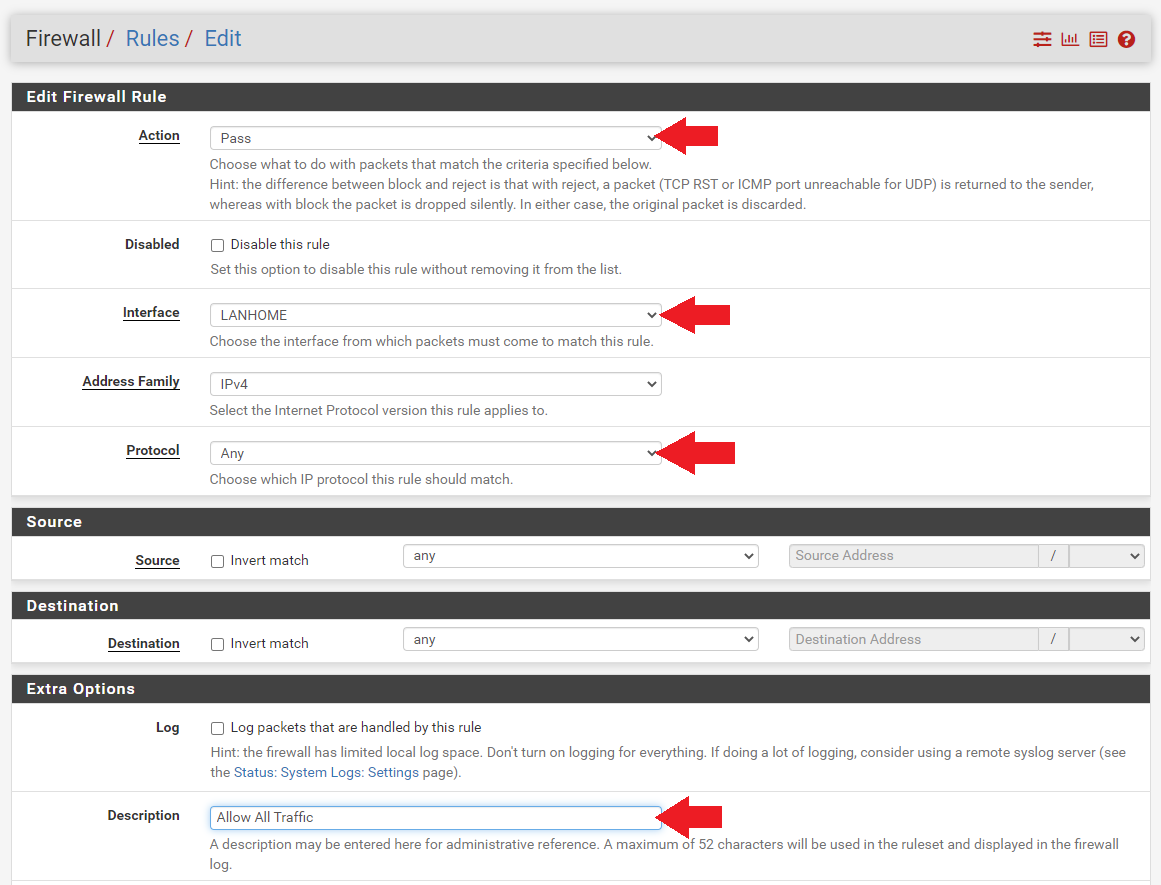
- On the next page, make sure the
Actionis set toPass. - The
Interfaceis set toLANhome(or whatever your secondary LAN is called). - Be sure to set the
ProtocoltoAnyotherwise this network will restrict the type of traffic that can be passed on it. - Next, you can add a short note to help indicate what this rule is for, such as
Allow All Traffic. - Then all other settings can remain in their defaults and click
Saveat the bottom of the page andApply Changesat the top of the page.
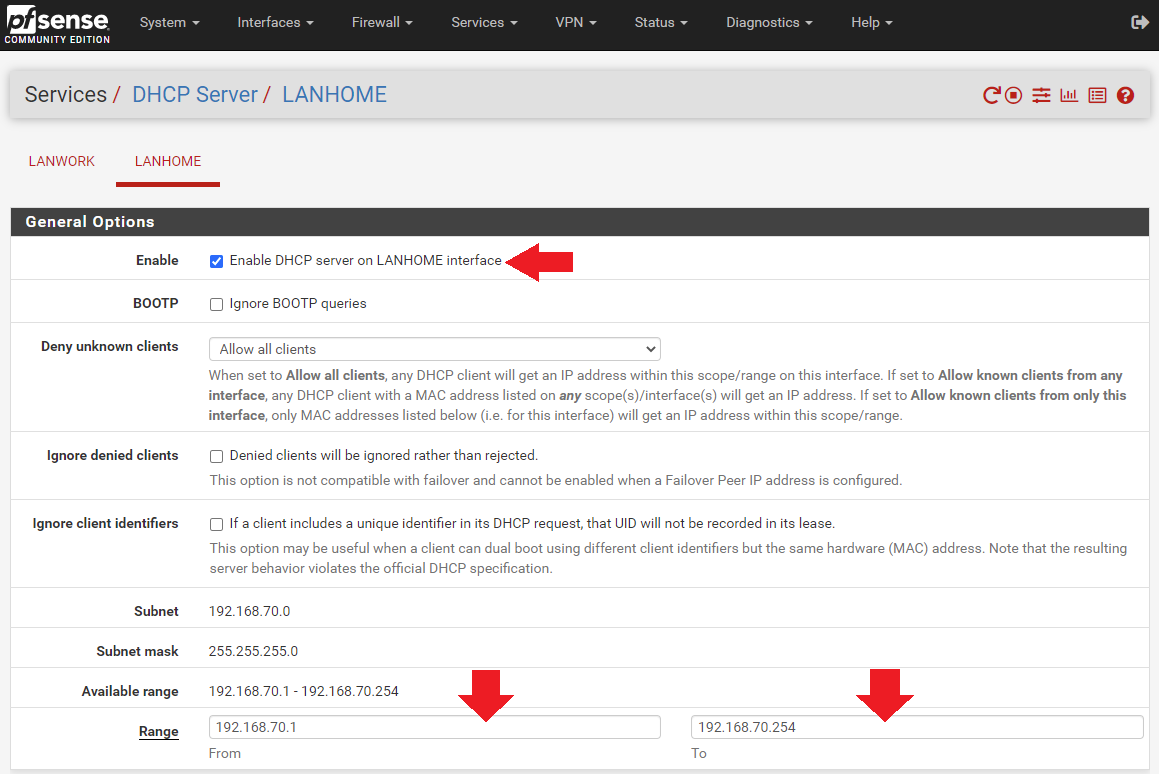
Before you can test your new network, you need to have an IP address setup on it.
- Navigate to
ServicesthenDHCP Server. - Then click on the tab for your new,
LANhome(or whatever your secondary LAN is called). - Click on the
Enablebox and then add your IP address range in the twoRangeboxes. For example,192.168.70.1to192.168.70.254. Then click onSaveat the bottom of the page andApply Changesat the top of the page.
Now you can test your new network by physically connecting a laptop to the corresponding port on the network card and then try to access the internet. If everything worked then you should be able to browse the wide open web.
With this additional LAN added, you can now have a router connected to the first port on the network card and make that your WiFi access point and then you can connect a switch to the second port on the network card and then connect all your ASICs to that switch and have all your devices separated. If you are interested in configuring a WiFi access point please refer to the full length guide.
Segregating LANs
You may want to ensure that devices cannot talk across any of your LANs, one use case would be if you wanted to establish a test network to deploy new miners on first so that you can test them in isolation and ensure that they were not delivered with some kind of malicious firmware before putting them on the same network as all your other miners.
Segregating LANs can be accomplished through the use of Firewall rules and Aliases.
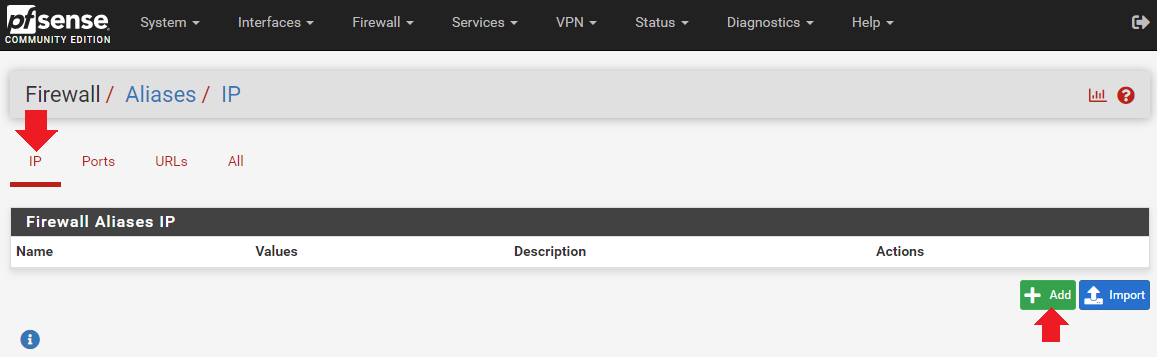
- Navigate to
Firewall>Aliases. Then under theIPtab click on theAddbutton.
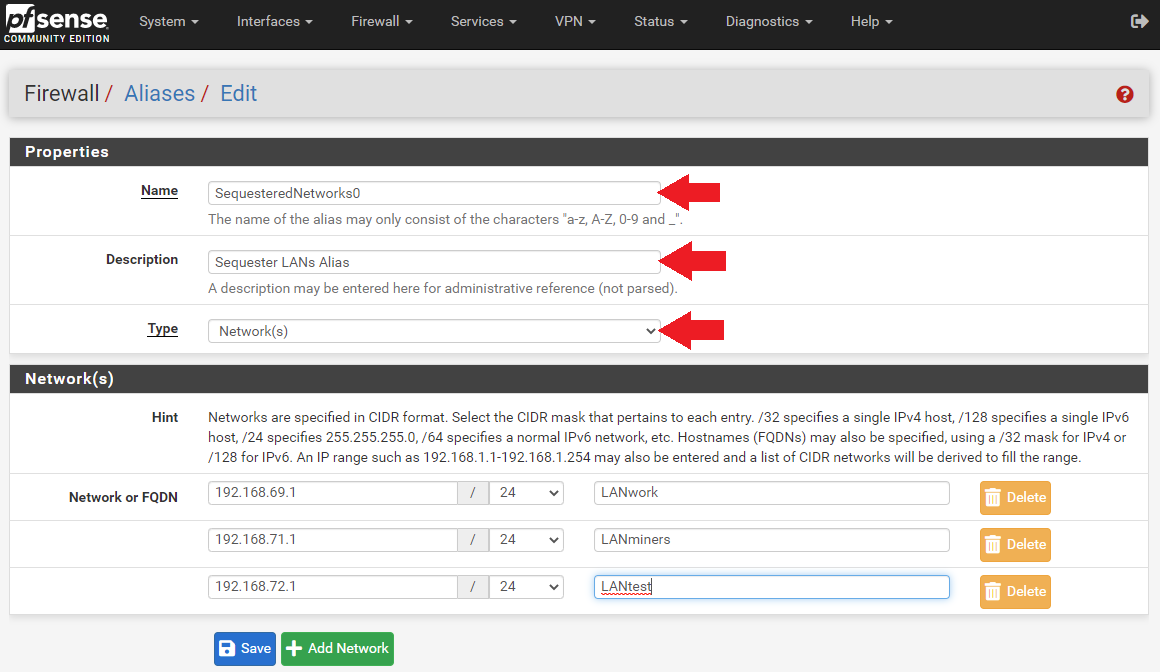
- Then name this alias something that describes its function, like:
SequesteredNetworks0. - You can enter a description to remind yourself what its function is.
- This alias will be used in a firewall rule that will be setup on the LAN that you are trying to separate from the other LANs. For example, the
LAN-2network. So you want to add your other LANs to theNetworklist. This way,LAN-2cannot talk toLAN-1,LAN-3, orLAN-4. - Click on
Saveat the bottom of the page and thenApply Changesat the top of the page.
Now you can add additional aliases that will be referenced in firewall rules on the other LANs to prevent LAN-3 from talking to LAN-1, LAN-2, and LAN-4. So on and so forth until all the networks are sequestered in a way that only the firewall can see what is connected on the other networks.
- With the alias created, a new firewall rule can be applied referencing this alias on the secondary LAN.
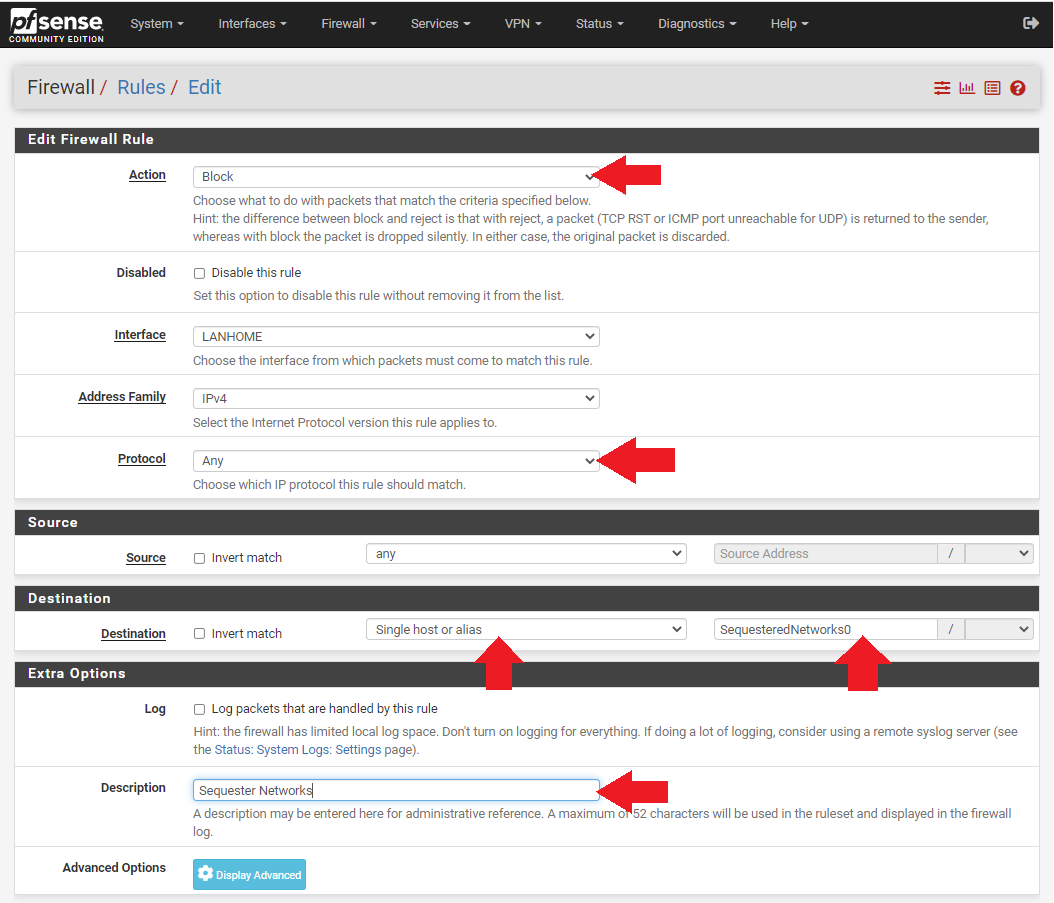
- Navigate to
Firewall>Rules, select the LAN you want to apply the rule to, e.g,LAN-2. - Then for
Actionset it toBlock. - For
Protocolset it toAny. - For
Destinationset it toSingle host or alias. - Then enter your alias name.
- Click on
Saveat the bottom of the page and thenApply Changesat the top of the page.
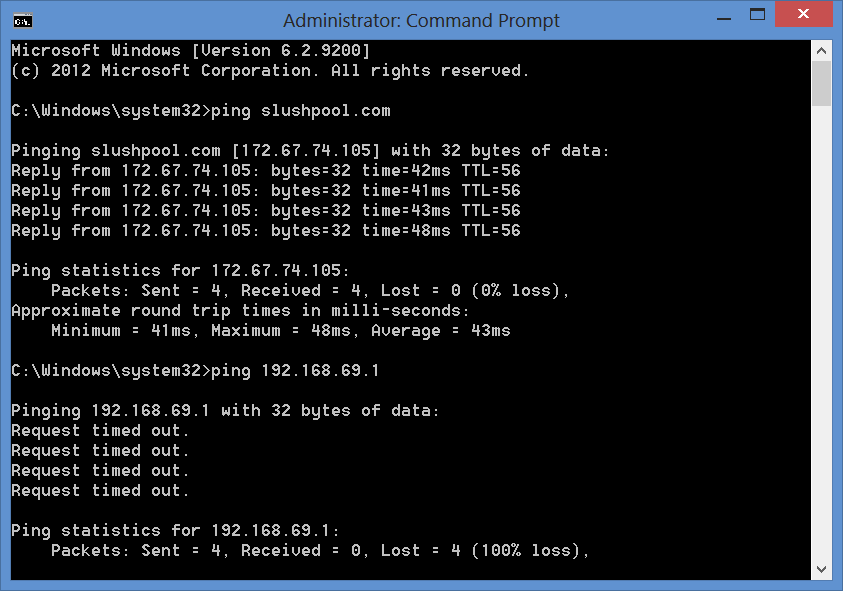
To review, you create a new alias for each LAN. The alias will contain a network list of the other LANs. Then you will add a block rule to each LAN that references the alias for that LAN. This way, you should now be able to plug a laptop into each network card port and try to ping the other networks and get a request timed out failure. But you will still be able to reach the wide open internet from each LAN. This is how you can protect devices on your LANs from potential attacks introduced by malicious firmware.