Self-Custody Made Simple
Self-custody means that you are in control of your private keys, this is how you maintain unrestricted access to your bitcoin. By extension, unrestricted access to your bitcoin means that you can send or receive bitcoin with anyone in the world for any reason at anytime. You don't need anyone's permission, you won't be held against any financial institution's moral standards, and nobody can stop you from making the transactions that you want to make.
With great power comes great responsibility however, self-custody also means that you are taking radical responsibility of your bitcoin. You and you alone are responsible for managing your private keys in a way that you can access them but not your adversaries. There is no 1-800 help line, there is no reversing transactions, and there is no one that can help you recover lost or forgotten information. This may sound intimidating or complicated but tools like Foundation's Passport make self-custody very simple and easy to manage.
Passport makes it possible to self-custody your bitcoin on a cold storage device; this way, your private key is kept on a device that never makes a connection to the internet. Through the use of QR codes to sign transactions and the accompanying Envoy app, using the Passport to receive, secure, and send bitcoin is easy and intuitive even without the internet connection directly to the device.
Unboxing
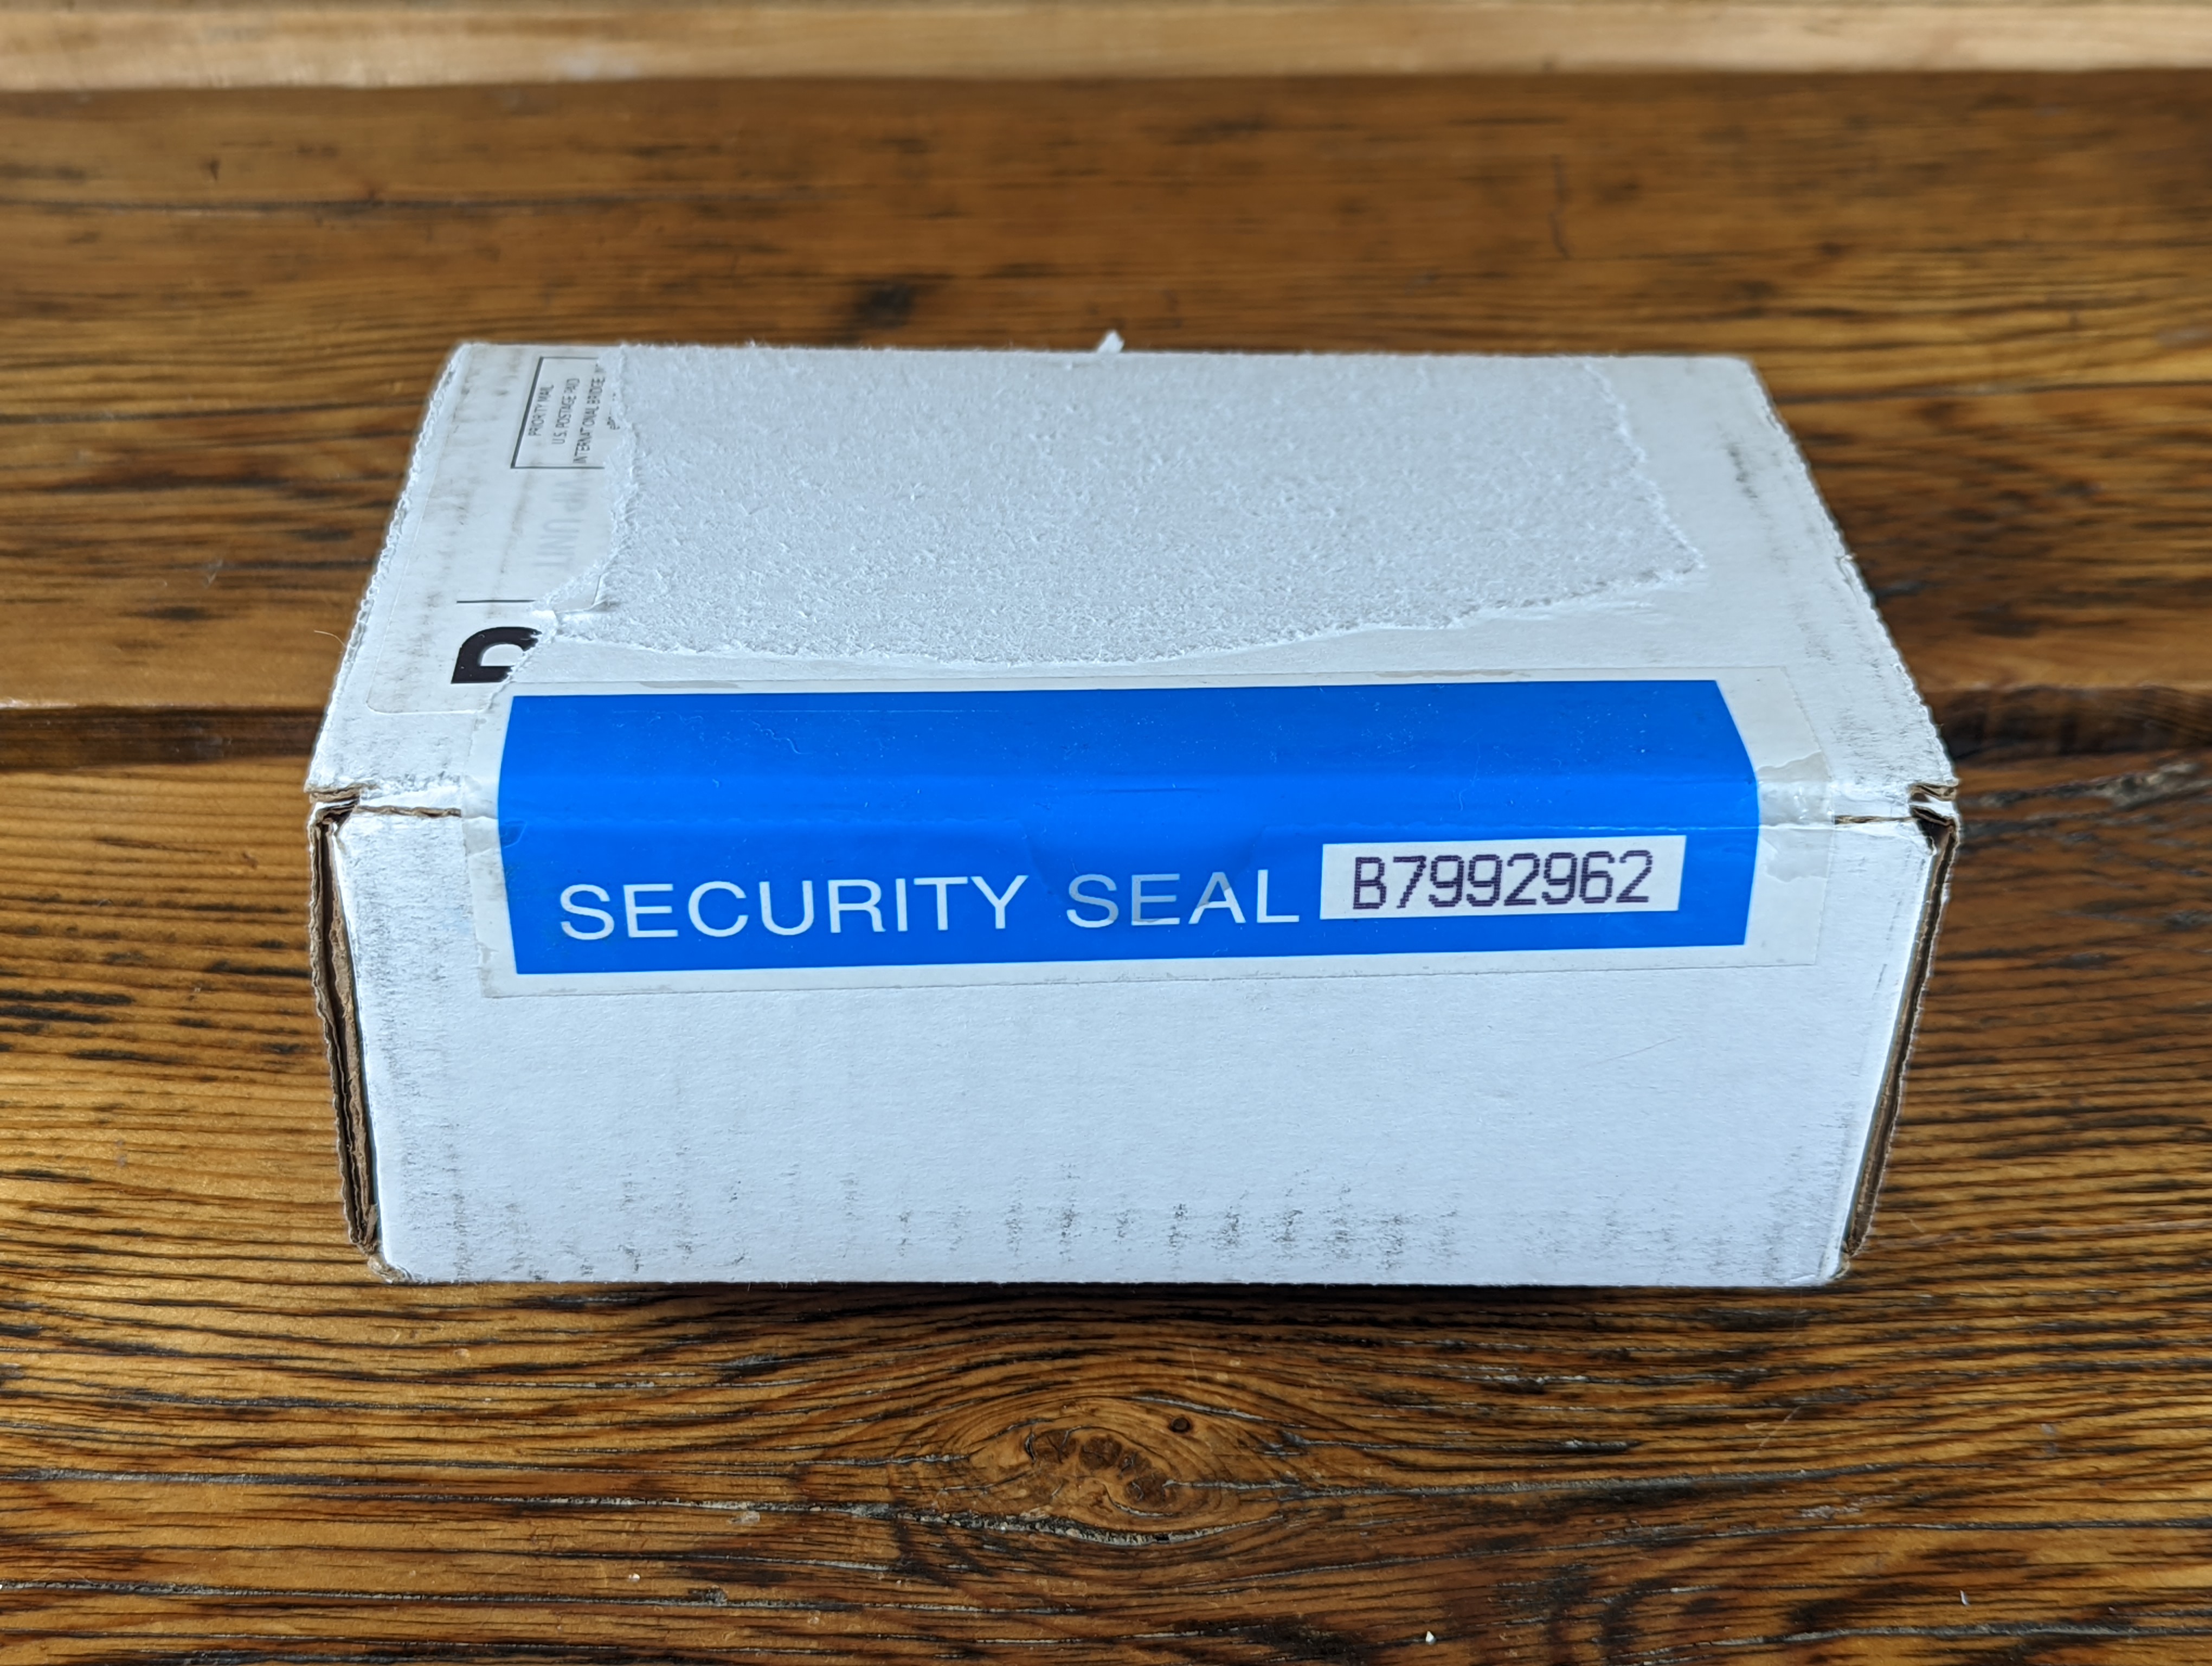
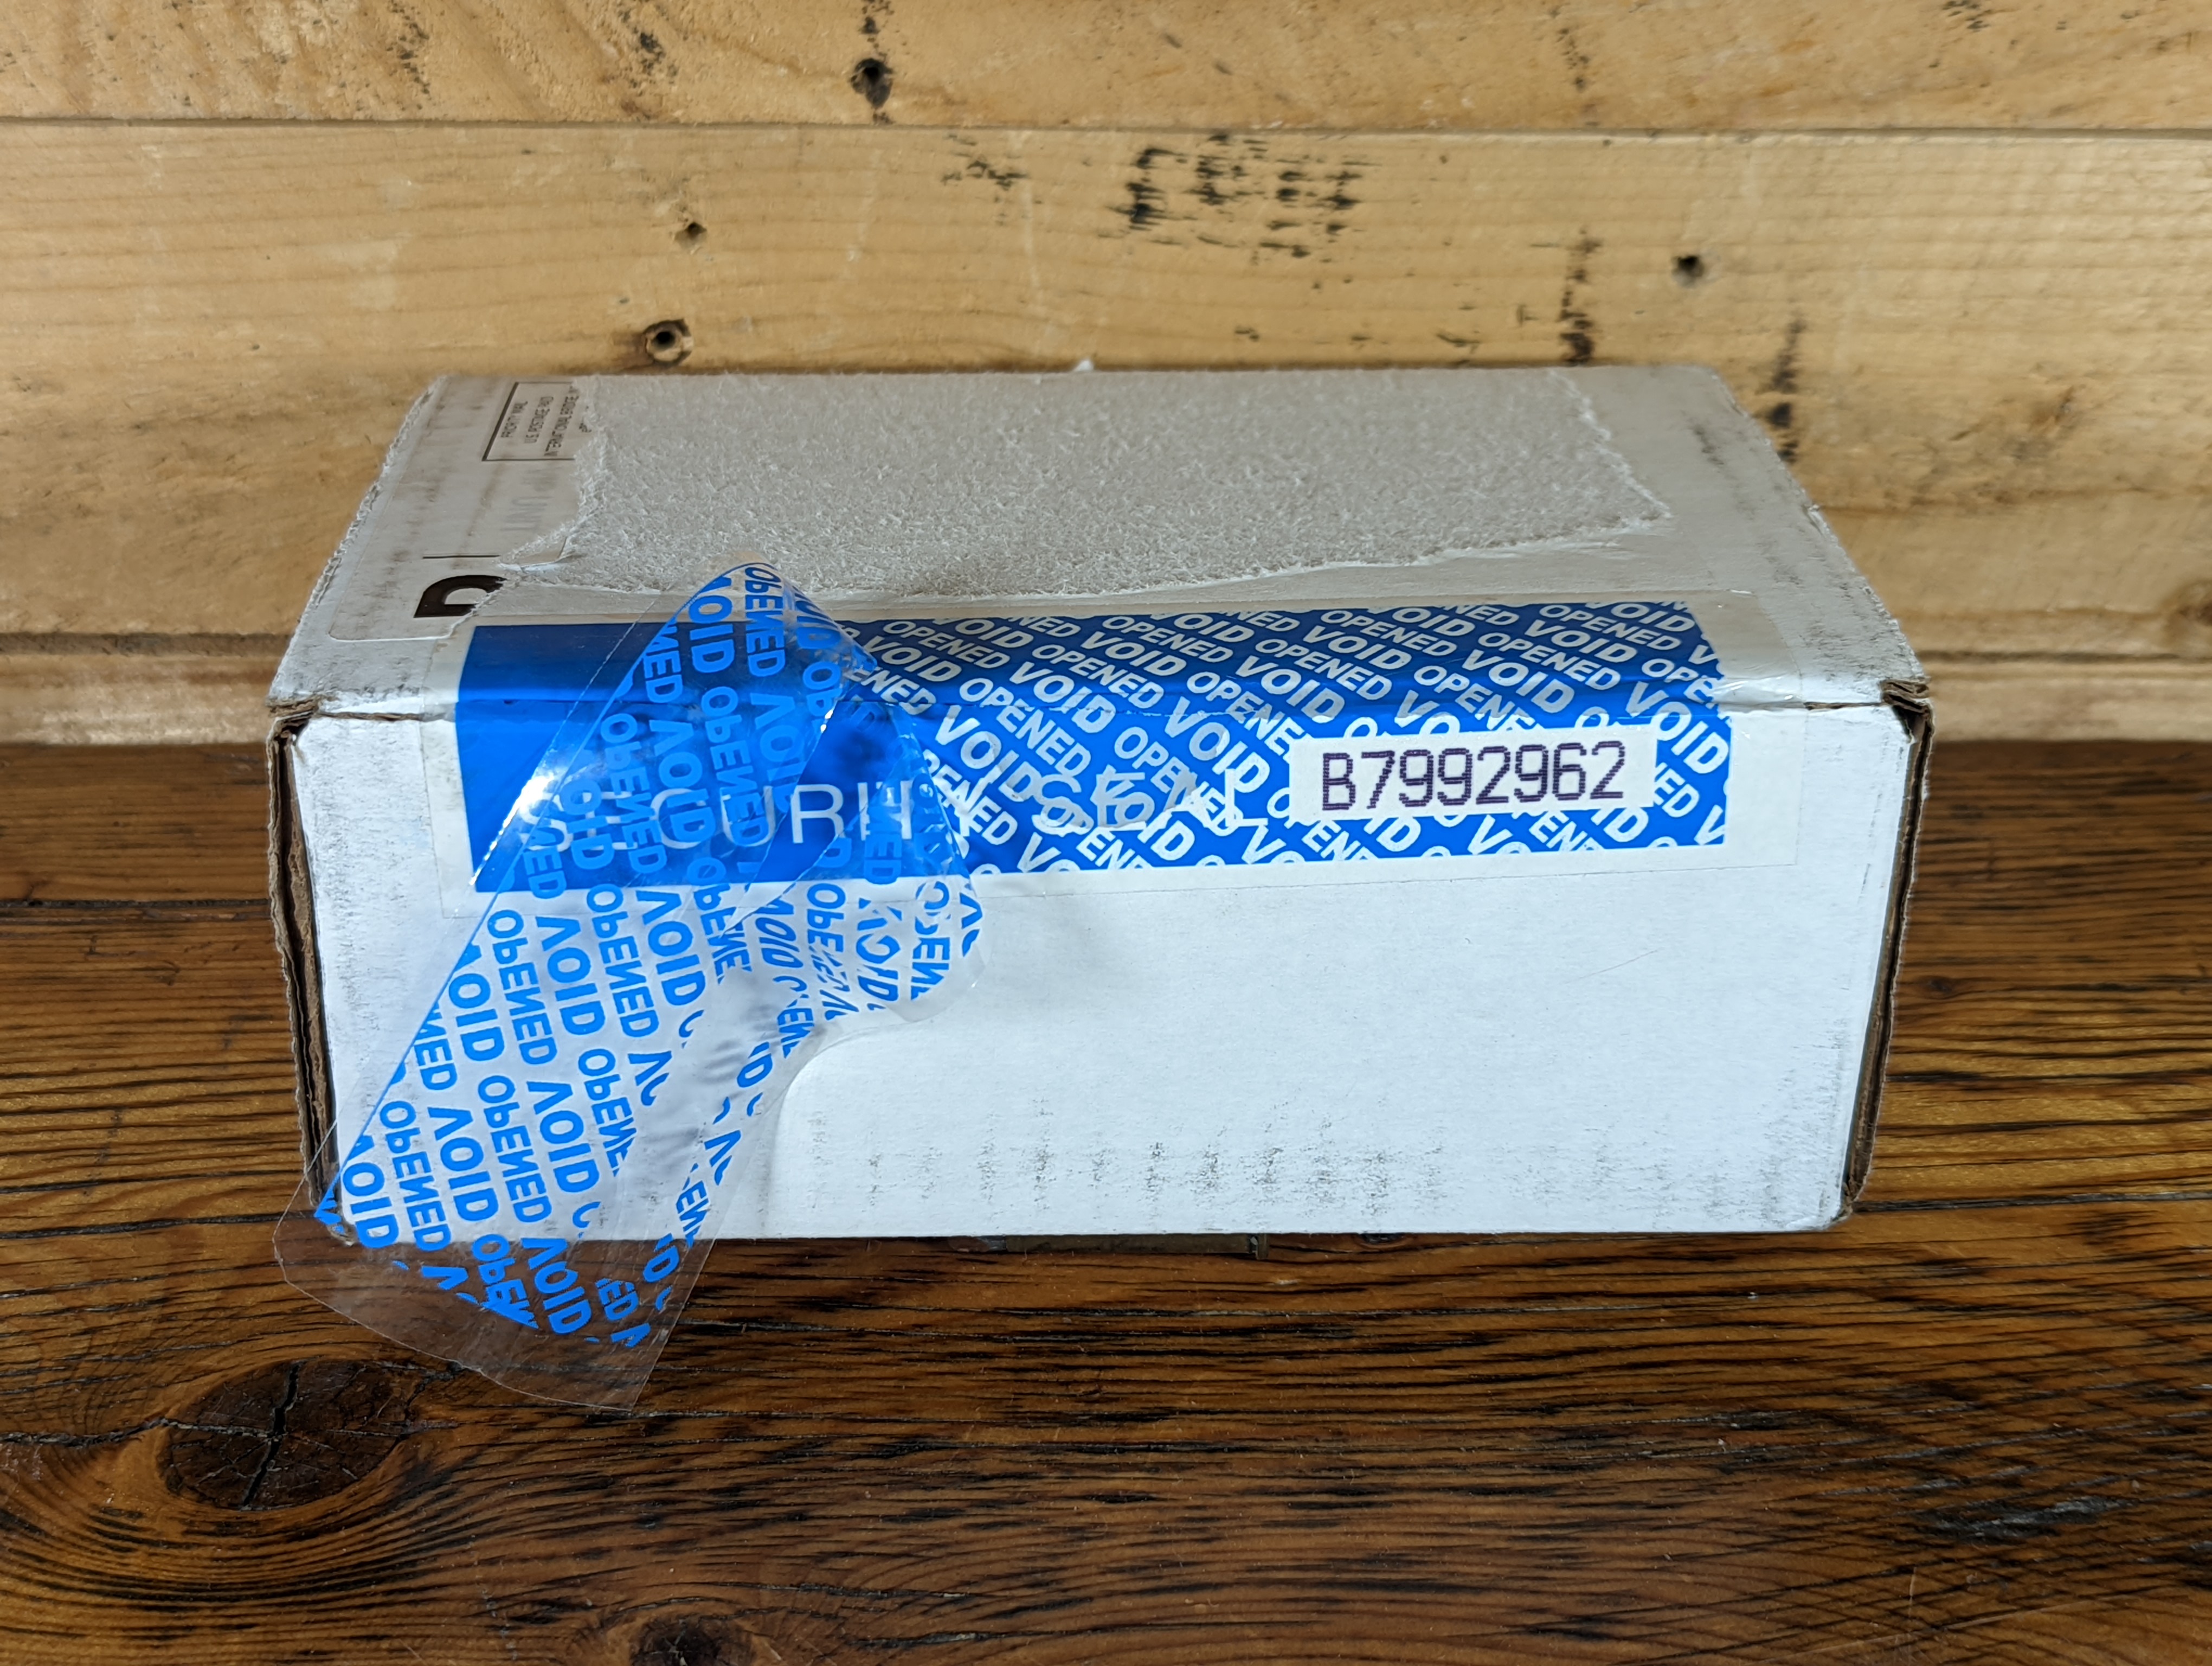
Passport is shipped in a nondescript white box. There will be a shipping label (peeled off for privacy reasons in this demo) and a blue tamper-evident seal on the outside of the box. The tamper-evident seal will be placed over the opening flap of the box and the seal will have a number on it that starts with B799, B862, or B863. The full-length unique numbers are not saved by Foundation Devices but the prefix is used to identify the production batch the device was manufactured in. You can find a maintained list of these prefixes here.
- Privacy Tip: Consider using a PO Box and an alias to avoid connecting your personally identifiable information to Bitcoin related items.
- Security Tip: If the security seal shows any signs of tampering, contact hello@foundationdevices.com
Inside the shipping box is the device box, it should be wrapped in bubble packaging.


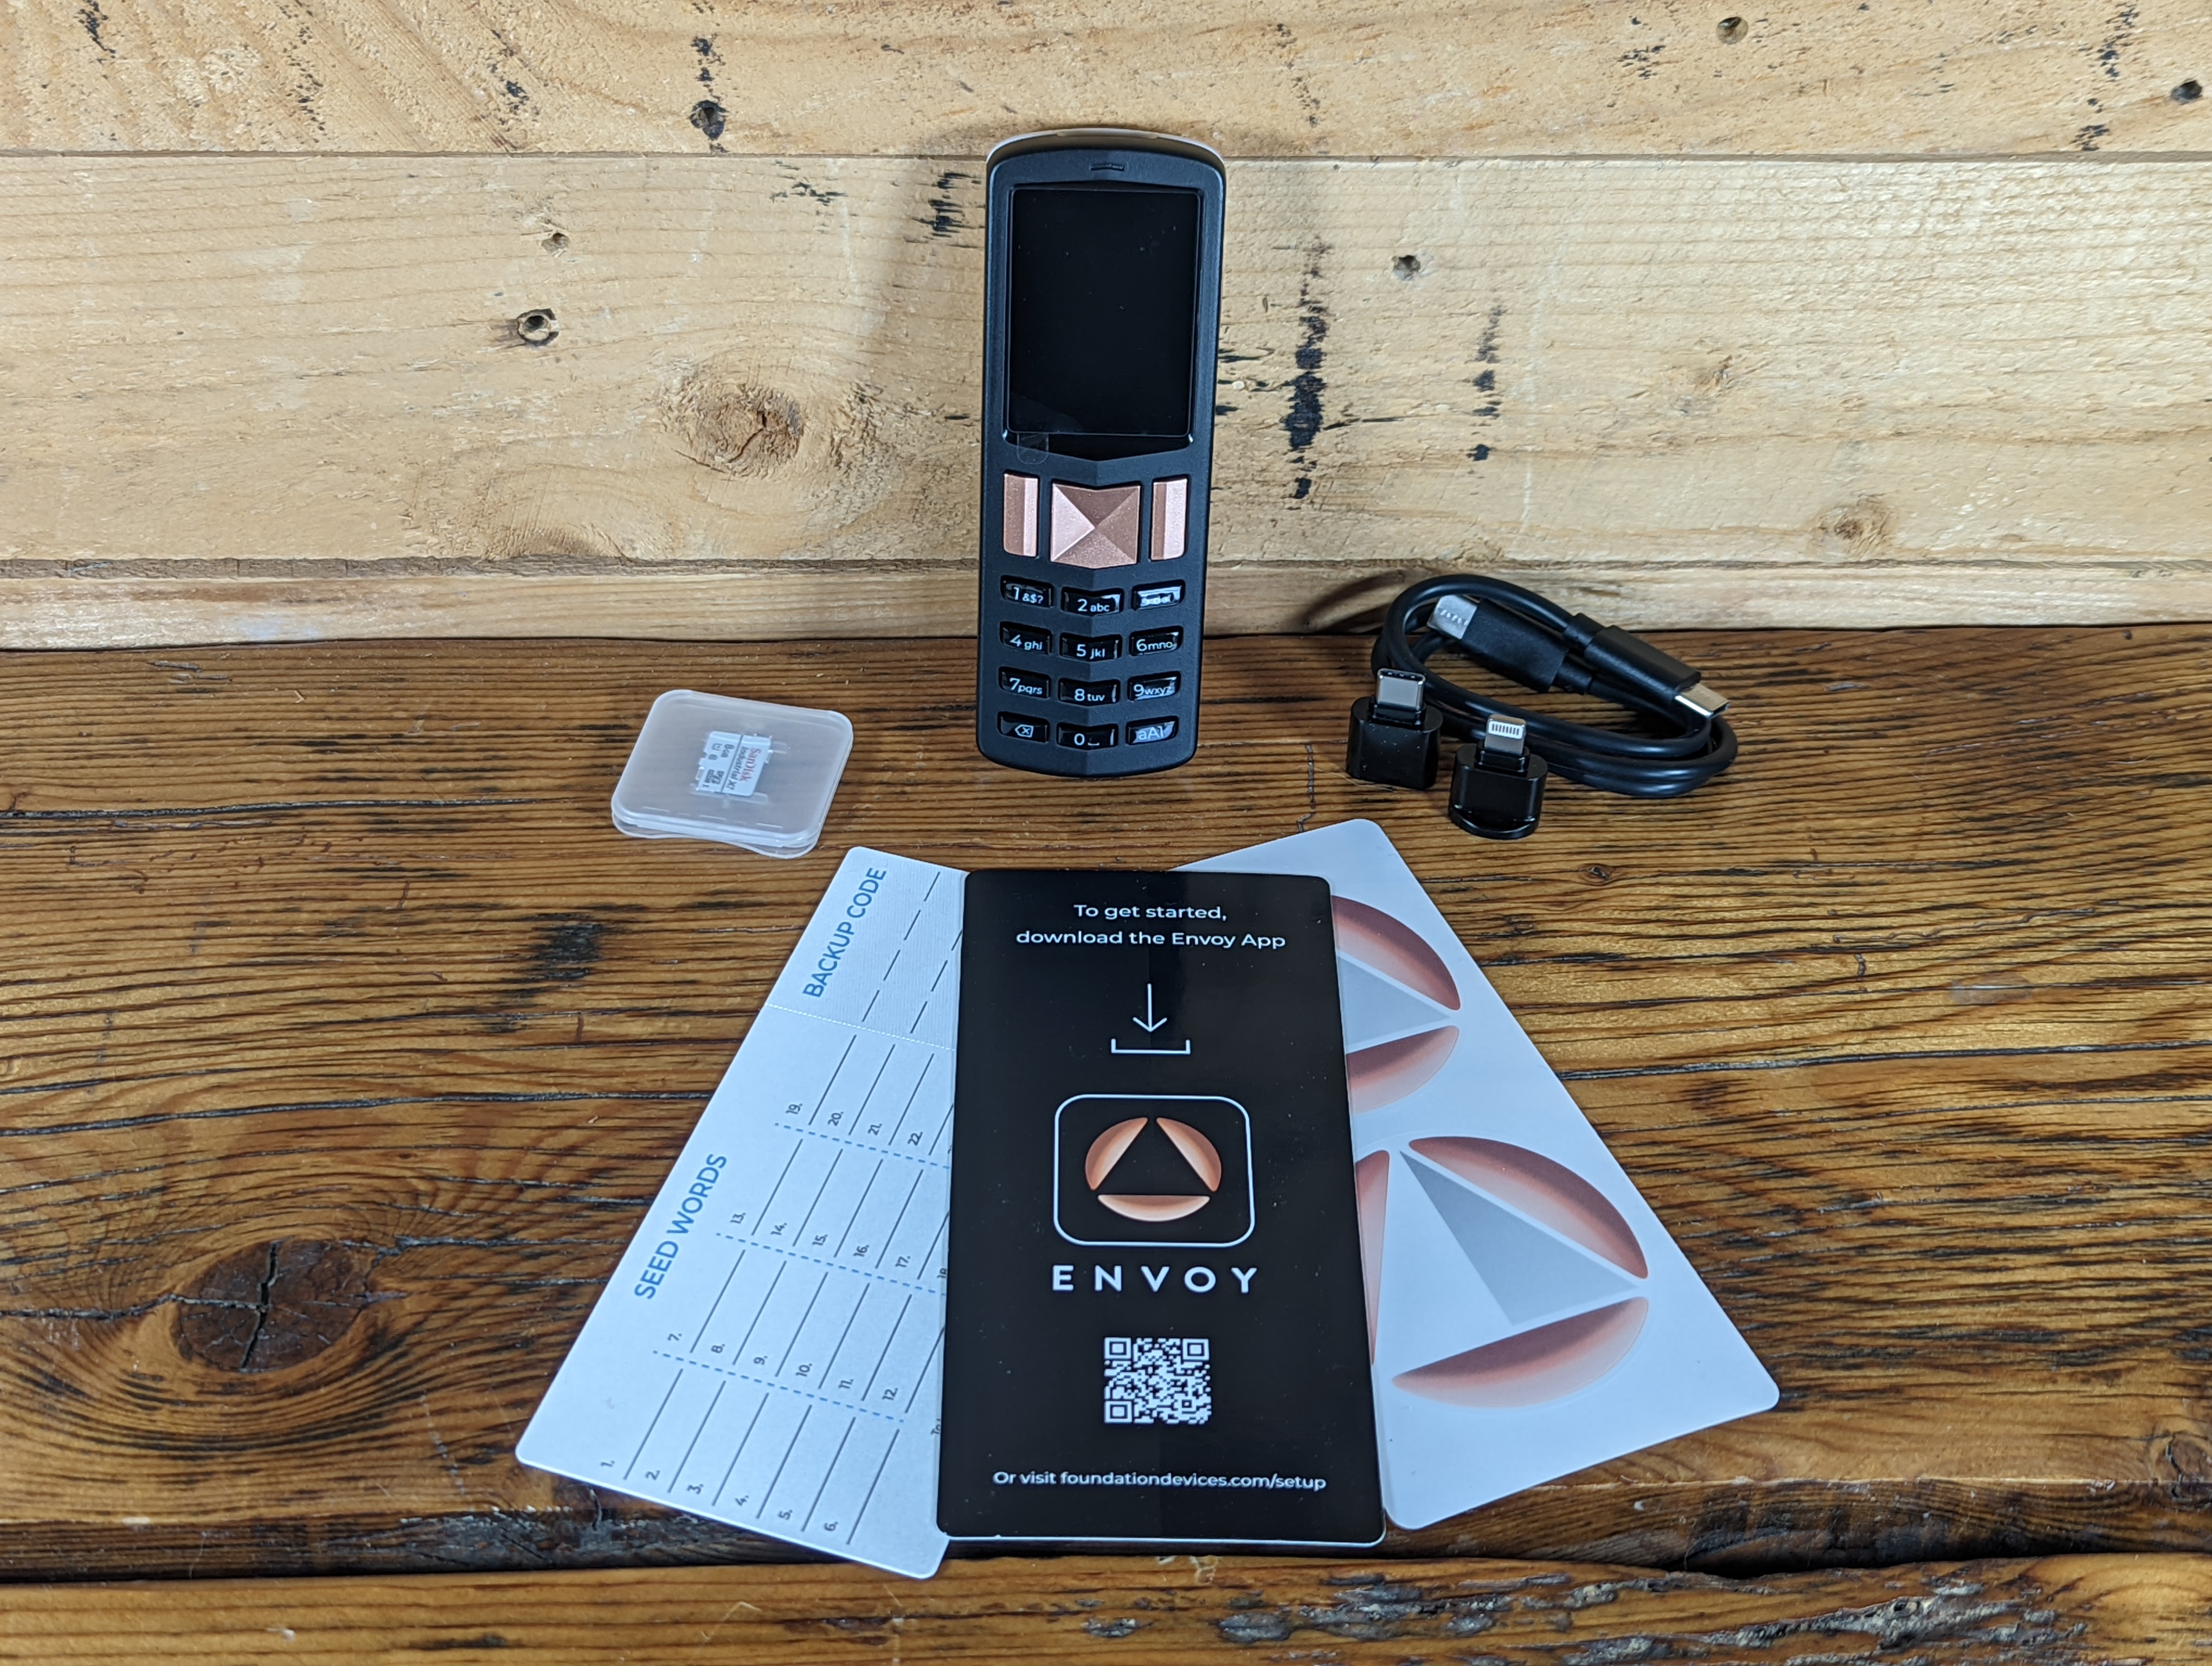
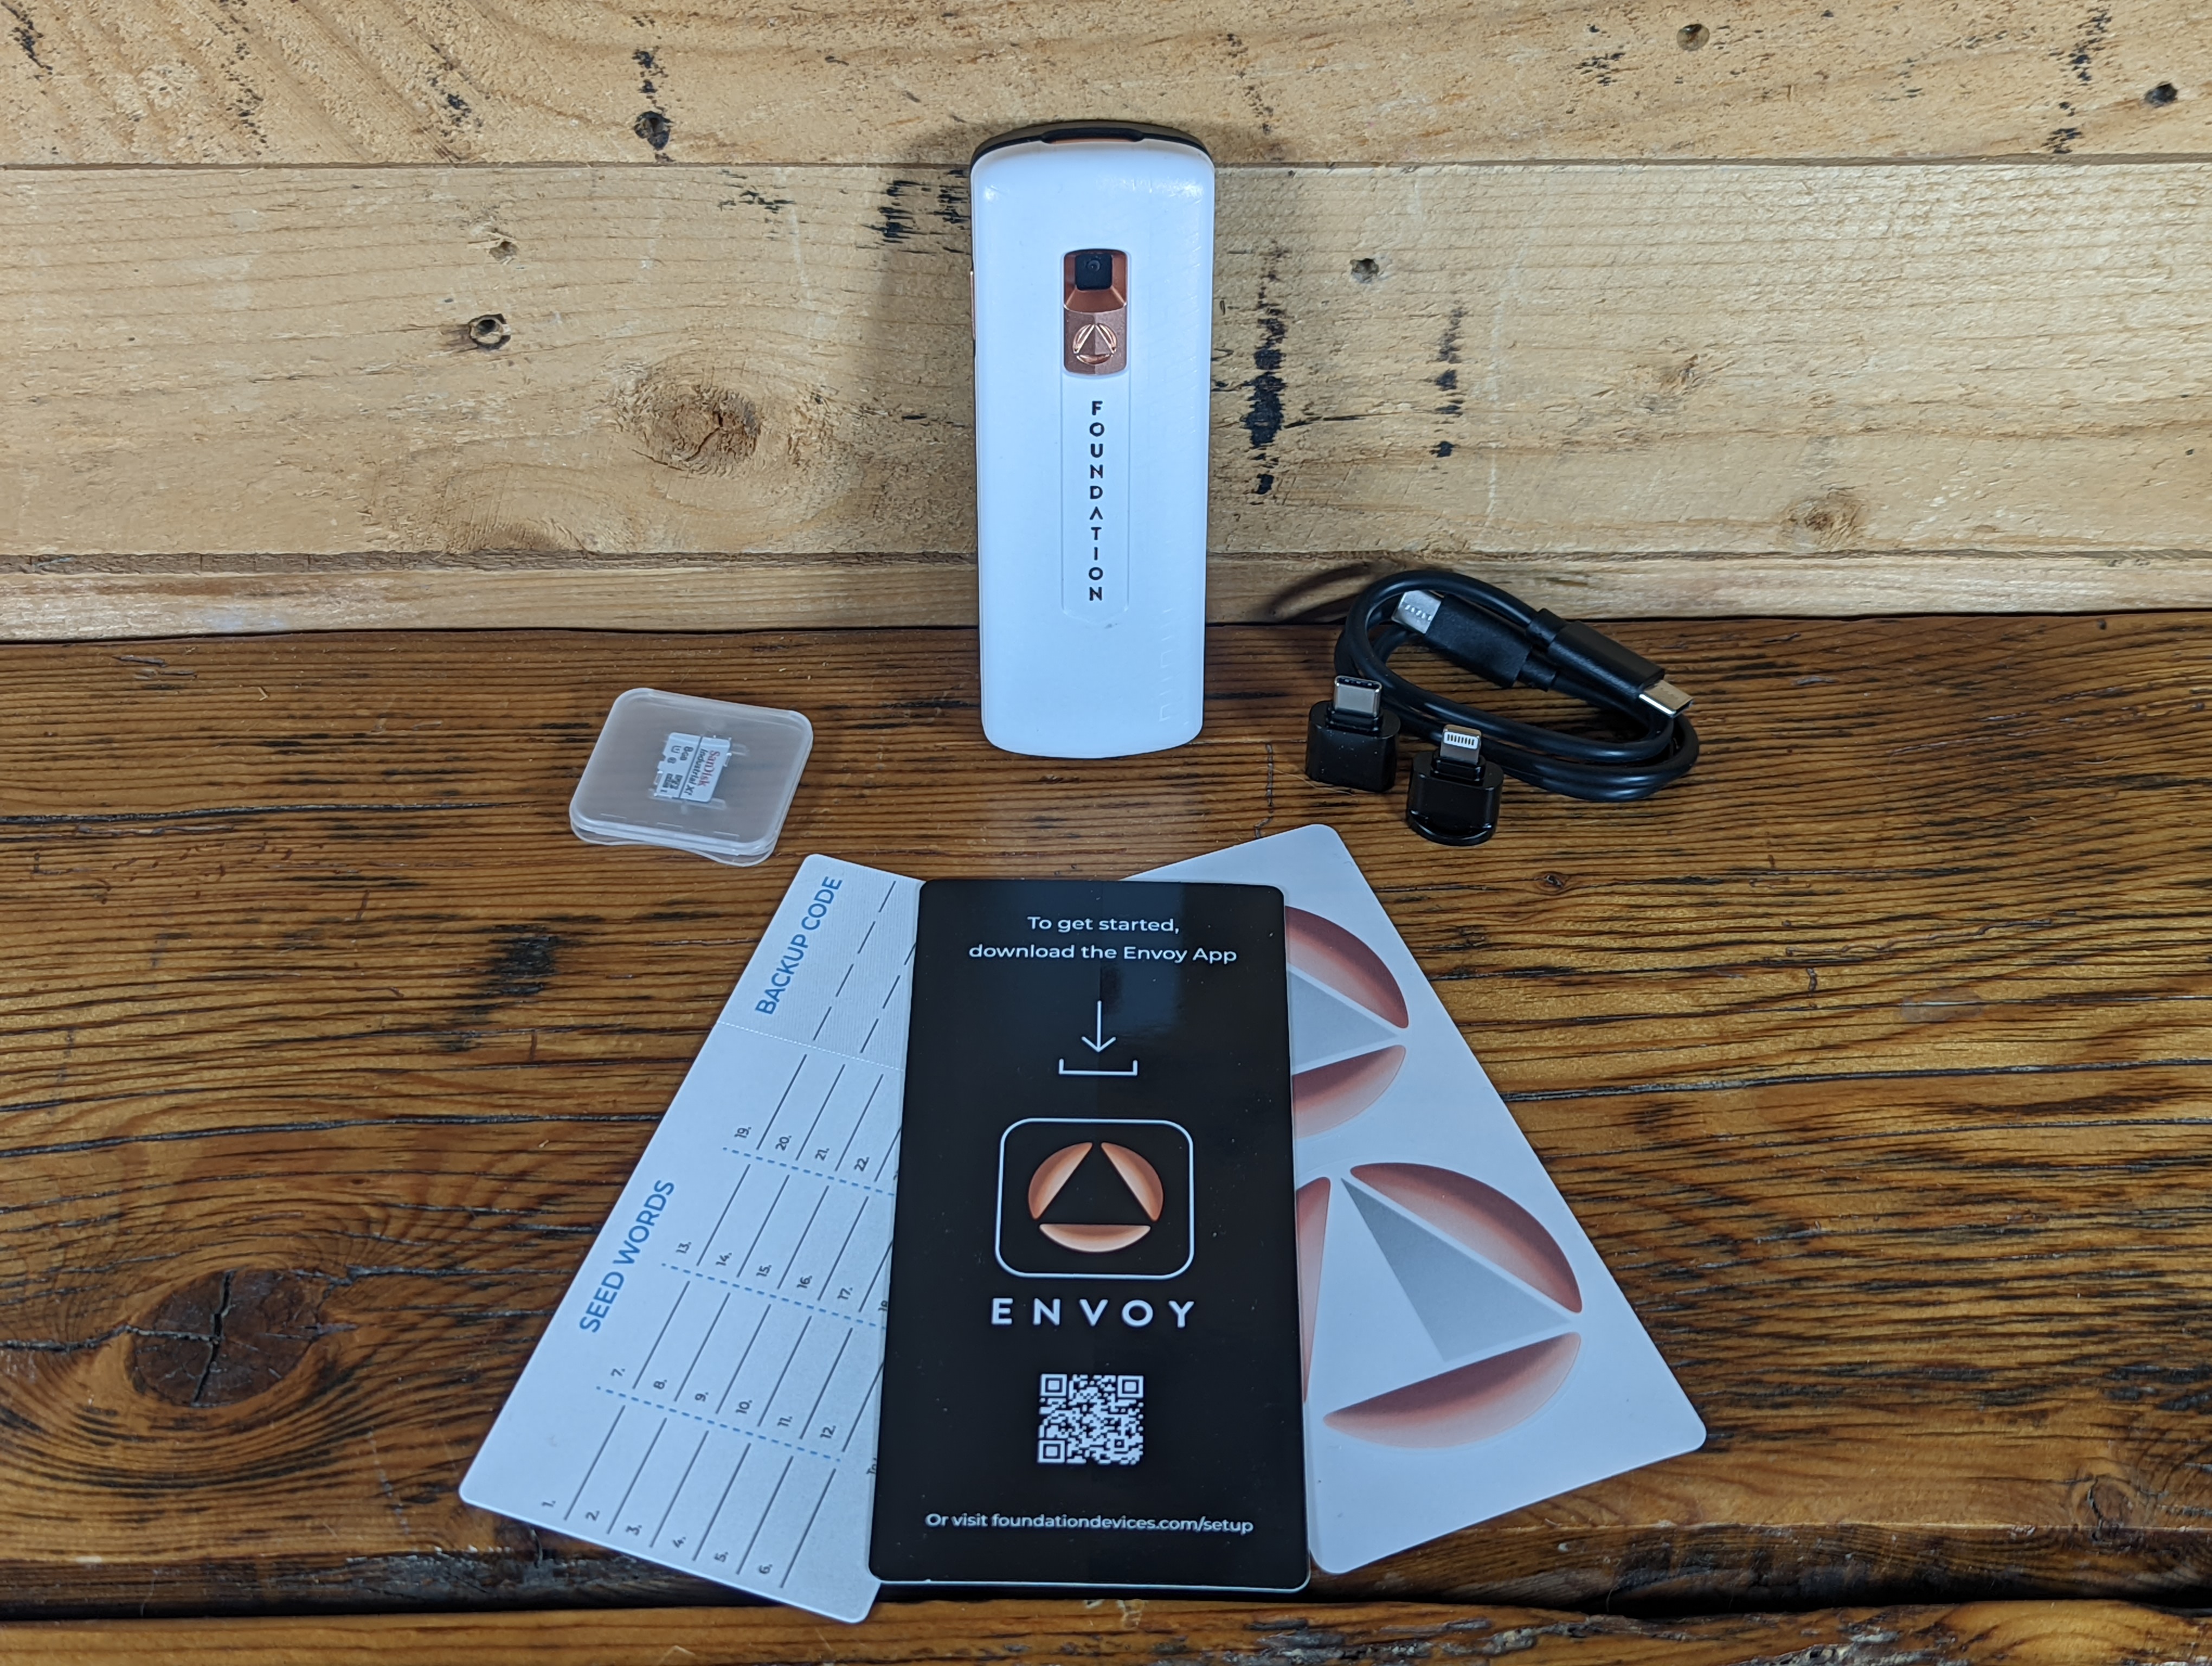
Inside the device box you will find:
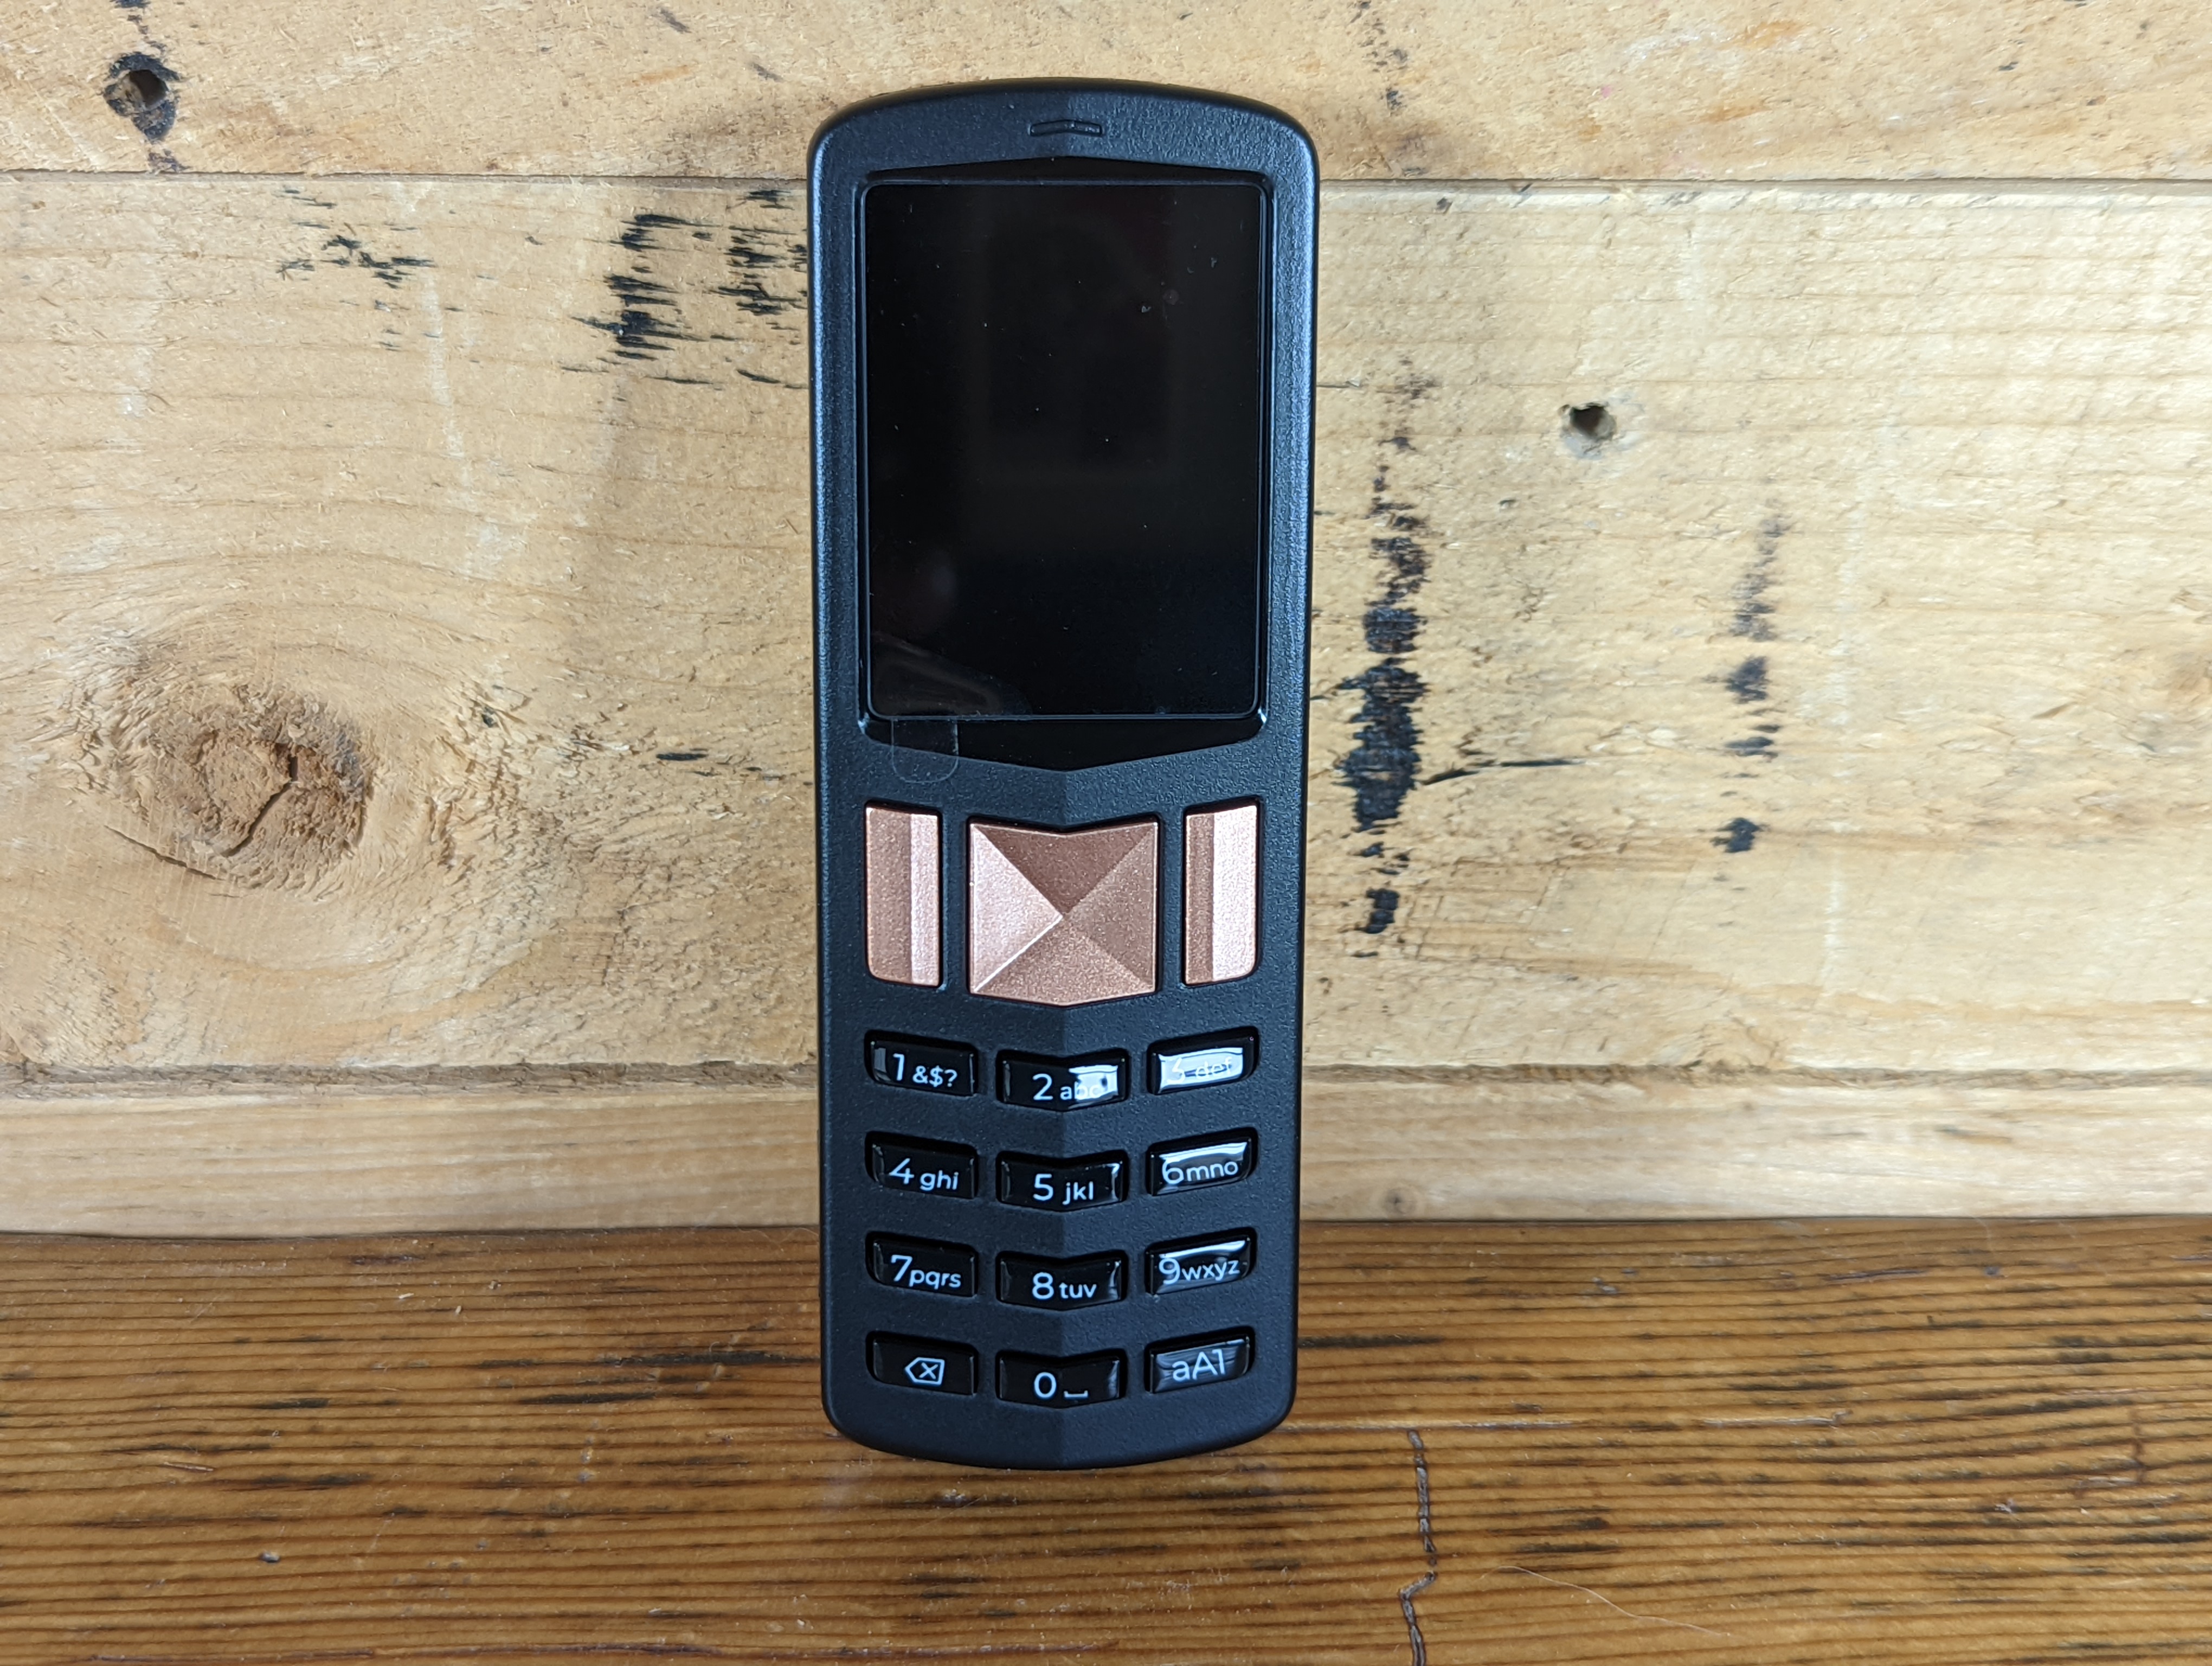
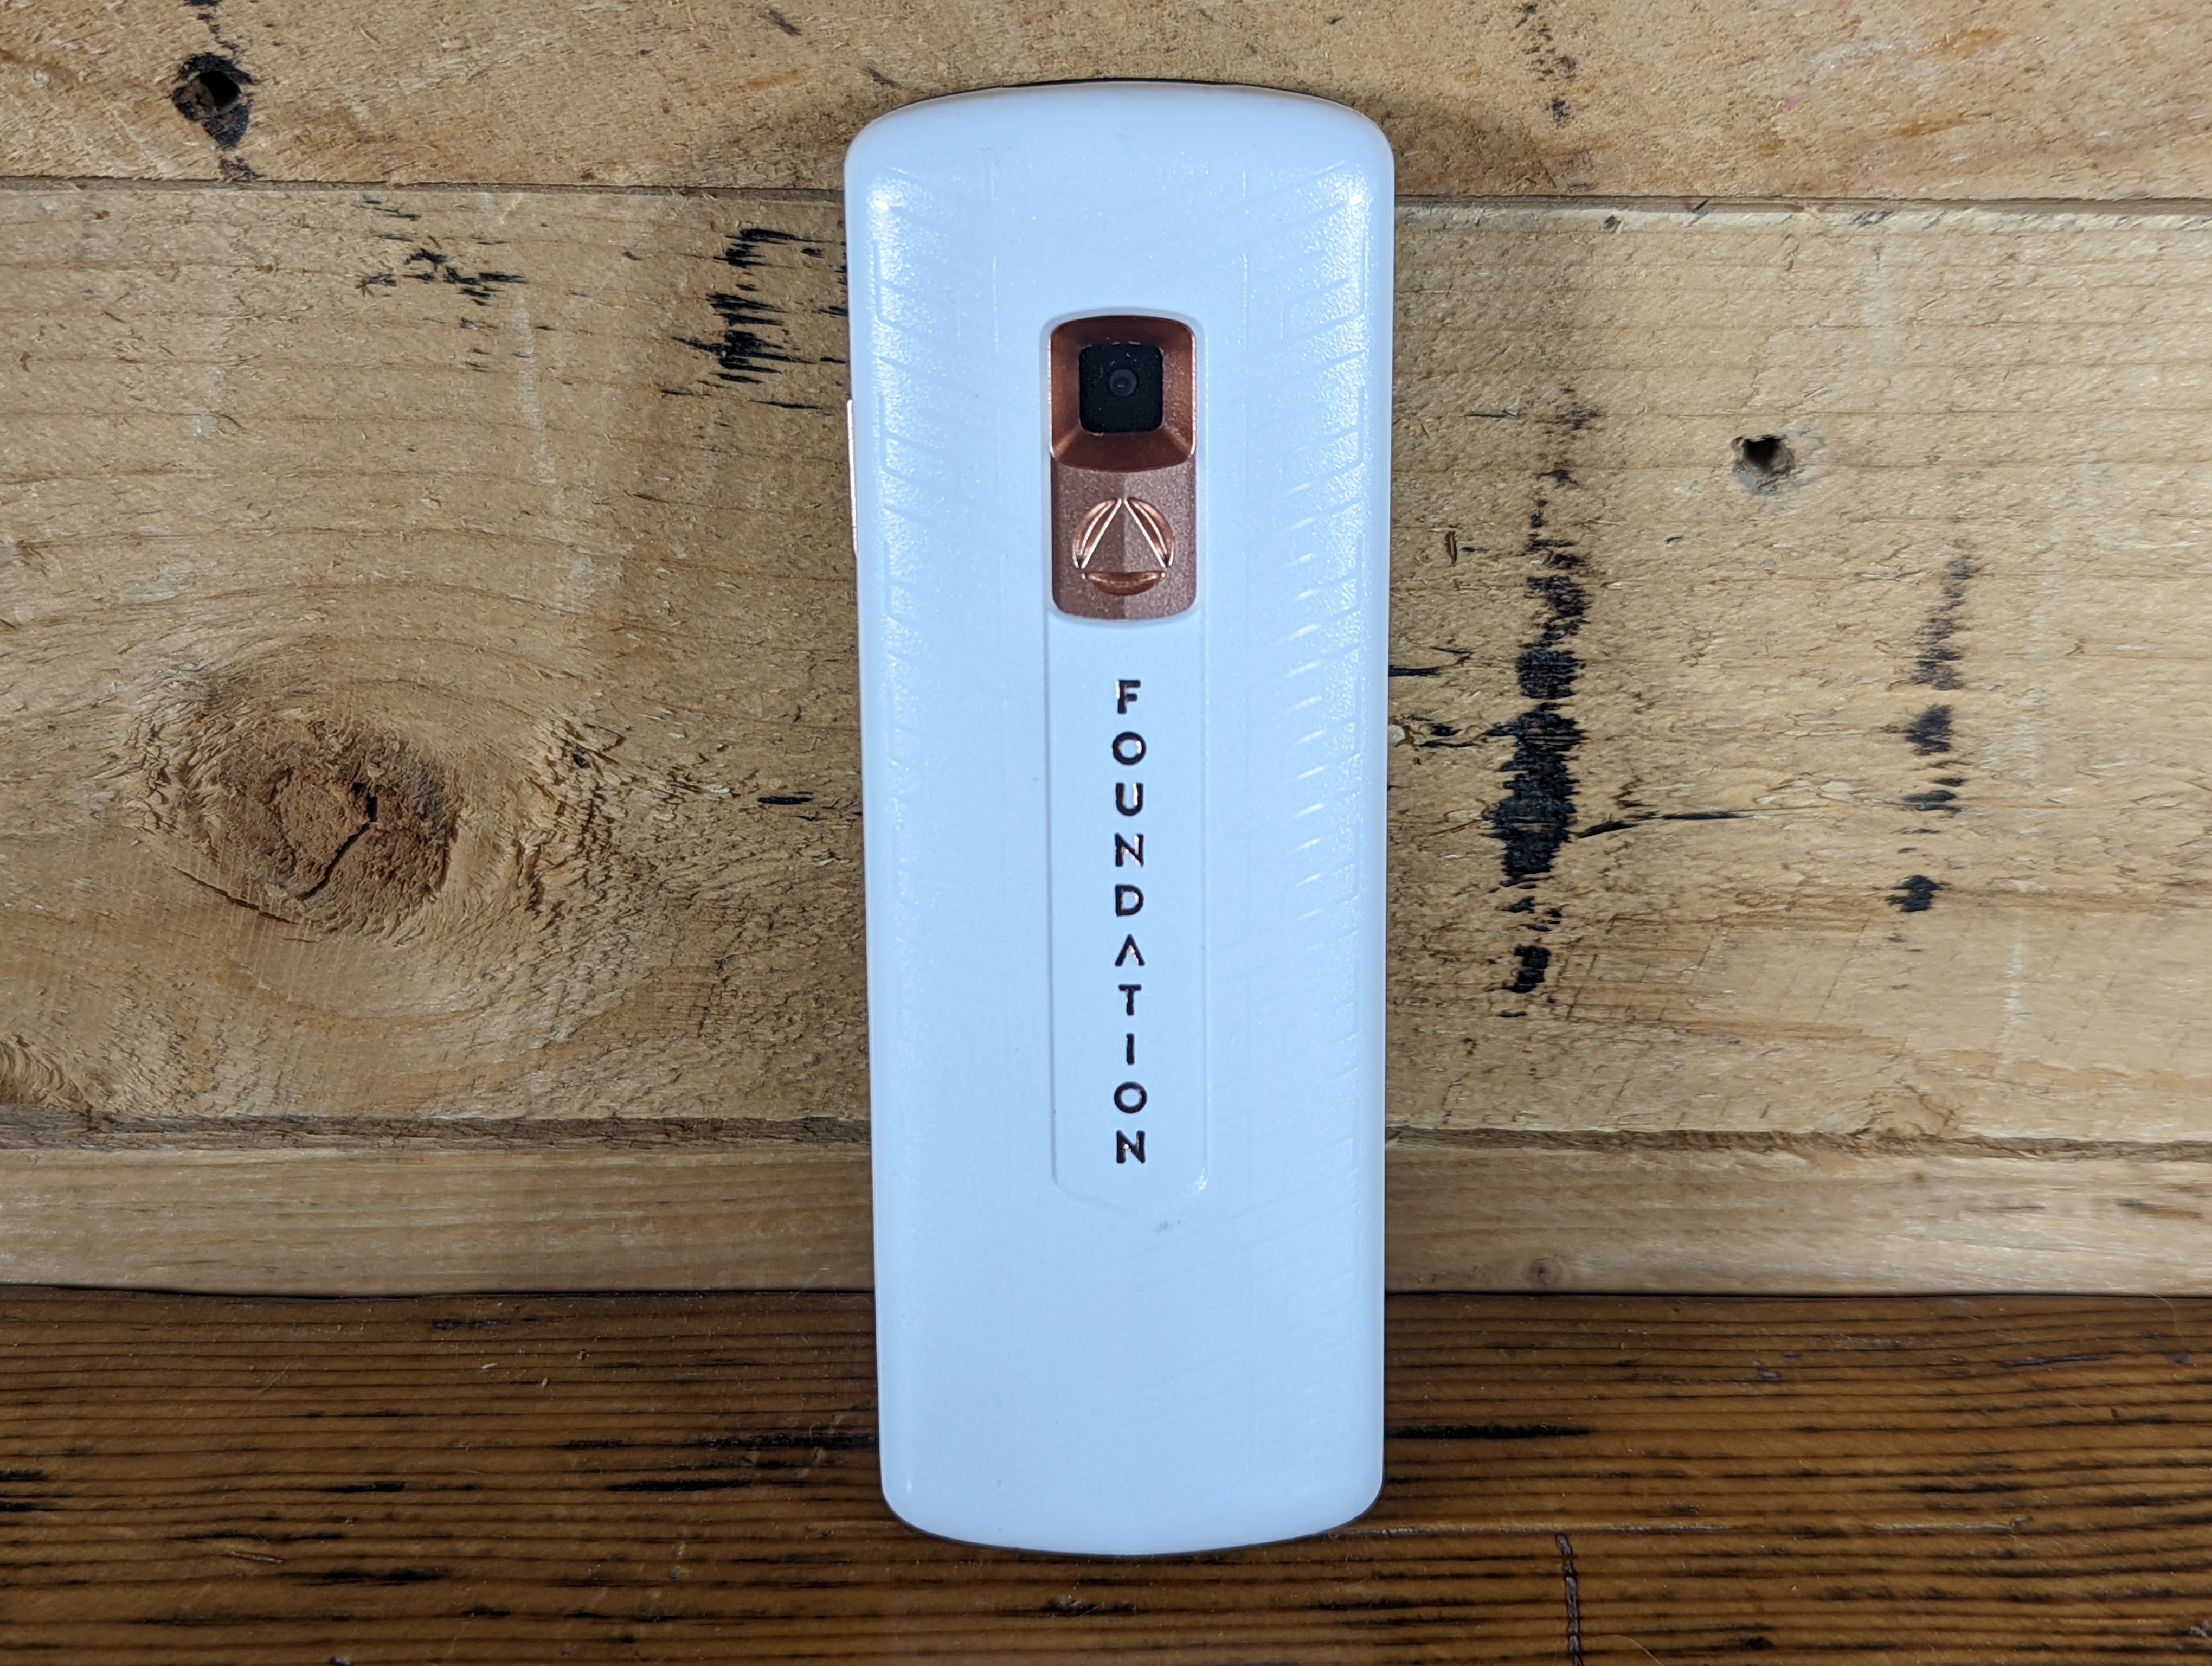
- Passport Batch 2 Bitcoin hardware wallet
- 8GB industrial grade microSD card
- USB-C to USB-C charging cable
- microSD to Android port adaptor
- microSD to iPhone port adaptor
- Getting started literature
- Seed phrase and backup code card
- Foundation Stickers
Downloading Envoy
Envoy is an Open Source companion app for Passport. This app is available for iPhone or Android and enables a secure guided setup experience for your Passport. While it makes for a convenient companion app, it is not required to use Passport. You can use any wallet you want to monitor balances, build transactions, or generate receive addresses. With Envoy, you can also install the latest firmware updates from your mobile device using the included microSD adapters. The security validation to ensure your Passport has not been tampered with in transit can also be completed from the Envoy app. There is a beginner-friendly Bitcoin wallet built into Envoy that enables you to easily receive bitcoin to your Passport. You can also create transactions in Envoy ready to sign with your Passport using the QR code communications, all while your private keys remain secured on the Passport. Envoy connects to the internet via Tor by default.
This guide will cover how to download Envoy from the F-Droid repository on an Android mobile device. The cool thing about F-Droid is that you can get apps from it without the need for a Google Play Store account. The F-Droid security model enforces that all apps have a valid signature over the entire contents of the Android Package (APK file) so you know you are getting the app intended for you by the developers who control the signing key of the repository you are using.
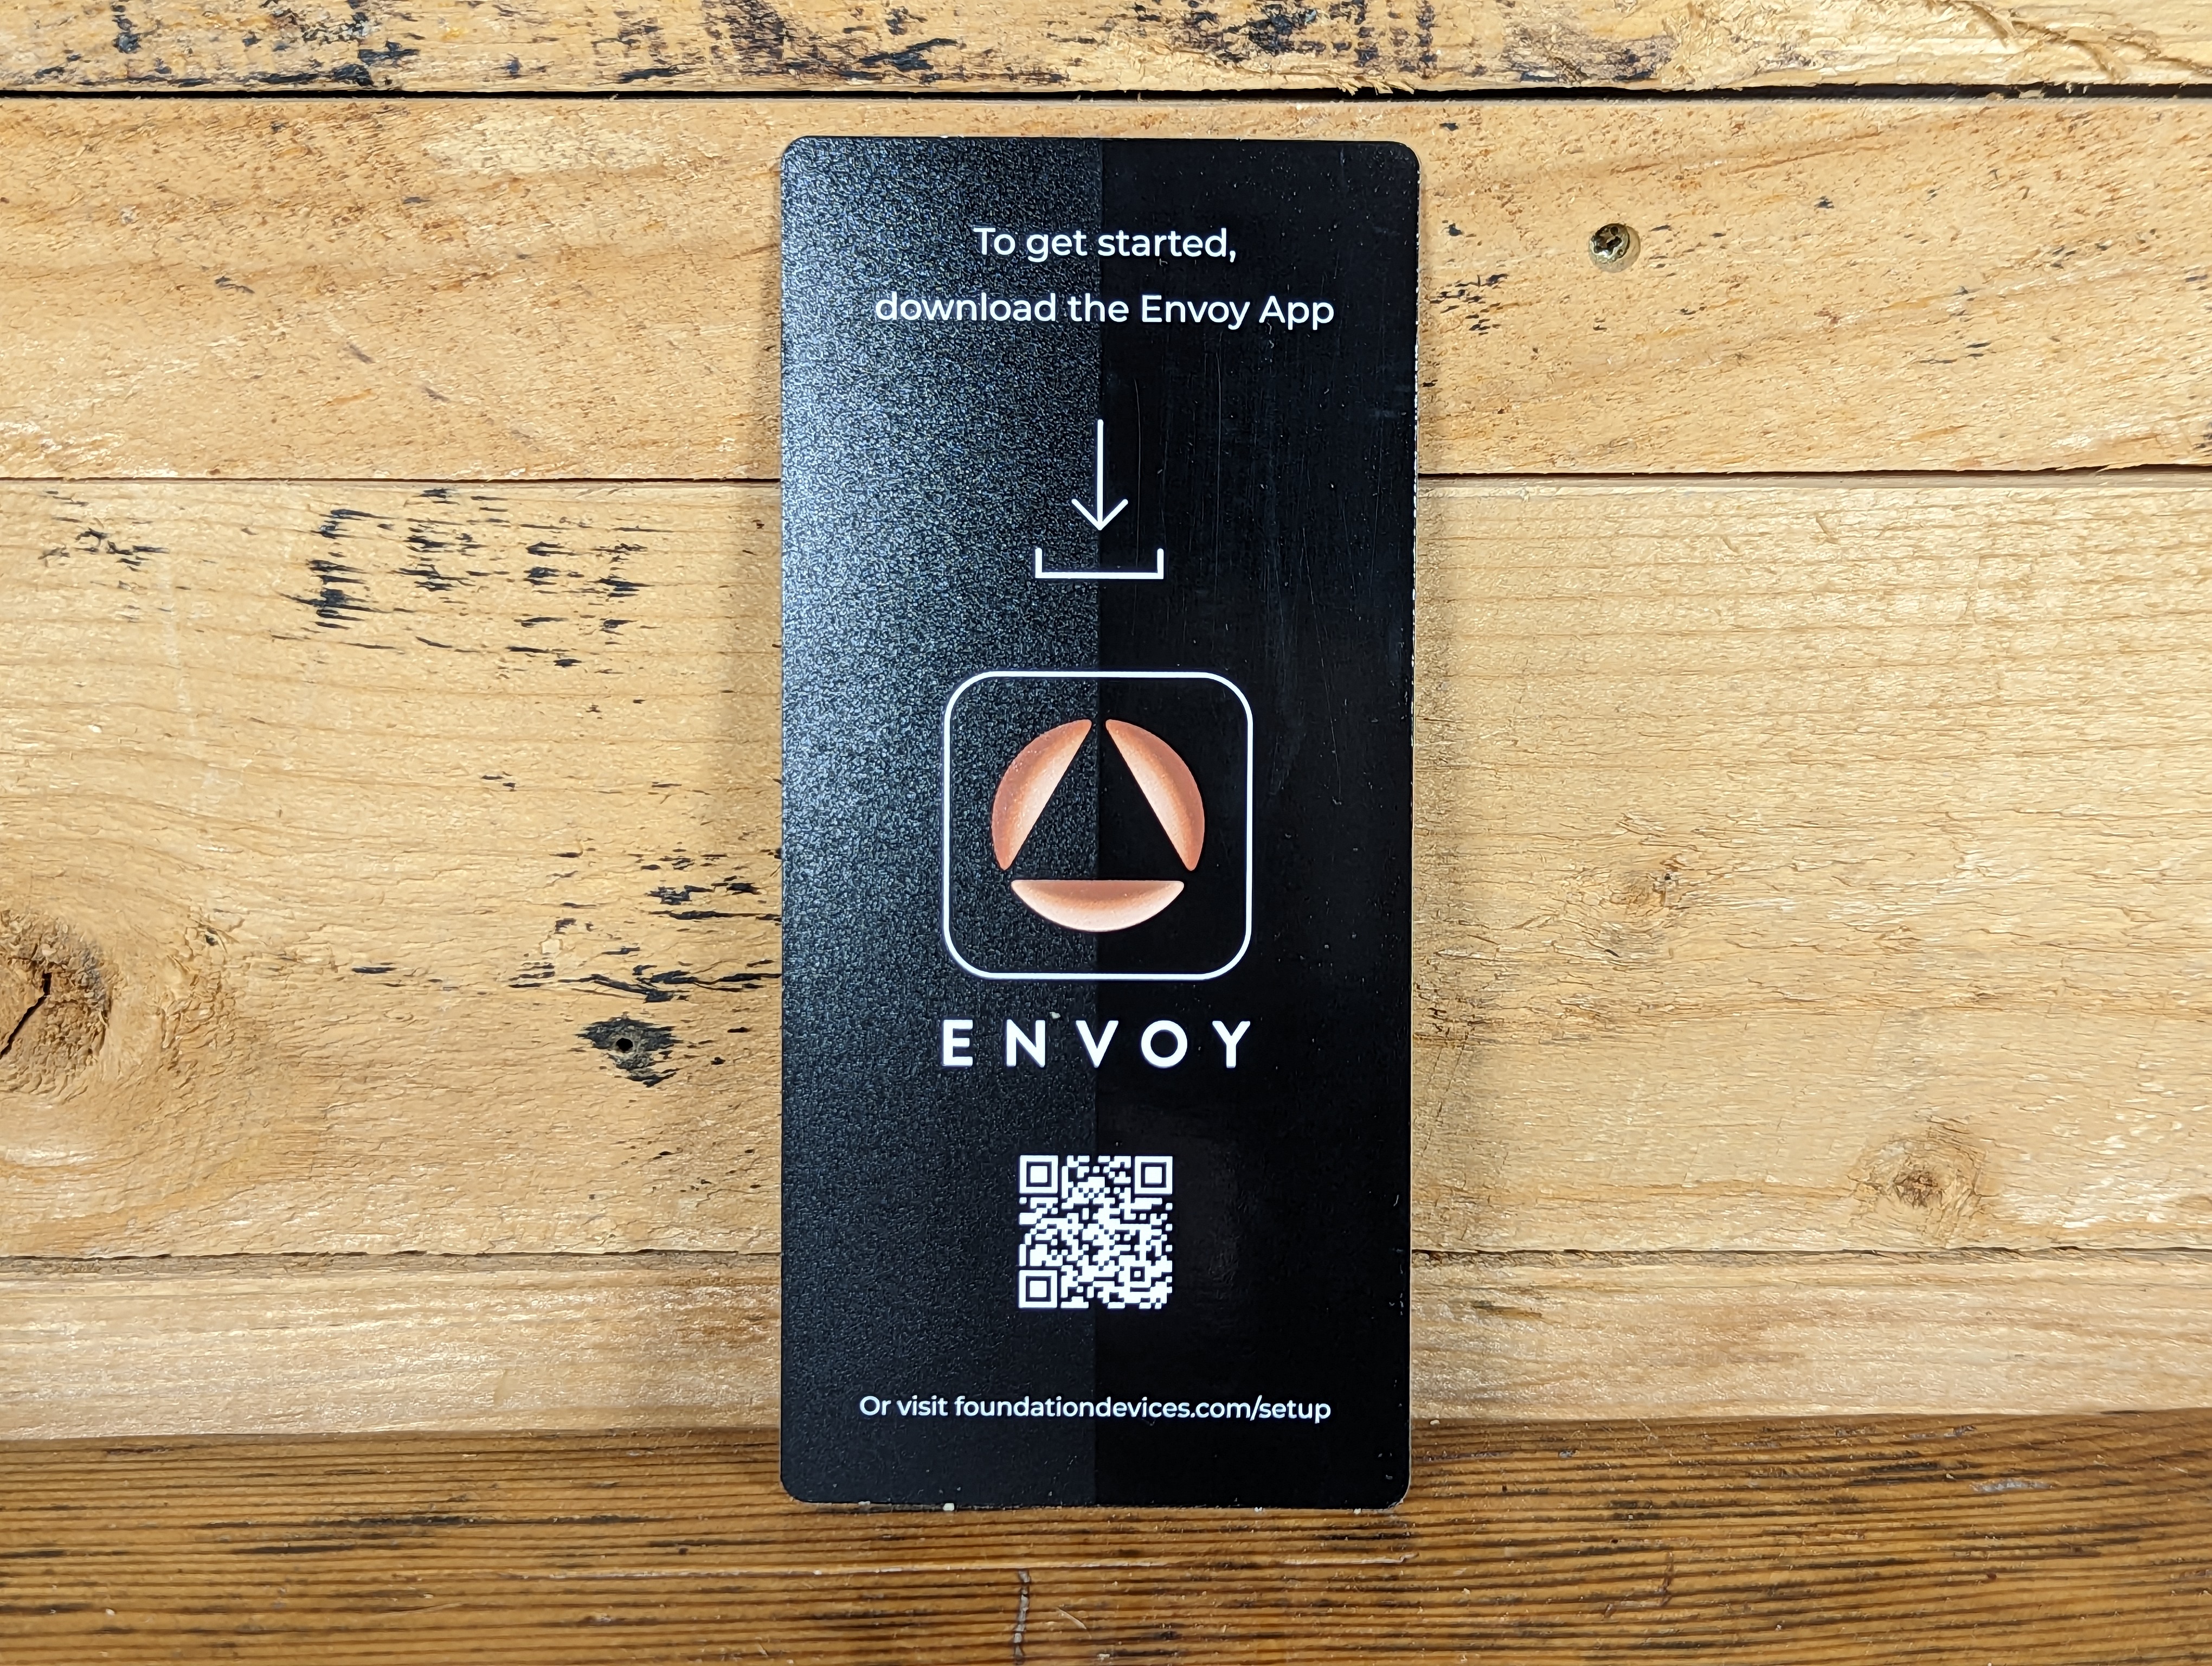
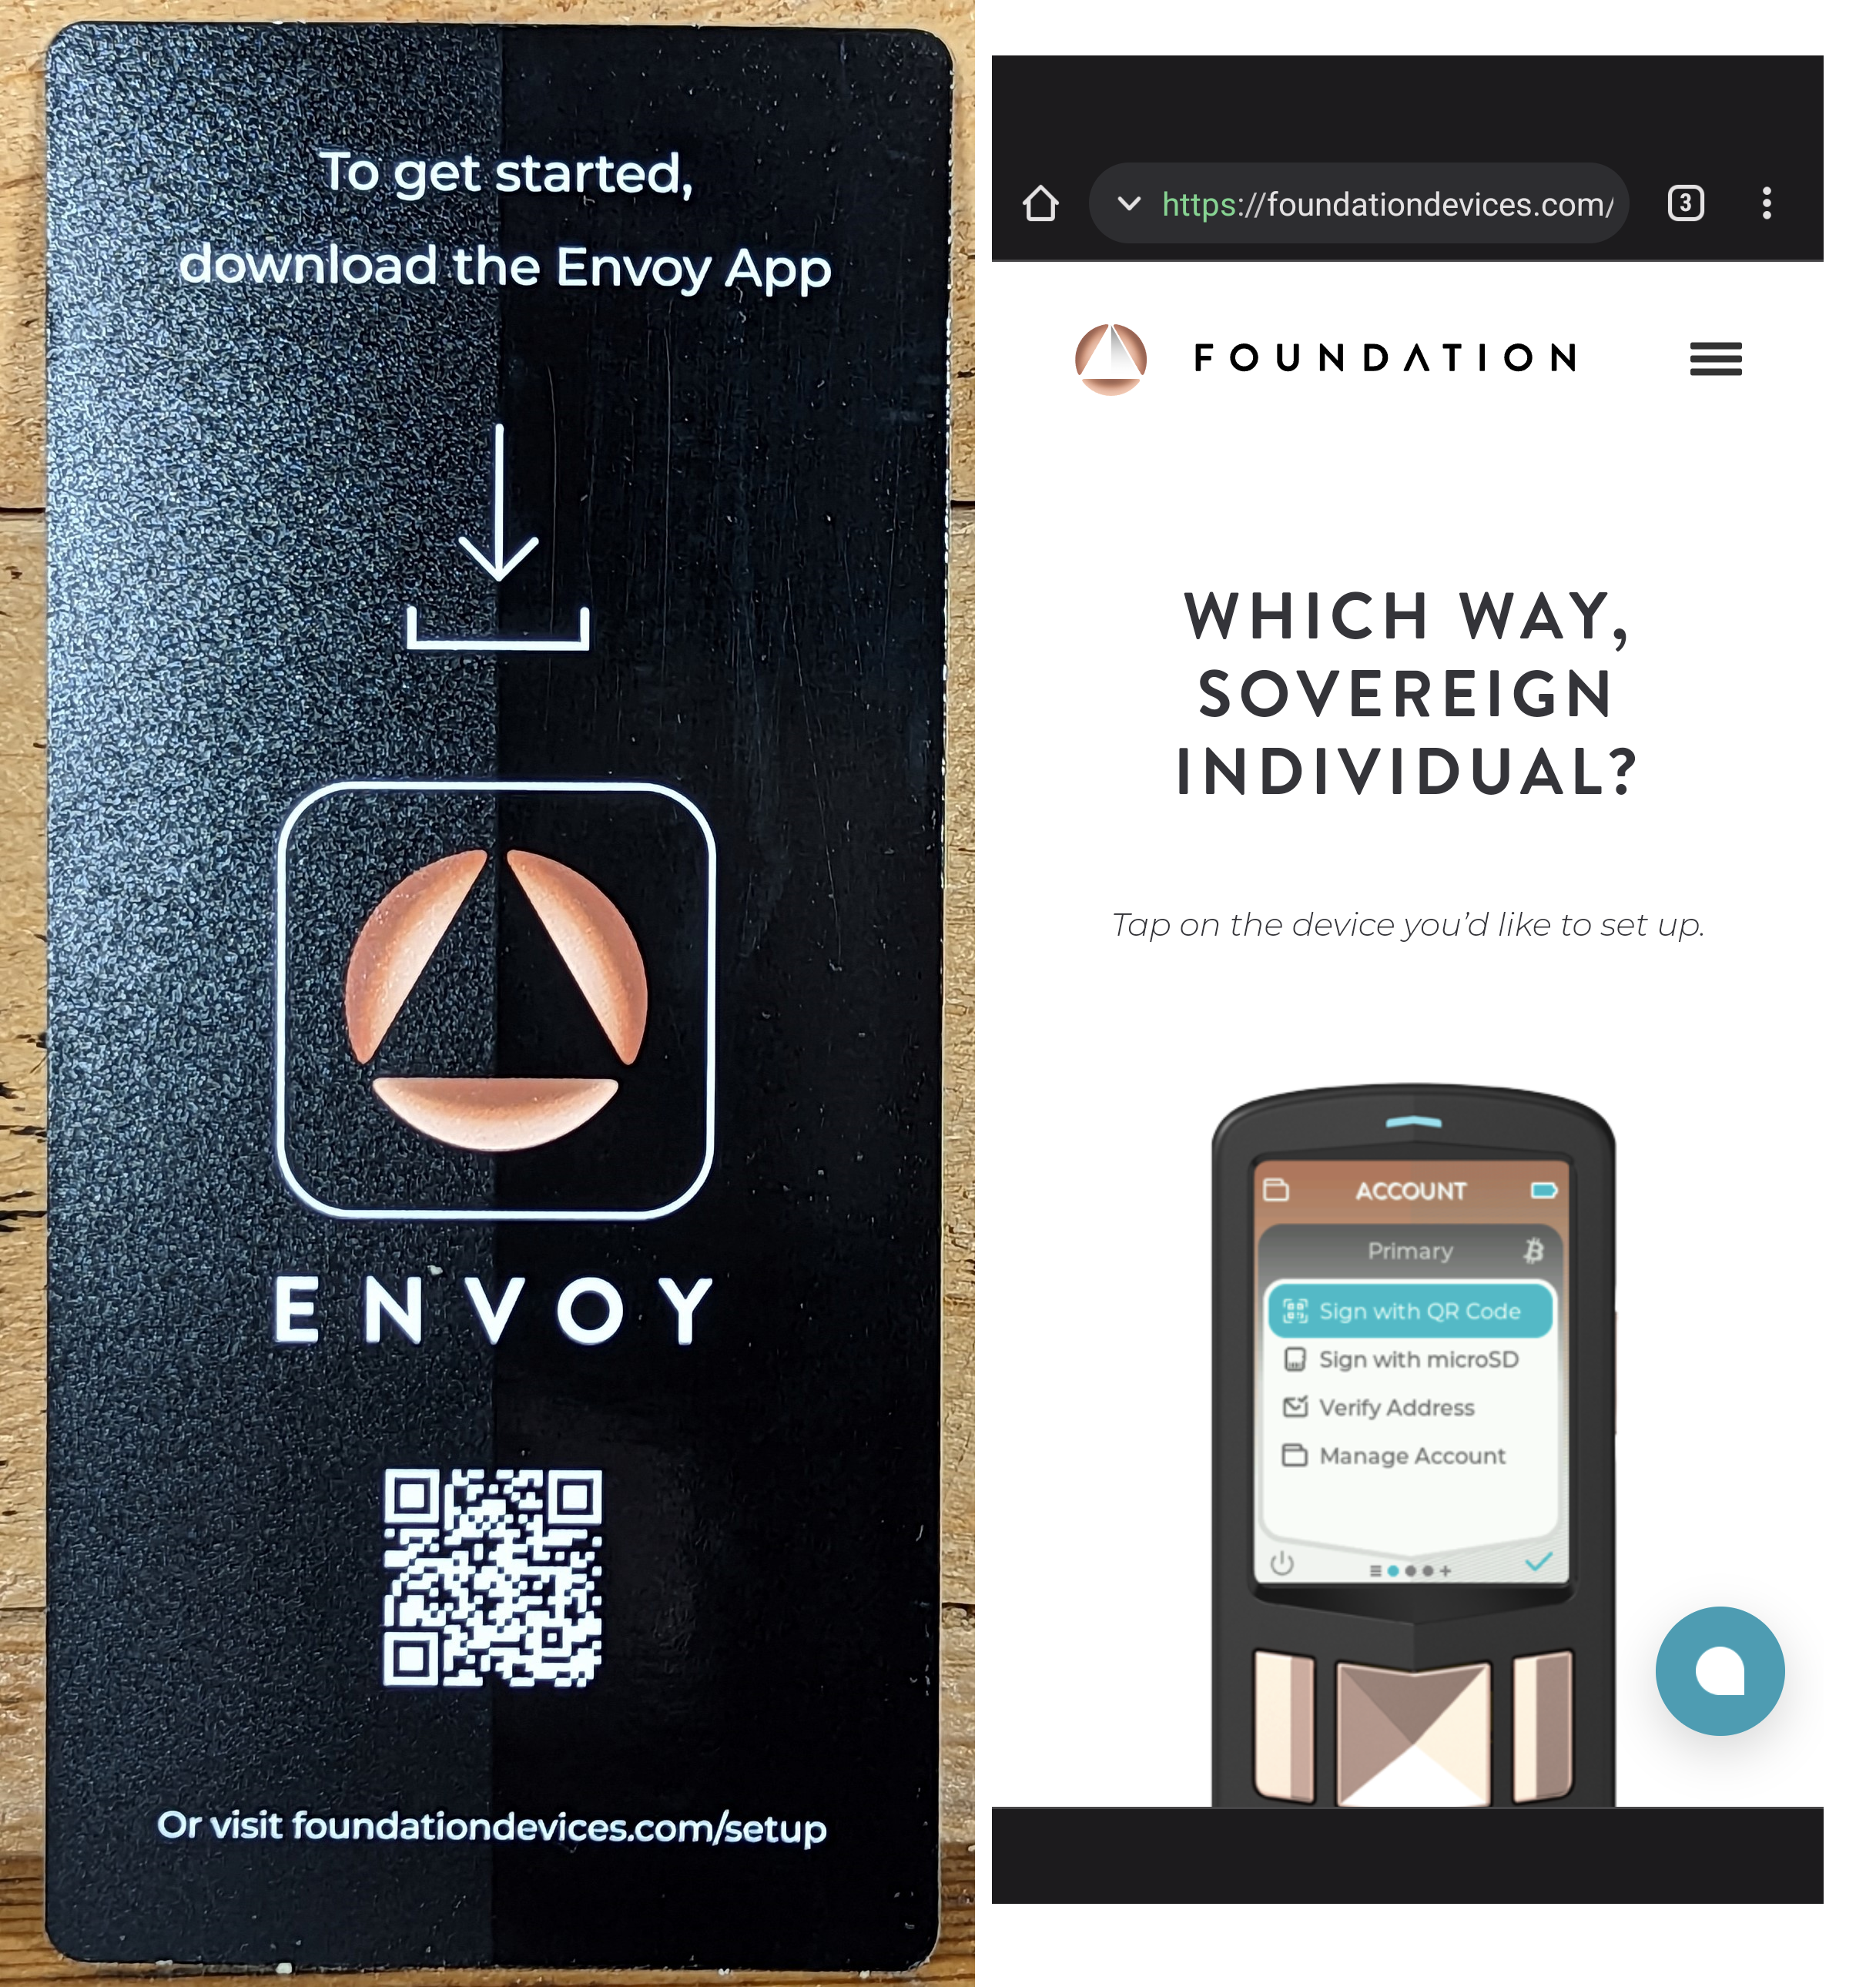
- With your mobile device, scan the QR code on the included note card and it will take you to the Foundation Devices start page.
- Click on the device you are setting up. In this case, Passport Batch 2.
- This will bring you to the Foundation Devices Startup Guide which features helpful and detailed step-by-step instructions and videos.
- Scroll down to the
Downloading Envoysection and click on theEnvoy Download Linkslink. - Then click on the F-Droid icon.
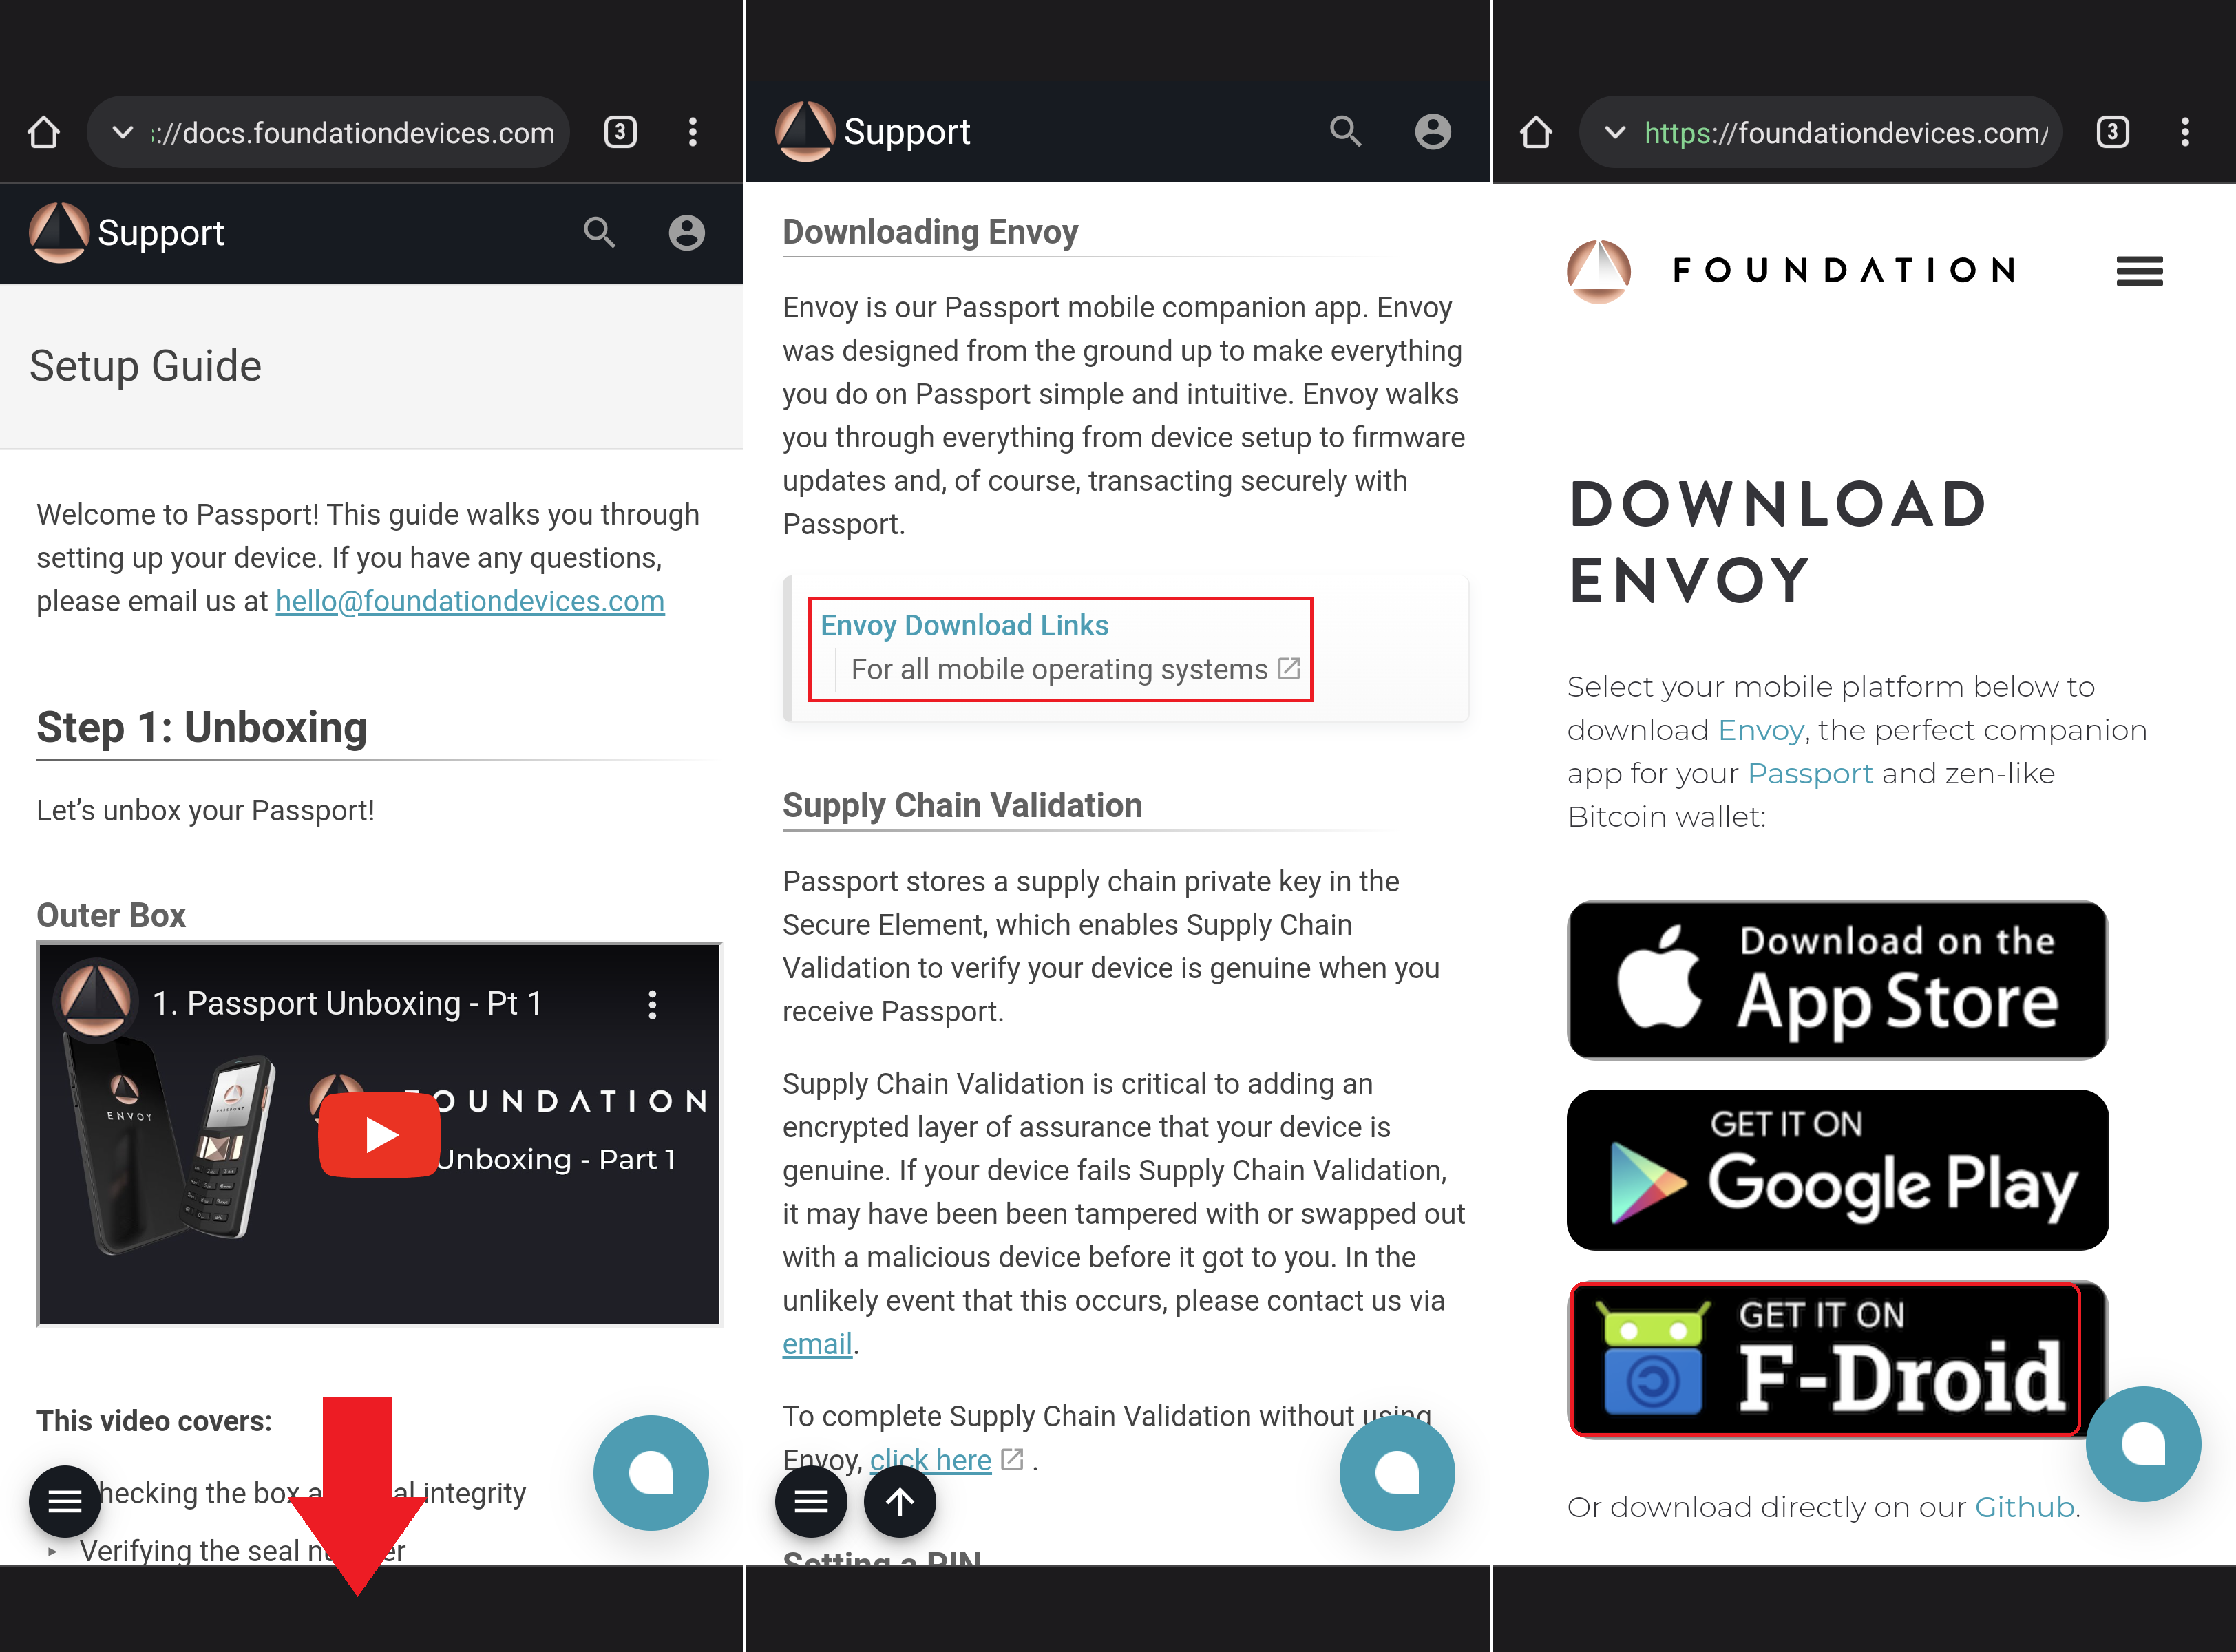
- You will be brought to the instruction page for downloading Envoy from F-Droid.
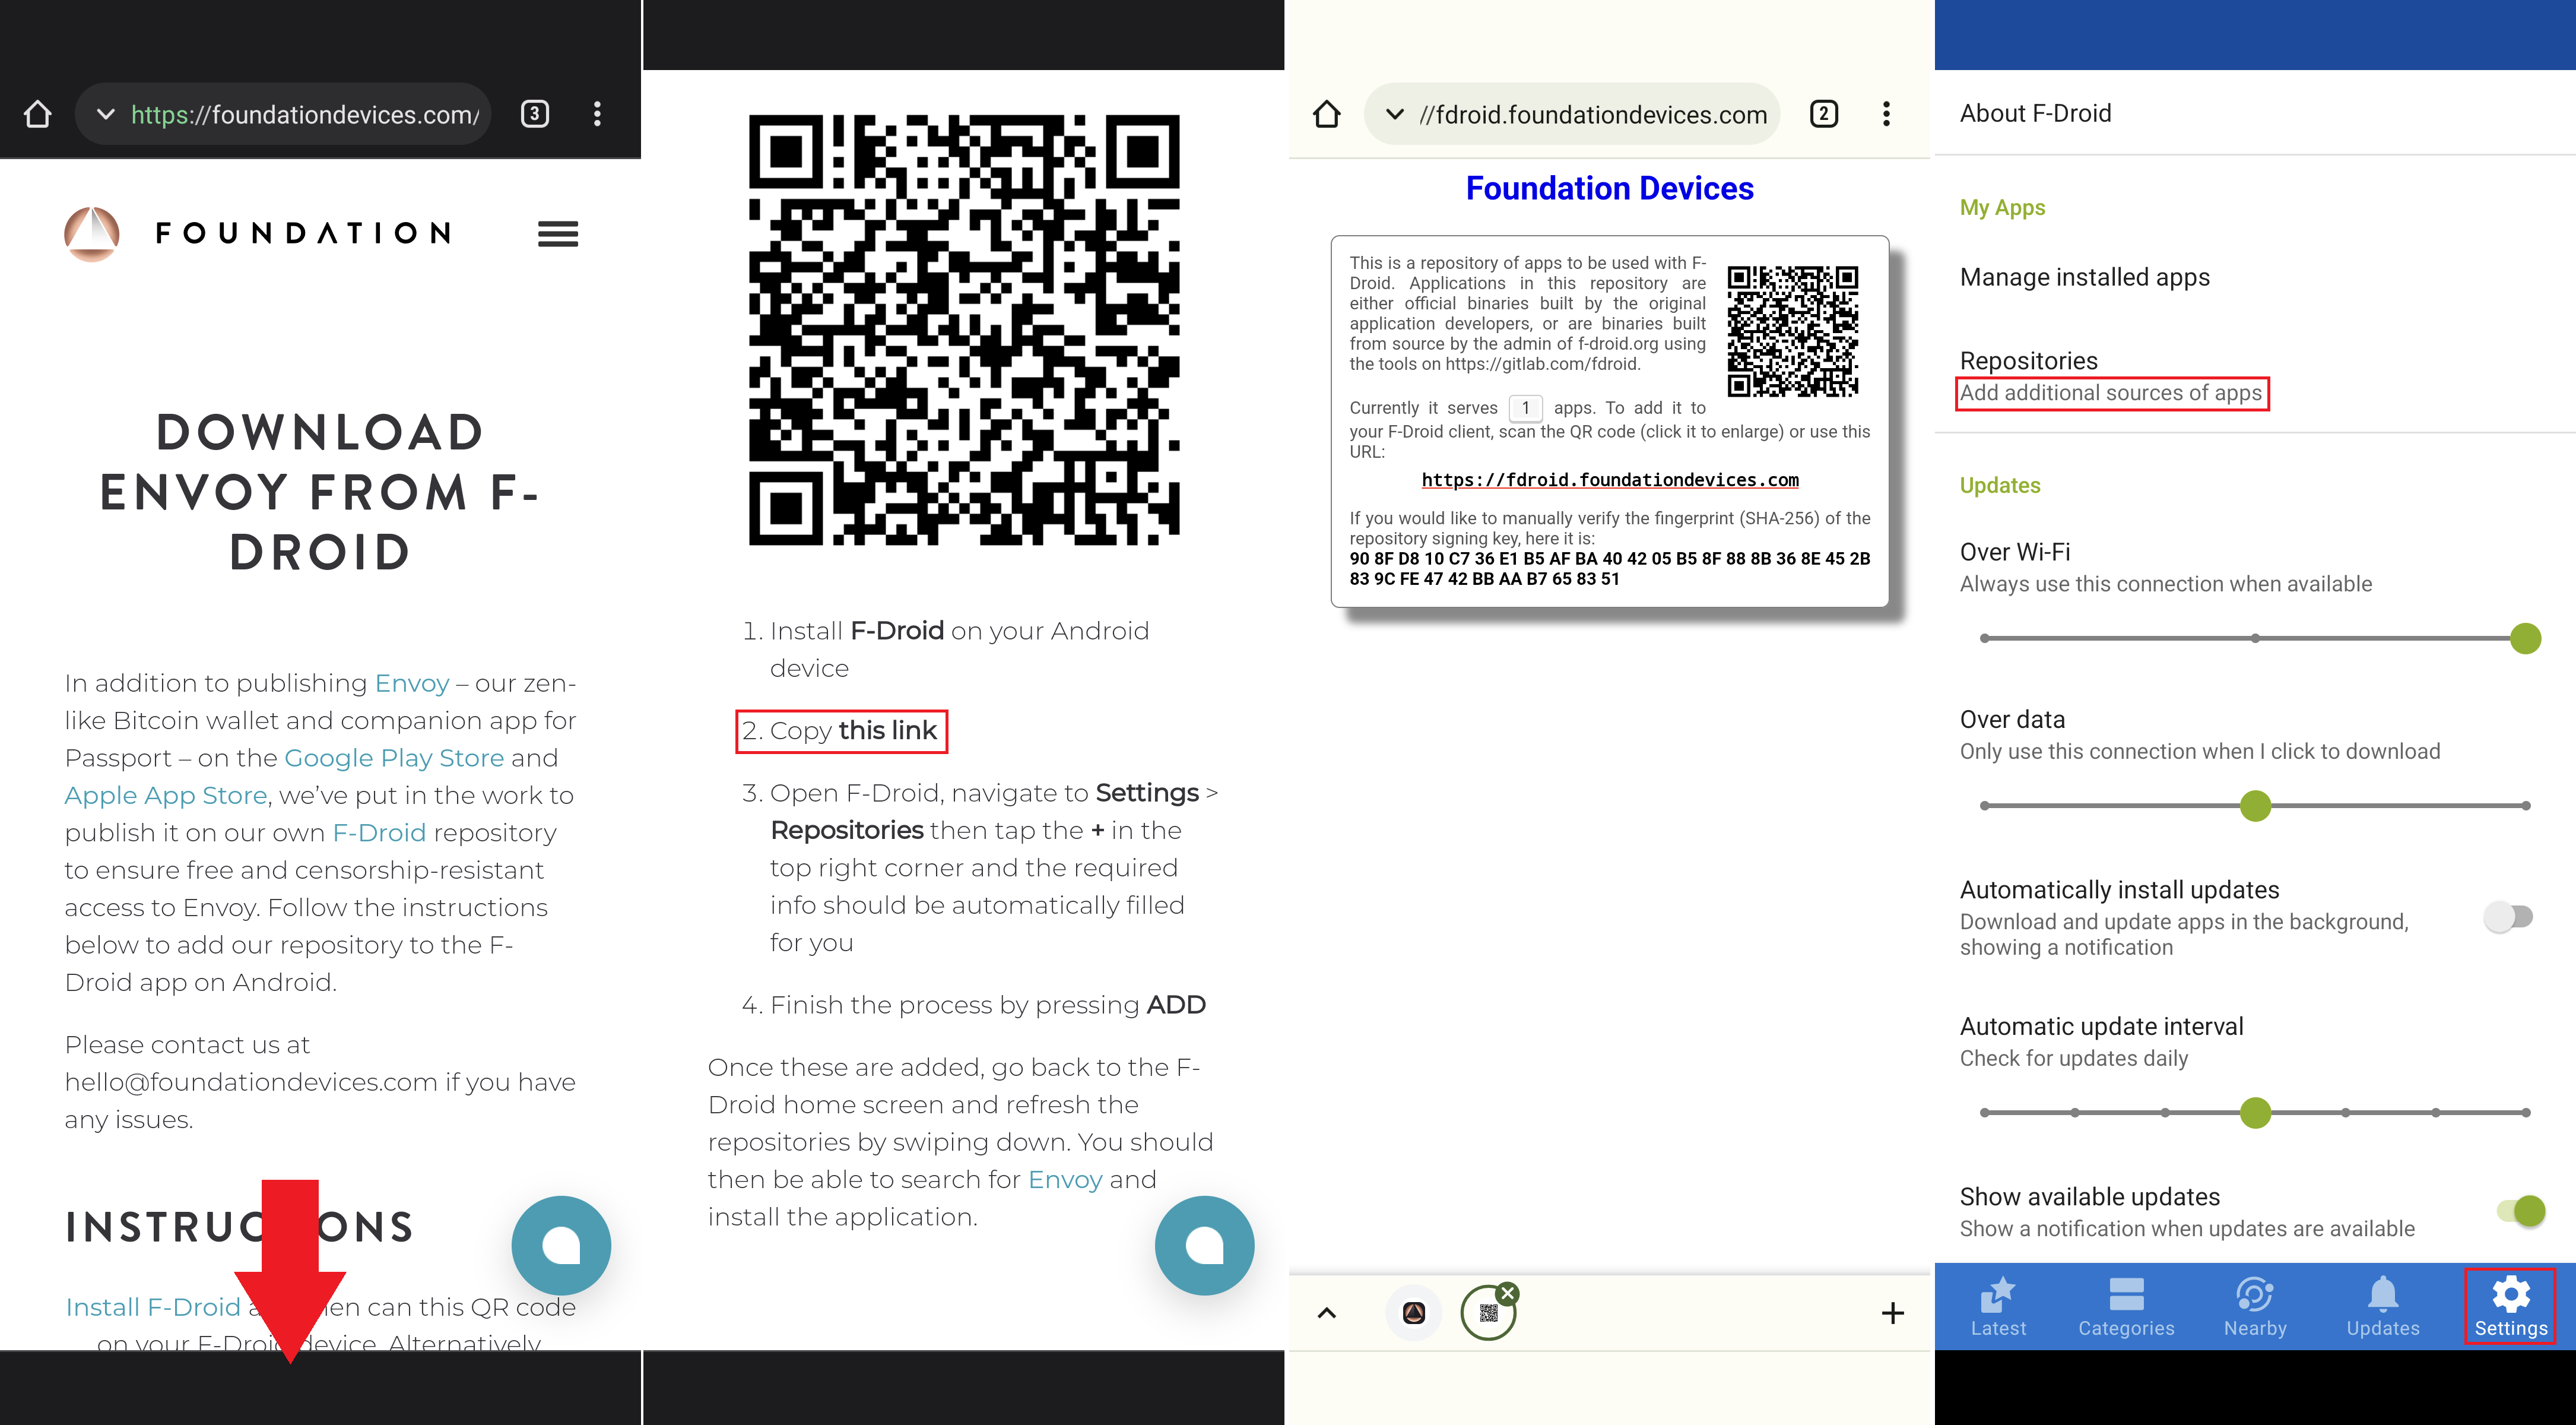
- Scroll down to step 2 under the QR code and click the link there.
- This will bring you to the summary page of the Foundation Devices F-Droid repository. Copy the link on this summary page.
- Then open your F-Droid app, click on
Settingsin the lower right-hand corner, then click onAdd additional sources of appsunderRepositoriesnear the top of the menu.
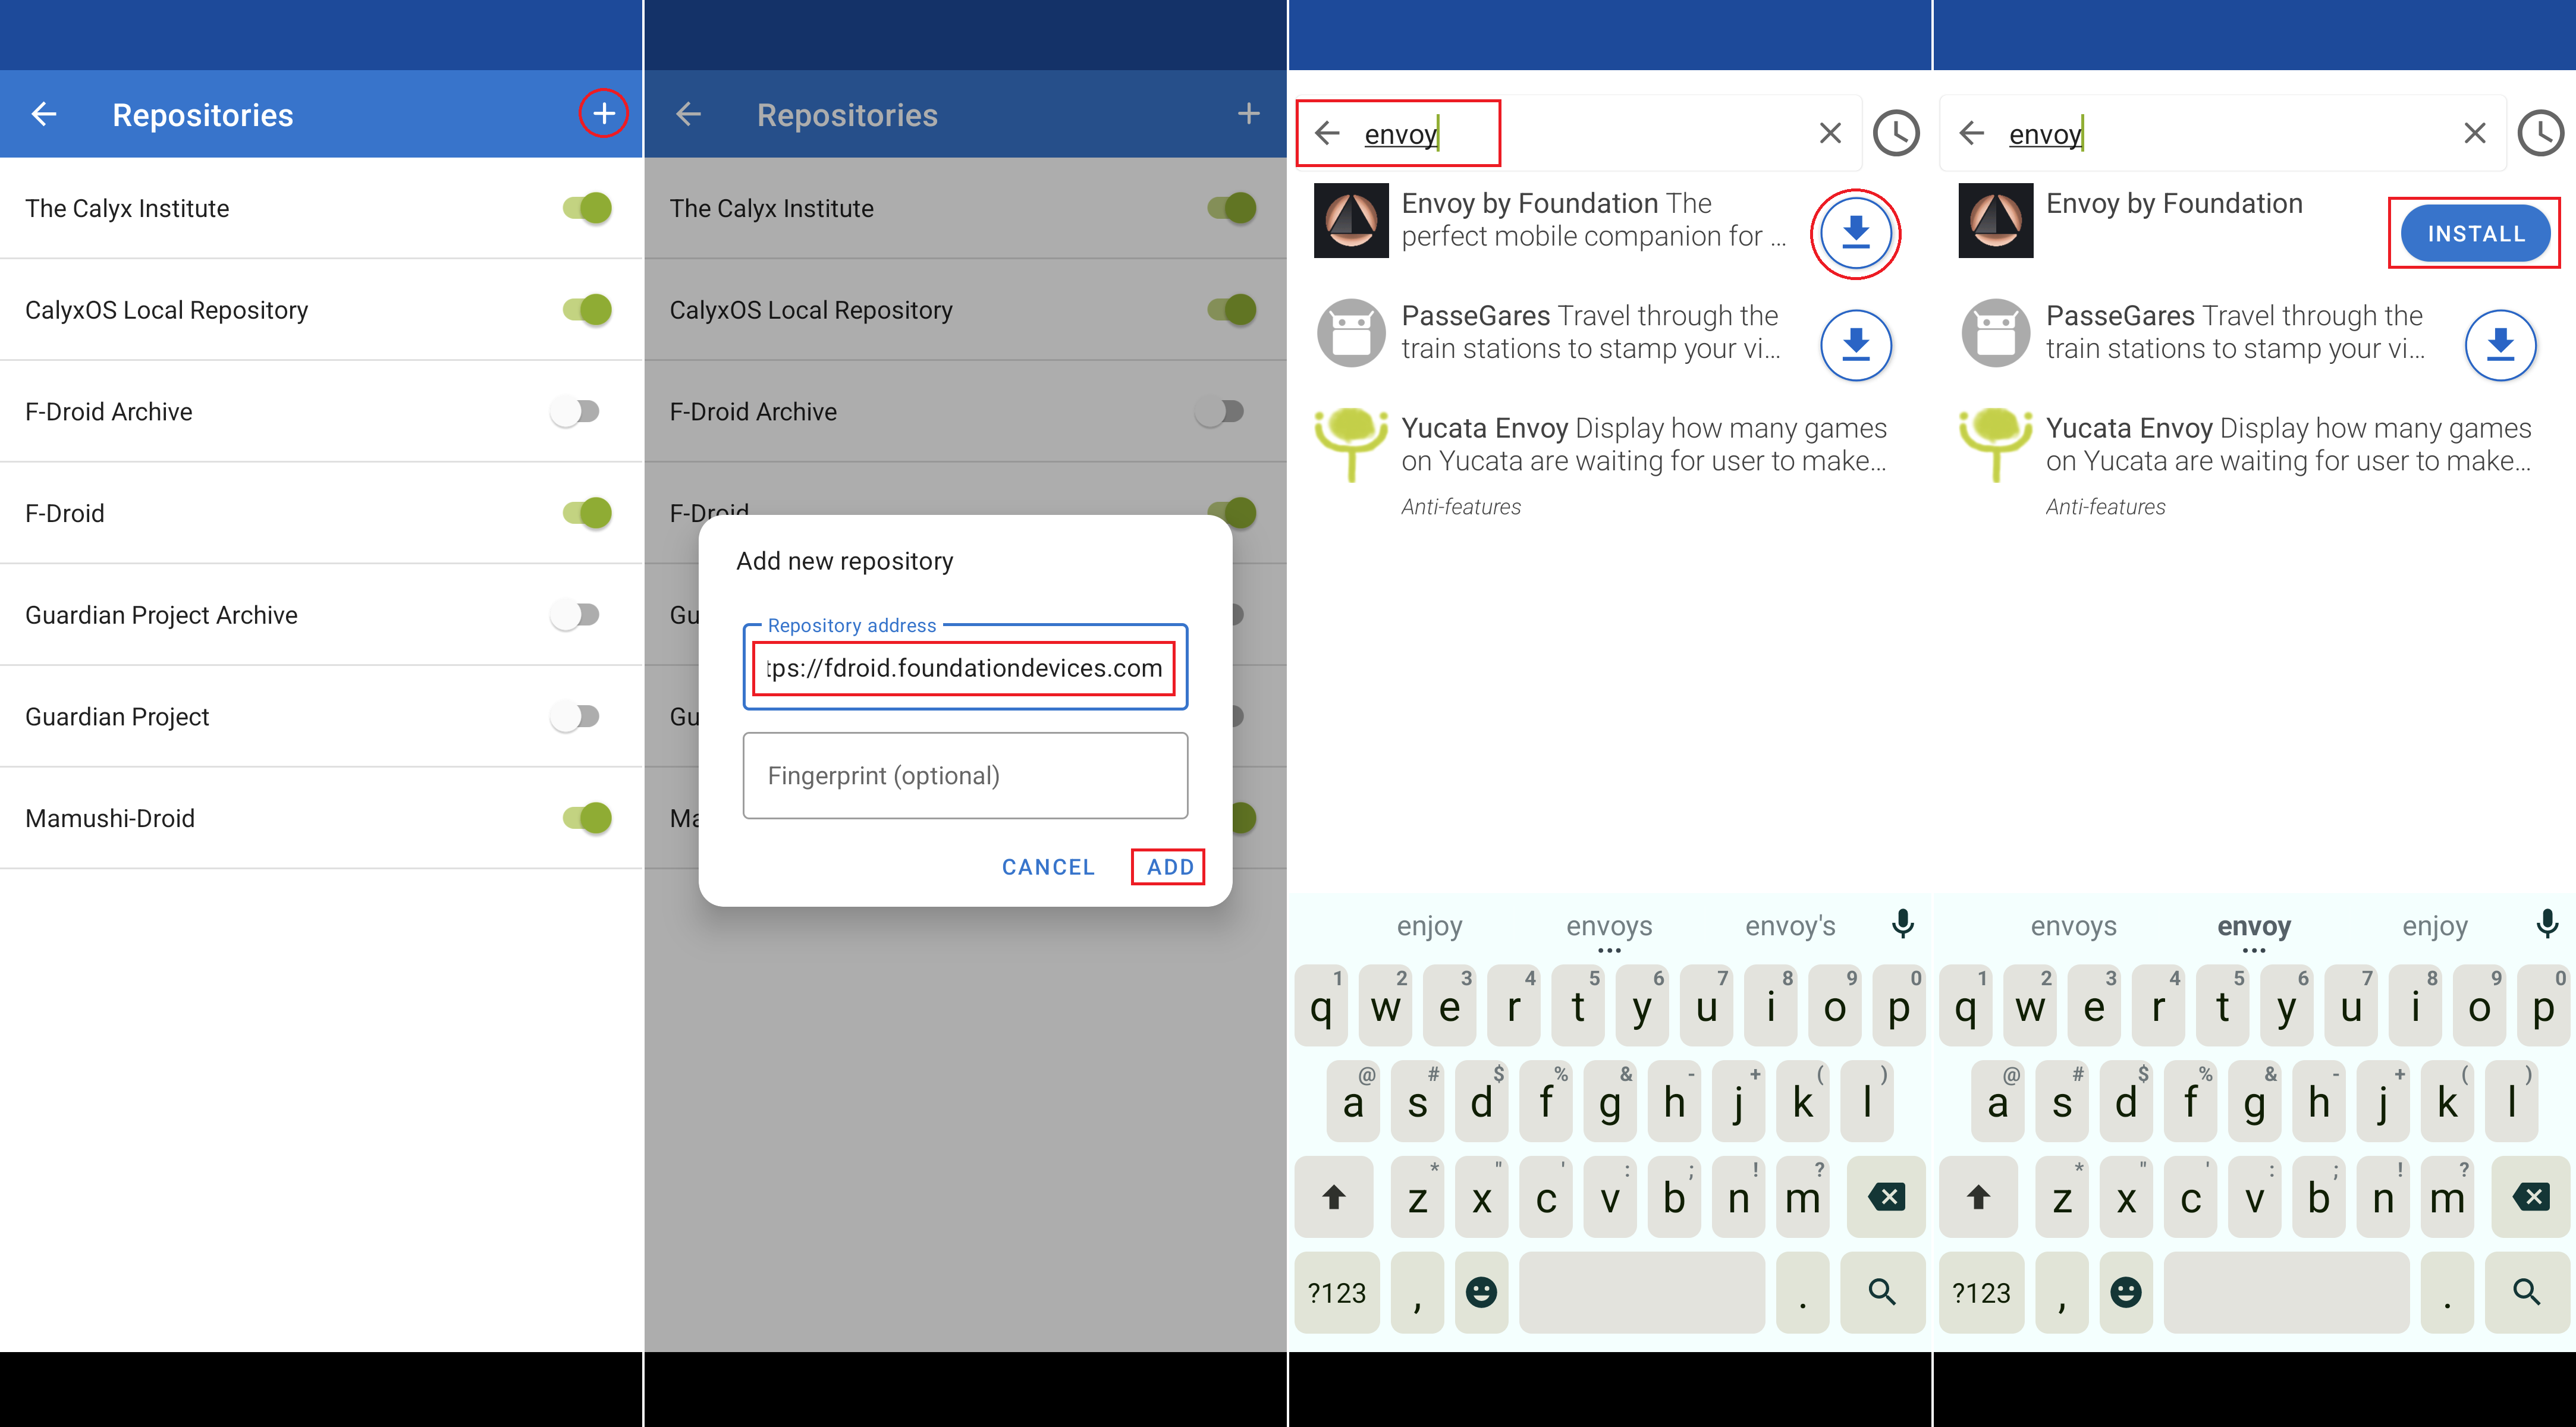
- You will be presented with a list of your currently available repositories. Click on the
+sign in the upper right-hand corner. - Then paste the link you copied previously. The fingerprint is optional and can be verified at anytime against the repository summary page. Then click on
ADD. - Once the repository is added, you can use the search function in F-Droid from the magnifying glass icon on either the
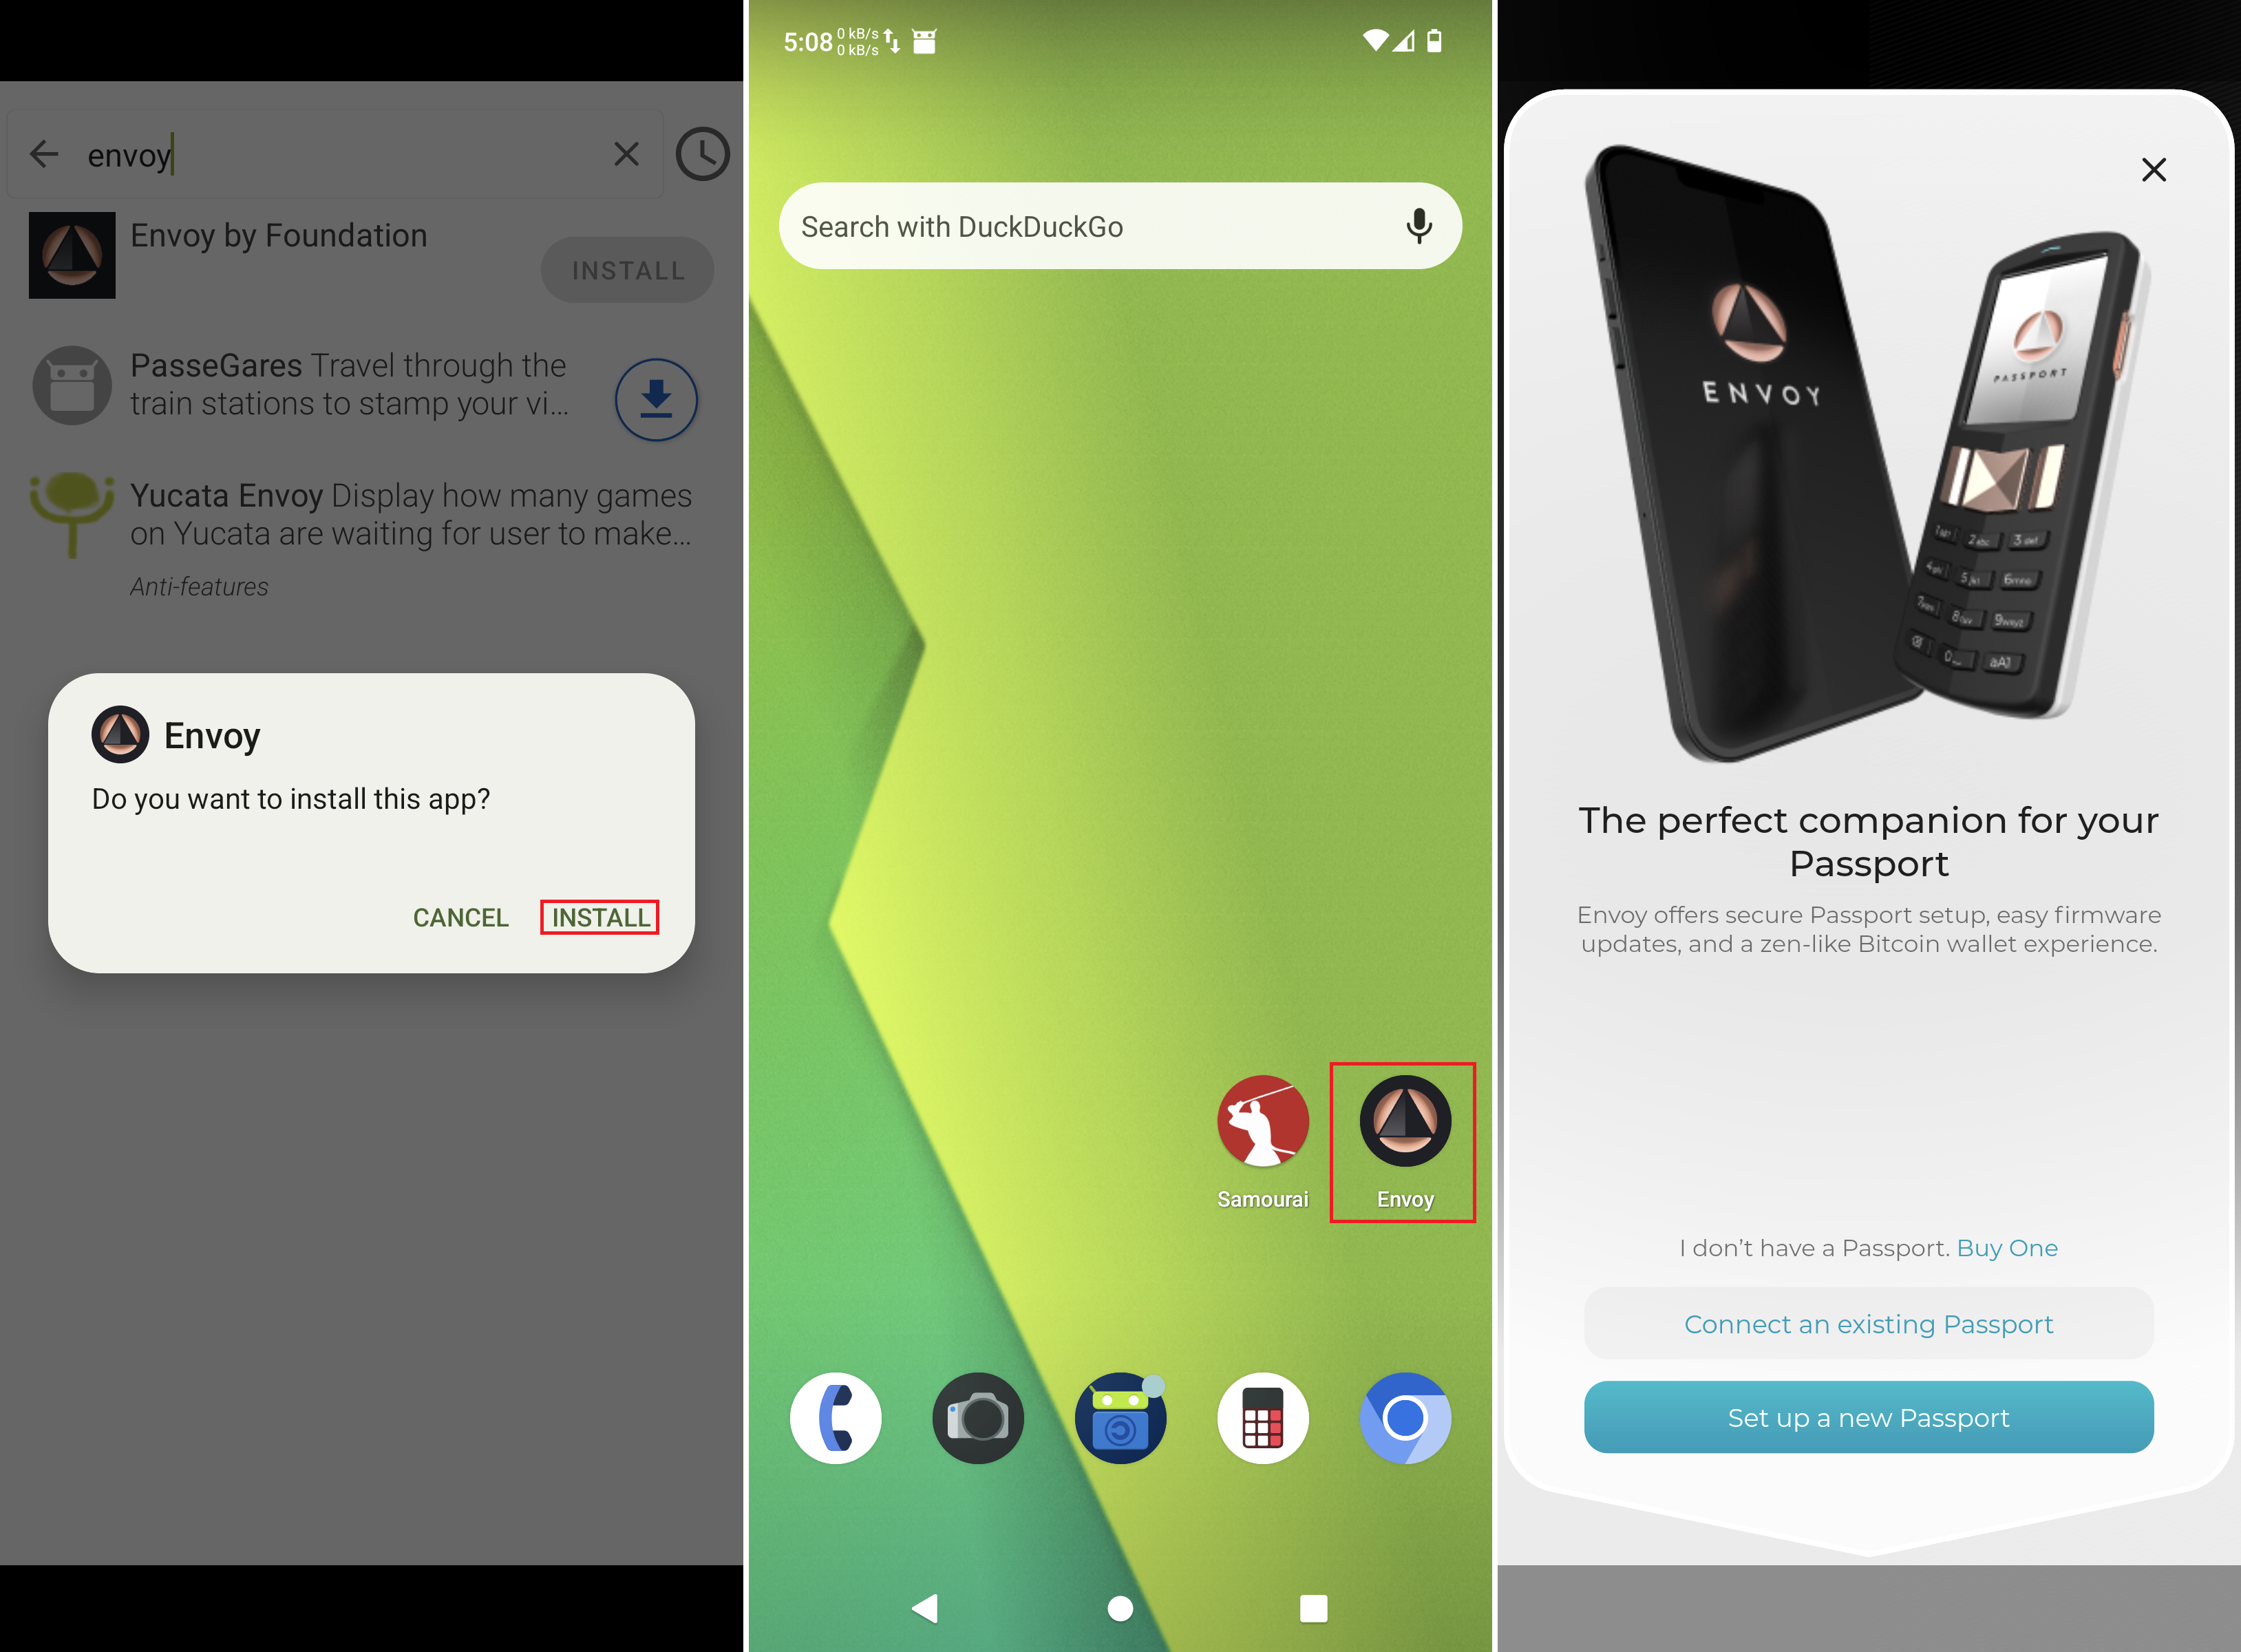
Latesttab or theCategoriestab to then search for Envoy. Once found, click on the download icon. - Once downloading is complete, click on
INSTALL.
- Once installed, the Android system will ask you if you want to install this app, click on
INSTALL. - Then you should be able to find the Envoy app in your app tray and you can click and hold to drag it onto your home screen if you want. Then you can open it.
- You will be greeted with the introduction message.
Supply Chain Validation
The first step is to complete the Supply Chain Validation. This ensures that your device has been delivered to you as the manufacturer intended, authentic and unmodified.
- Open the Envoy app on your mobile device.
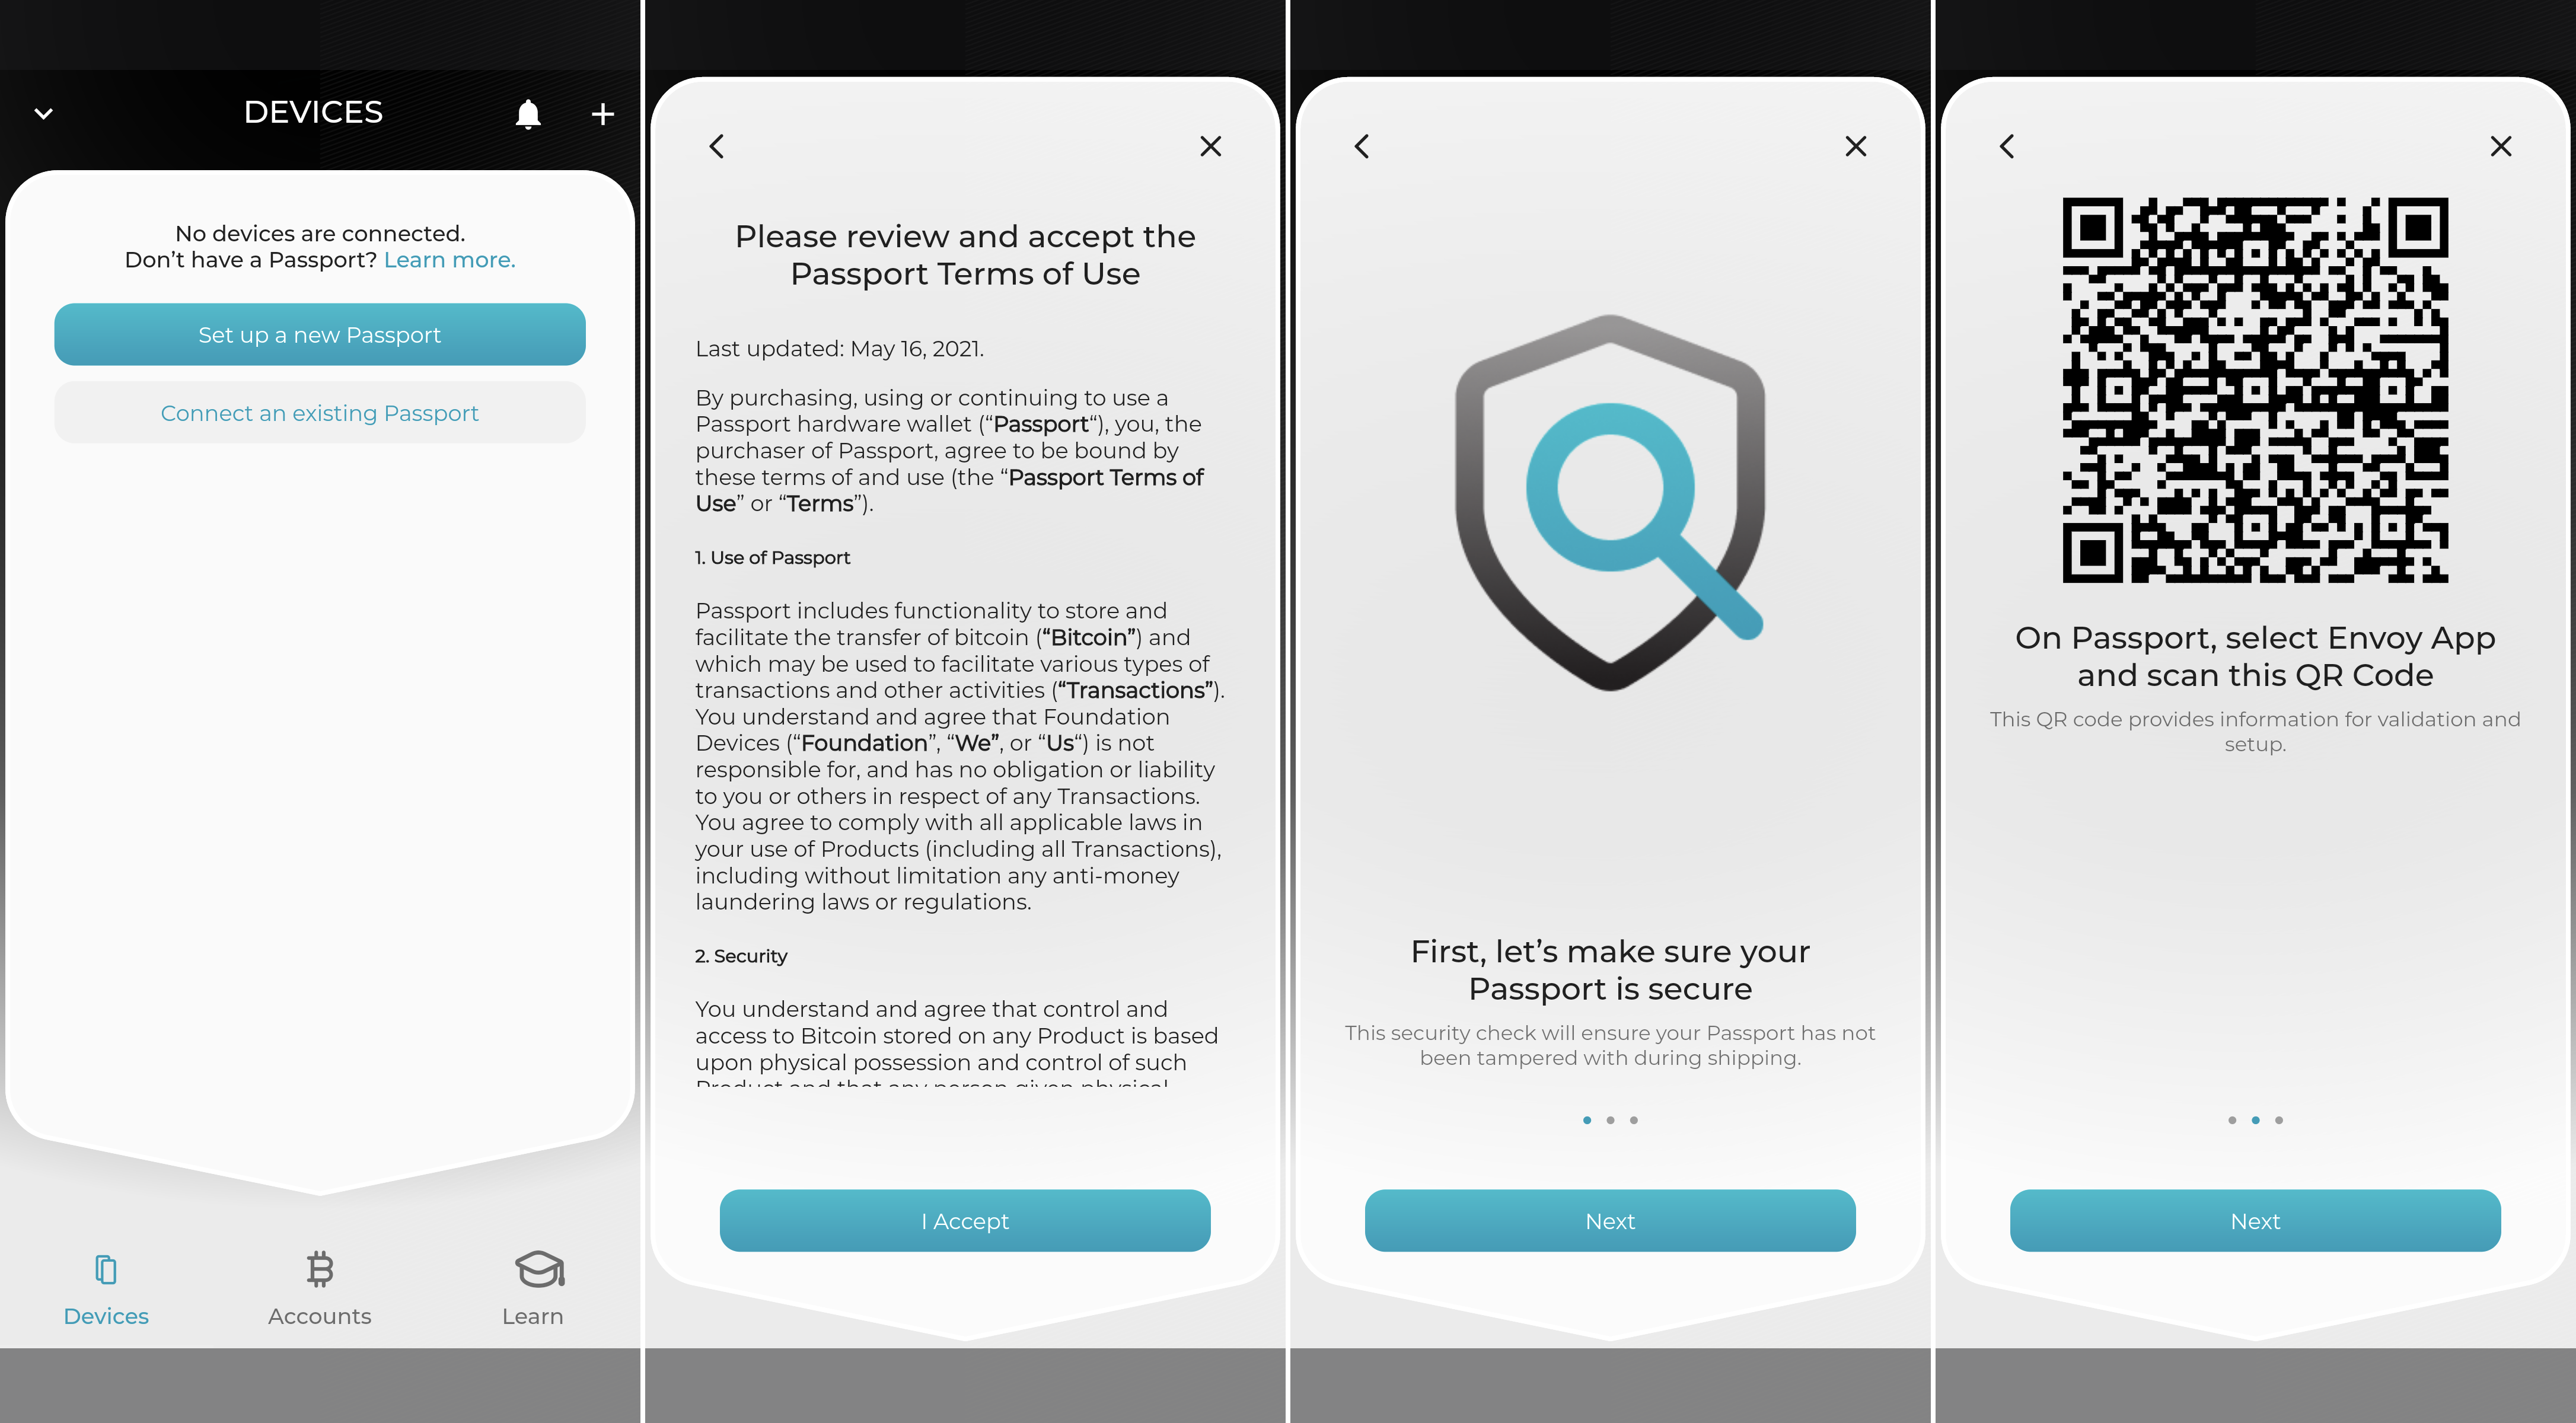
- Select
Set up a new Passport. - Accept the Terms of Use.
- Select
Next. You should see an animated QR code start cycling.
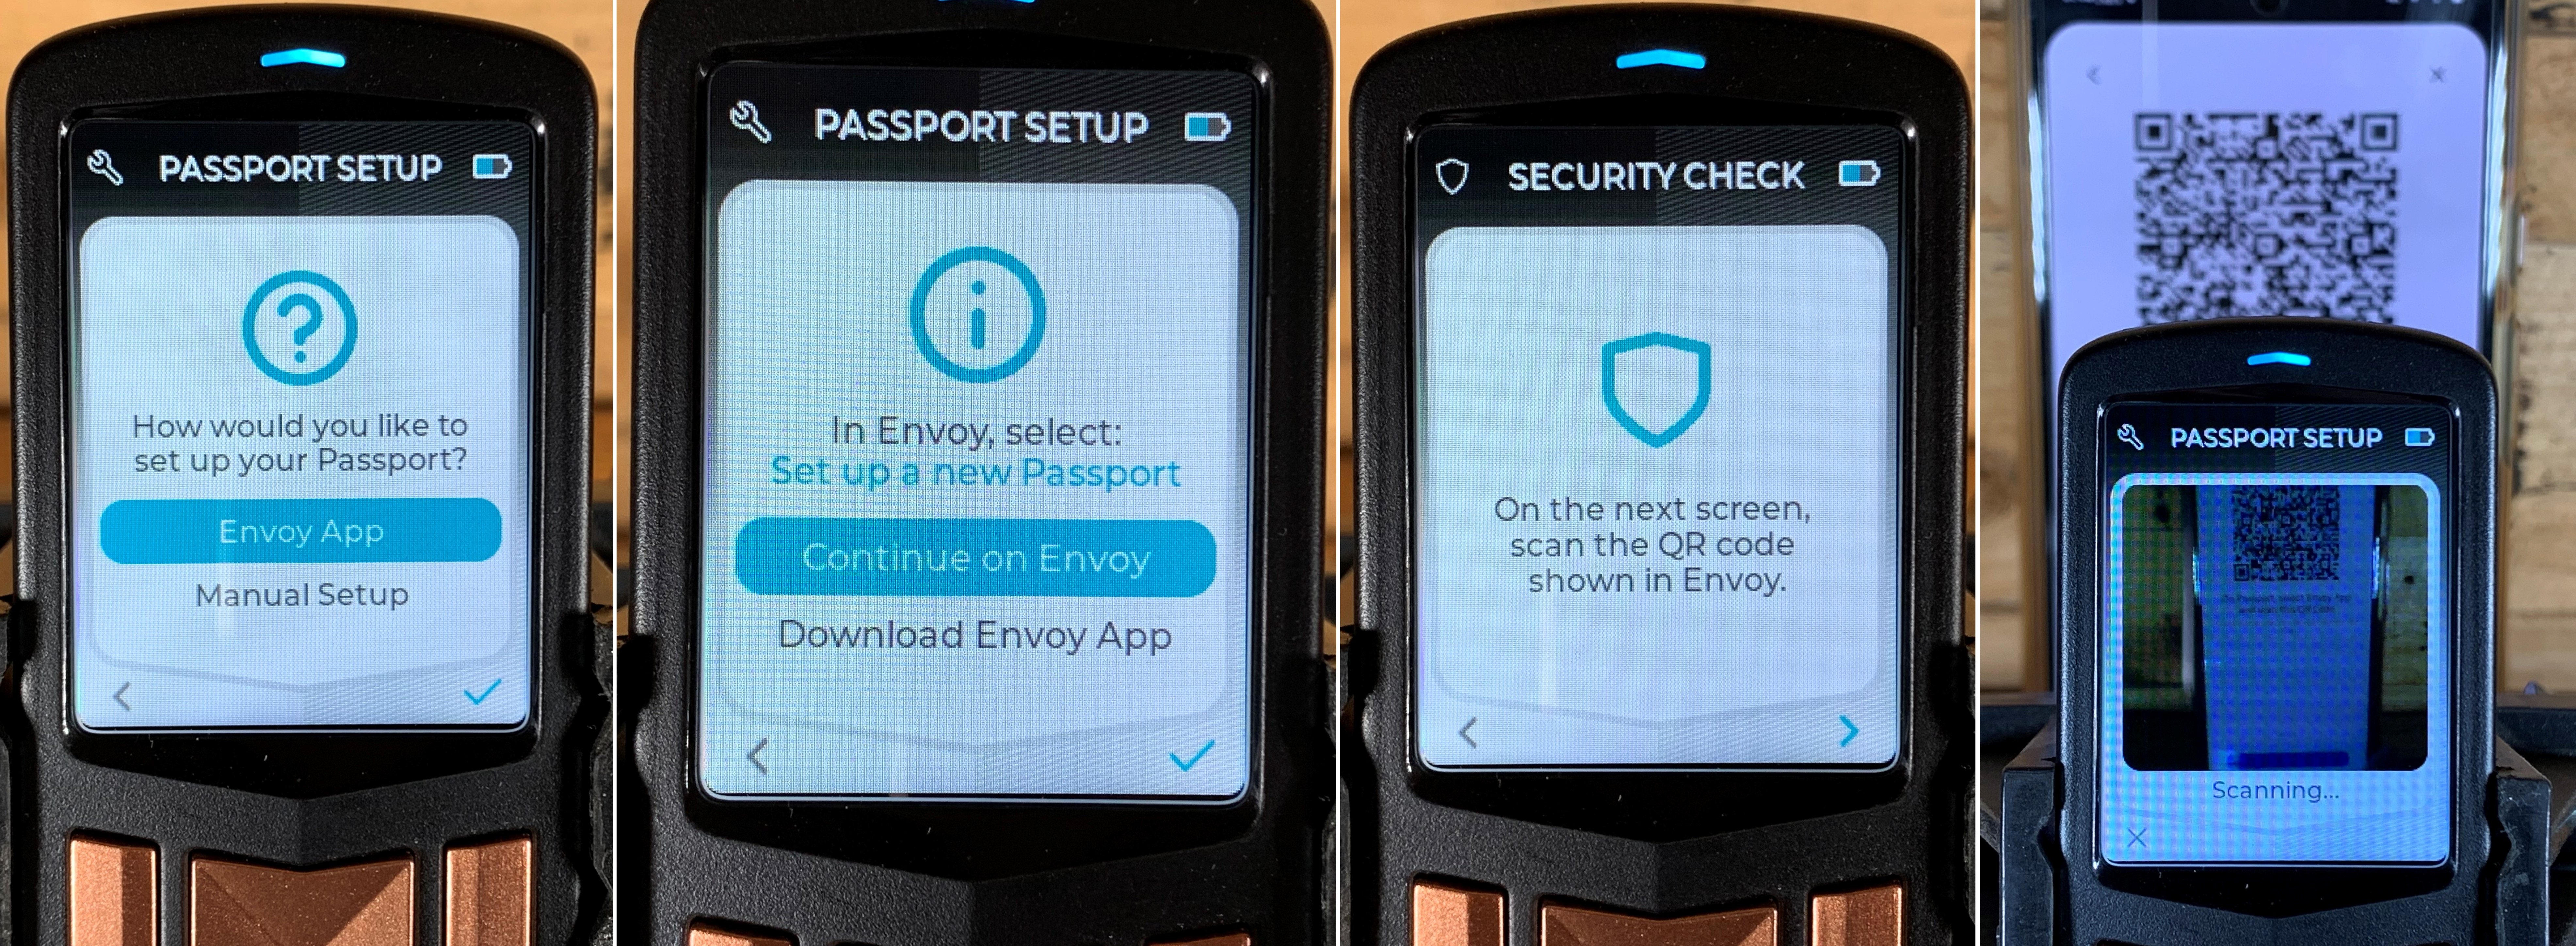
- Power on your Passport.
- When prompted for how you would like to set up your Passport, select
Envoy App. - Then select
Continue on Envoy. - Select the
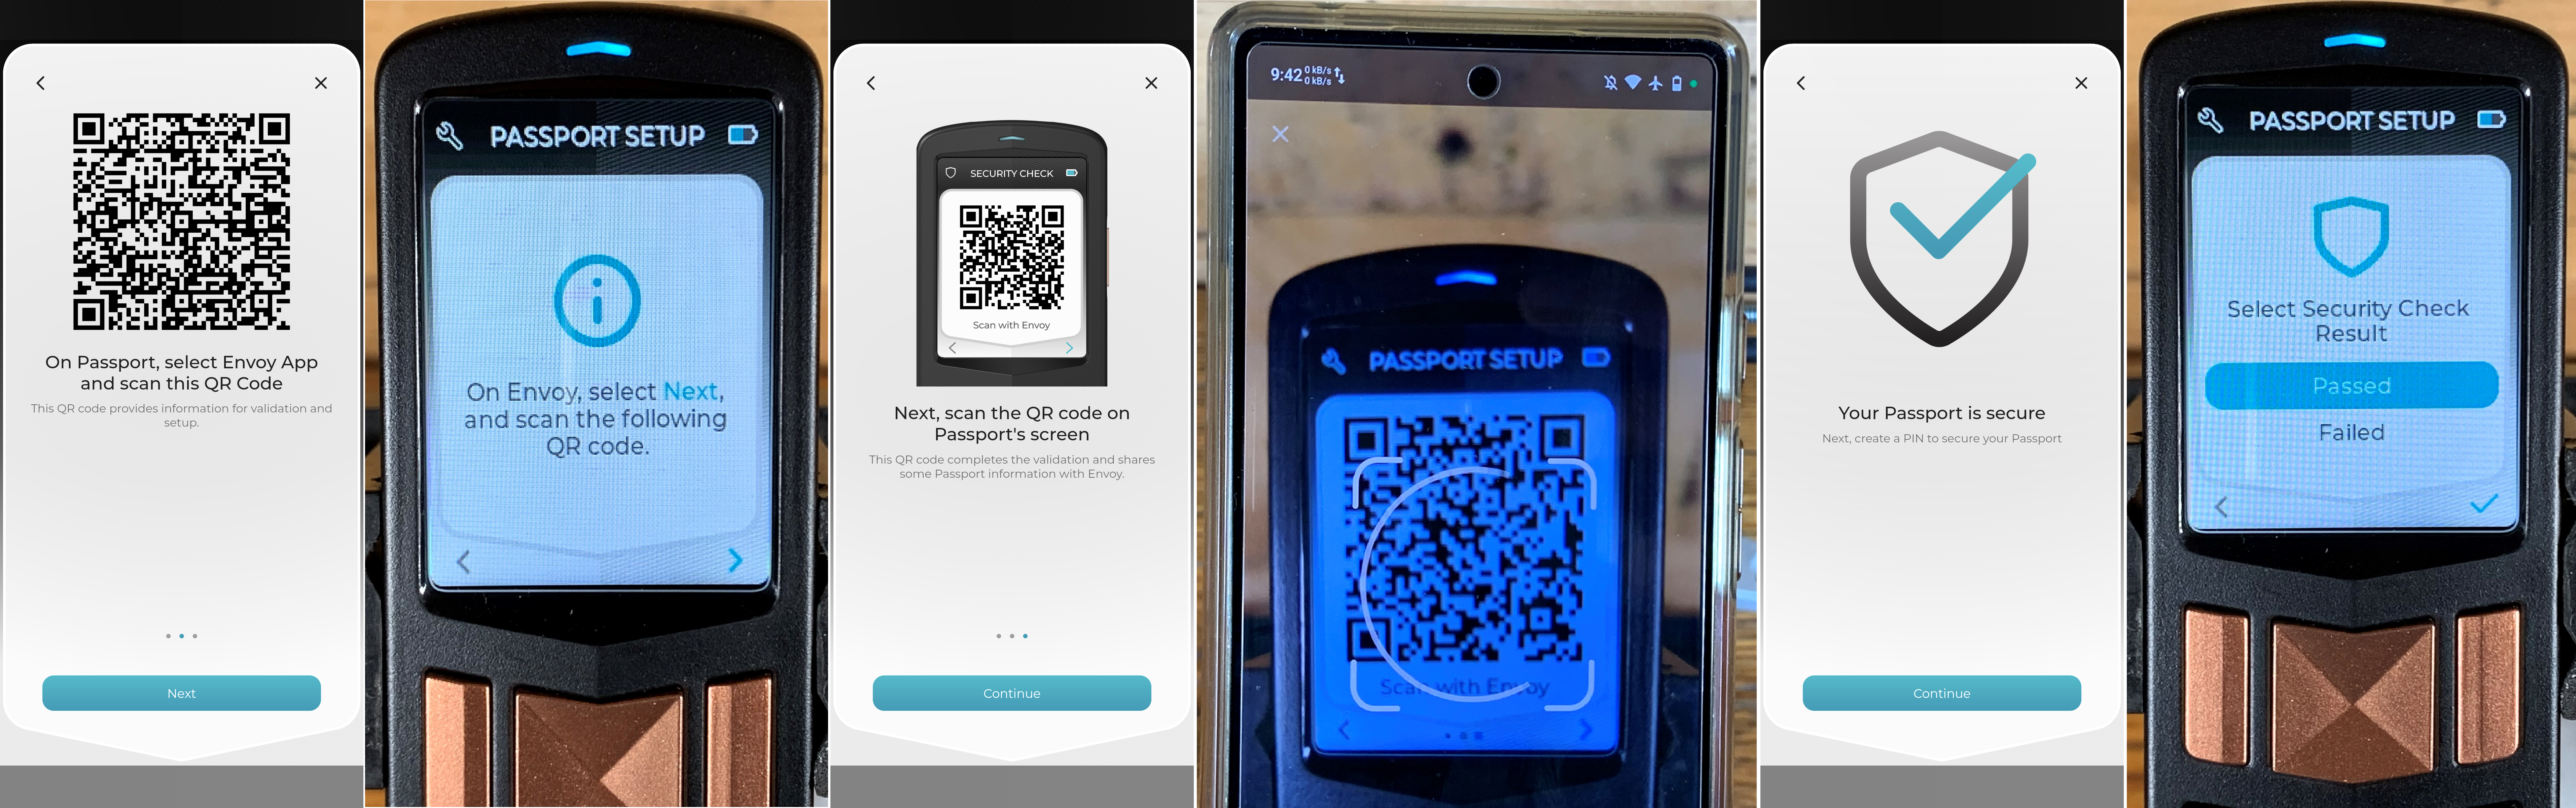
>arrow to initiate the Passport camera. - Then scan the animated QR code on your mobile device. You should see the Passport start counting the percentage completed until 100% of the information is received.
- In the Envoy app, select
Next. - On the Passport, select
>for next and a QR code should appear. - In the Envoy app, select
Continueto initiate your mobile device's camera. - Scan the QR code on the Passport with your mobile device.
- You should receive a notification in the Envoy app that your Passport is secure. If your device fails the Supply Chain Validation, it may have been tampered with or swapped out with a malicious device while in transit to you. In the unlikely event of a failure, contact The Foundation team via email at hello@foundationdevices.com. If your Passport Supply Chain Validation was successful then select
Continuein the Envoy app. - On the Passport, select
Passed.
PIN number
PIN numbers on the Passport can be between 6 and 12 digits in length. Using a PIN number that is easy to guess is not recommended. There is no way to recover a lost PIN number. In the event that an incorrect PIN number is entered into the Passport Batch 2 twenty-one times, the device will self destruct and become permanently useless. If that occurs, your bitcoin is still safe so long as you have your seed phrase (covered in the next section), it just means the device itself is ruined.
You can also enable security words which add a layer of protection in the event that your device is ever tampered with. If you enable security words, you will enter your PIN in two parts, a prefix and suffix. After entering the prefix, you will be presented with two English words, for example "moment auction". Because of the way these words are generated, if anything has been tampered with on your Passport hardware or software then these words will be different than the ones you were expecting. If the words are the ones you were expecting then you enter your PIN suffix and complete the login process.
- On the Envoy app, you can just select
Continuewhen you see the prompt to enter a 6-12 digit PIN. The actual PIN set up will be carried out on the Passport.
- On the Passport, use the
>arrow when you see the prompt to set up your PIN, which should be the first prompt you get after the Supply Chain Validation procedure. - Using the
>arrow, acknowledge that there is no way to recover a lost PIN. You may want to consider writing your PIN down on paper or stamping it into metal and then storing it in a safe and secure location. - Using the
>arrow, acknowledge the warning to record your PIN somewhere safe. - Then using the numeric keys, enter your desired PIN number.
- Then enter it again to confirm.
- Next, the Passport will cycle through
Setting initial PIN,Logging in, and finally you will receive a notice that the PIN was set successfully.
Next time you turn on your Passport, you should be prompted for your PIN before being able to use the device.
Seed Phrase
The seed phrase is a human readable representation of the initial entropy used to generate your Bitcoin private keys. Most commonly, seed phrases will be a list of 12 or 24 words. Backing up your seed phrase in a safe and secure way will enable you to access your bitcoin in the event your wallet is lost, stolen, destroyed, etc. So long as you have your seed phrase, you have access to your bitcoin. That also means anyone else who gains access to your seed phrase has access to your bitcoin. Take precautions to ensure you save your seed phrase in a safe and secure way. There are several methods ranging from encrypted microSD cards, paper backups, QR codes, and steel plates or washers. Whichever method you choose, your seed phrase will work with a wide range of Bitcoin wallets. Many industry participants have implemented the BIP39 standard which defines how seed phrases work. This allows users to recover their bitcoin on a number of mobile, desktop, or hardware wallets regardless of which wallet they used to generate the seed phrase. Taking a picture or screenshot of your seed phrase is not recommended.
- Picking up where you left off, you will probably be at the prompt on your Passport asking you to upgrade the firmware. Since the Passport has not been connected to the Envoy app yet, this step will be skipped at this point and will be revisited after the seed phrase is created. You can update the firmware using the microSD card at this point if you would like to do so before continuing on to create your seed phrase.
- If you skipped the firmware update for now, then select
Create New Seedon the Passport. - You will be asked if you want to generate a new seed phrase now, select the check mark.
- You should see the Passport save the seed and then you will be notified that the new seed has been created and saved.
- Next, Passport will create an encrypted backup of your seed phrase and prepare to save it to the included microSD card. Select the
>arrow. - Part of having an encrypted backup is having the code to decrypt it. Passport will generate this code and it will be required to to open your backup file in the future. Select the
>arrow. -
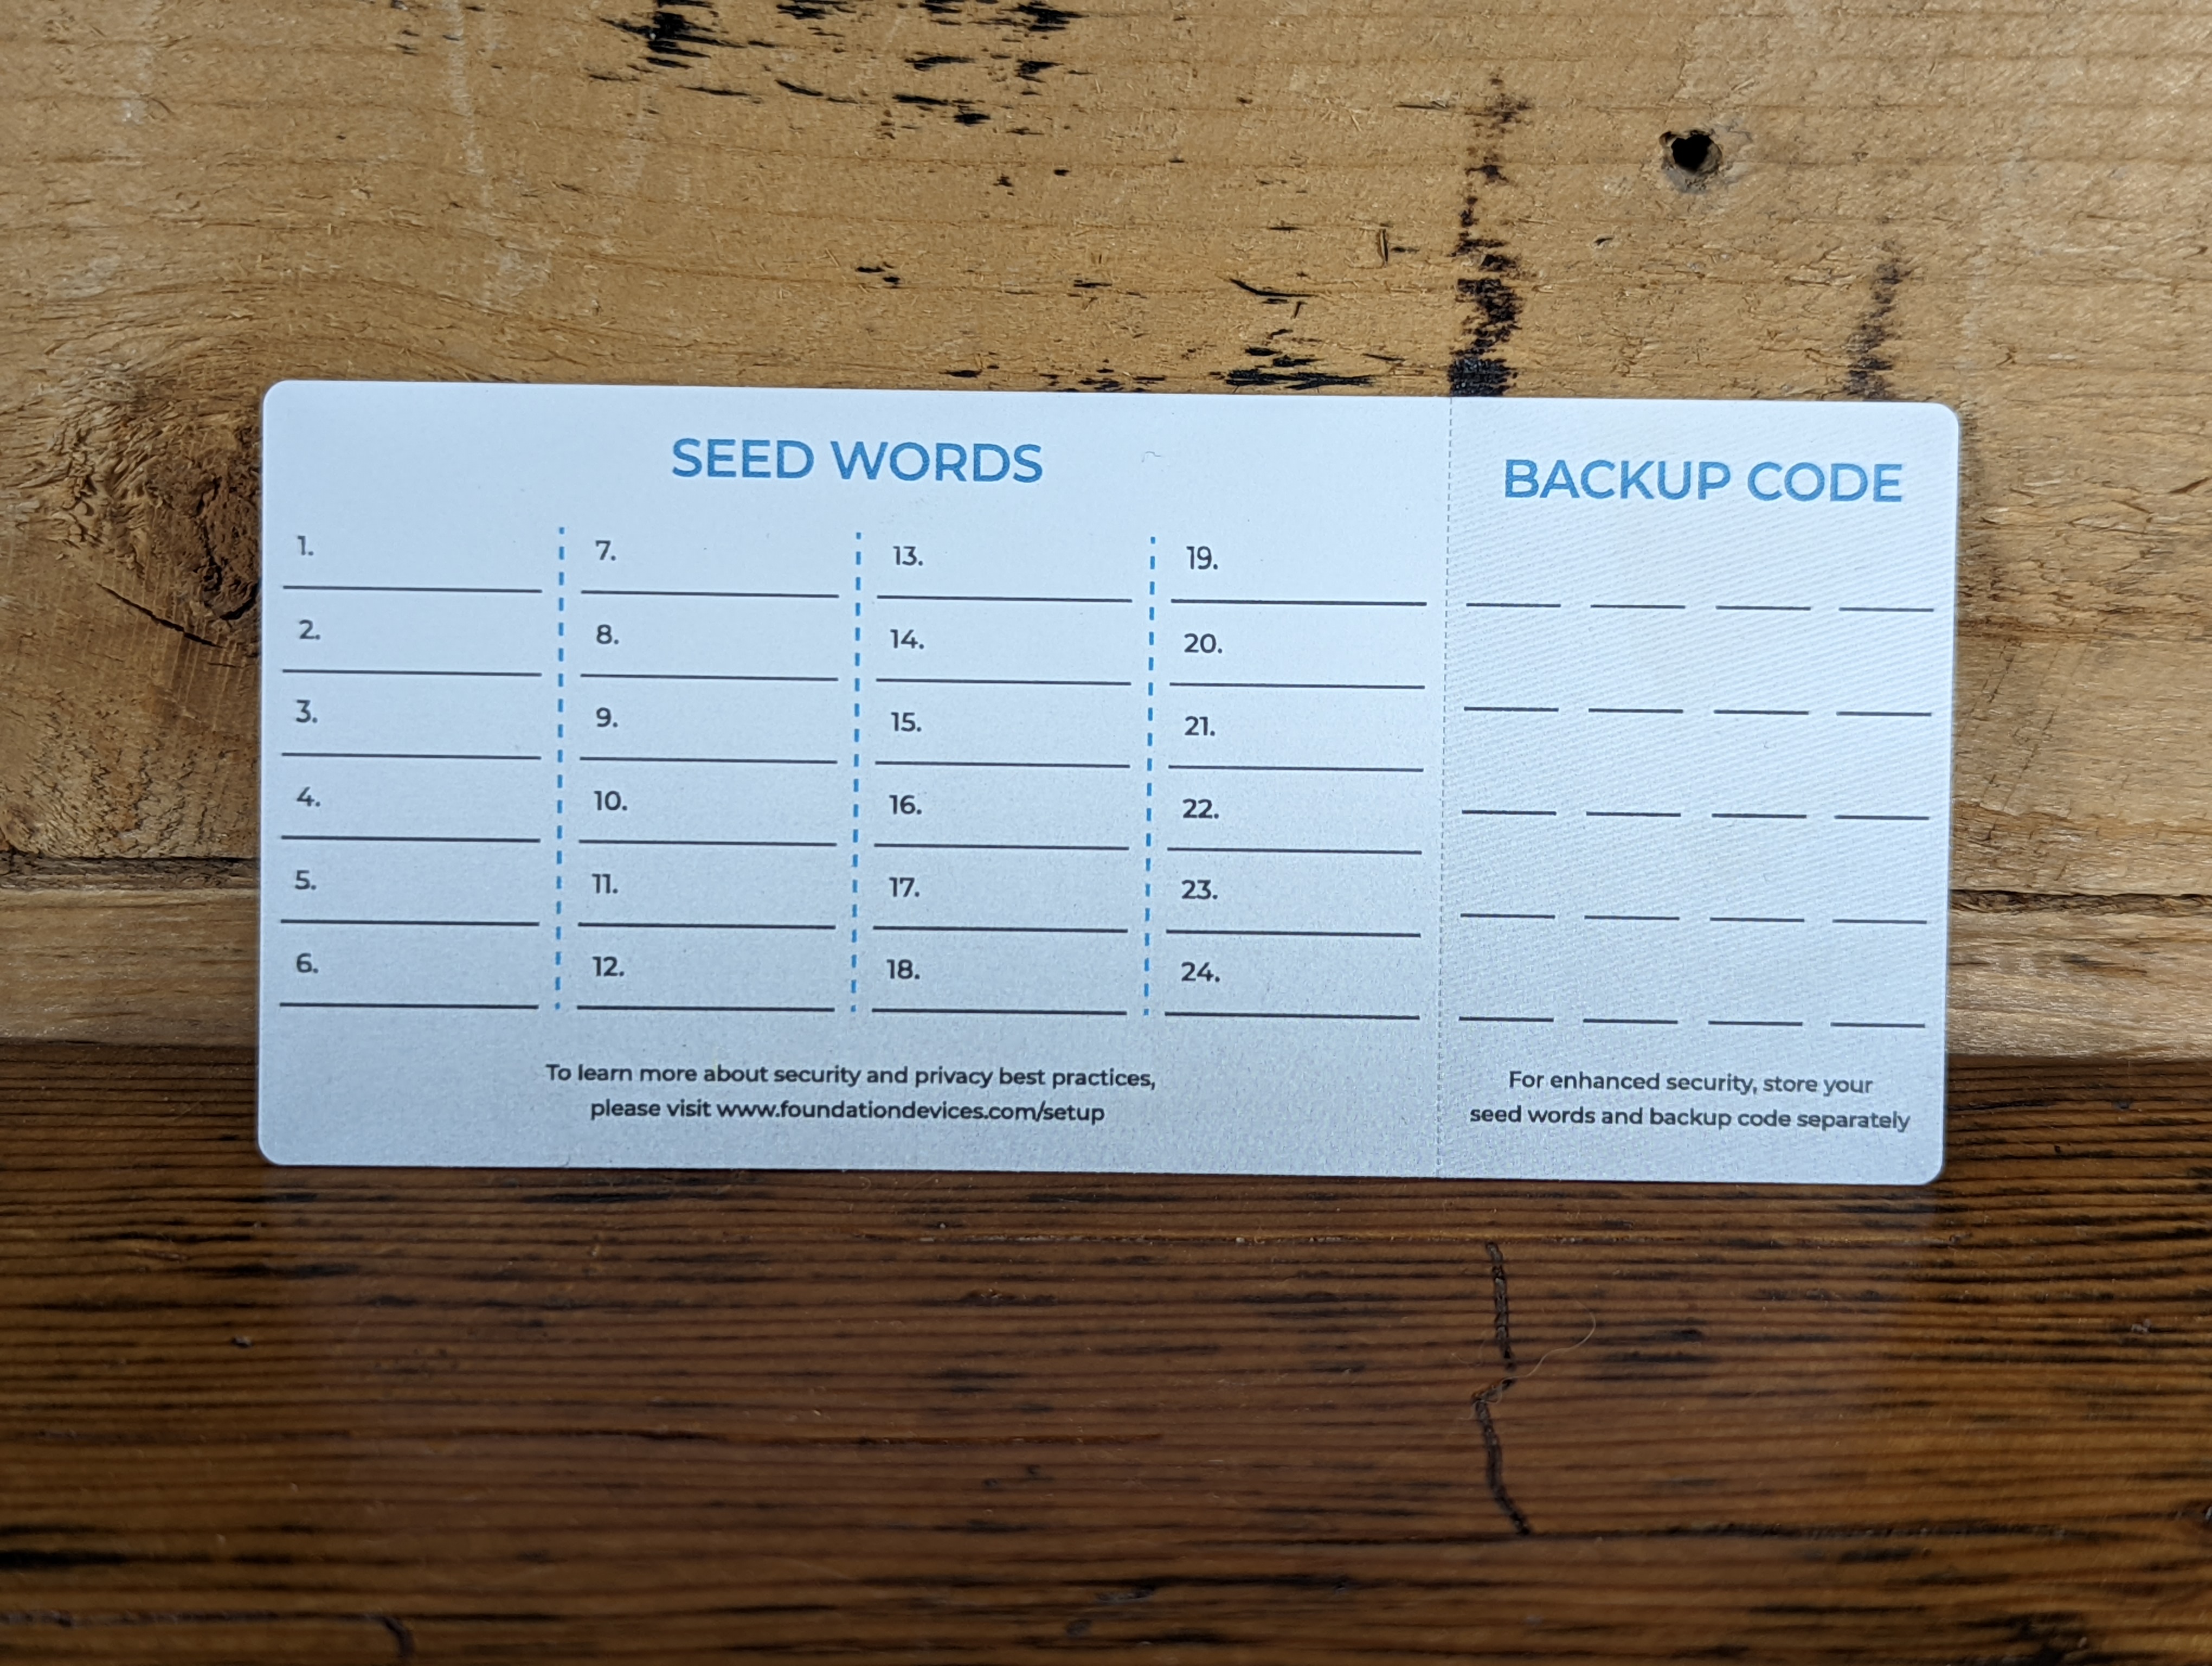
Your Passport came with a perforated note card, on one side of the perforation is space to write down your seed words and on the other side is space to write down your code for the encrypted backup. Foundation recommends writing down the backup code on this note-card and it is considered a safe procedure because physical access to the microSD card is required. Consider storing the note-card and the microSD card in separate locations. Select the
>arrow. - For a more in-depth article on encrypted backups, check out this resource.
- Your backup code will be displayed. Copy this down on your note-card. Double check your work then select the check-mark.
- Passport will ask that you confirm your backup code was written down correctly by having you re-enter it. Select the check mark.
- Enter your code in the blank spaces using the numeric key pad.
- Once entered, select the check mark.
- You should receive confirmation that your backup code was entered correctly. If not, try again.
- If you haven't done so already, insert your included microSD card into the Passport. It never hurts to look at the microSD card on a desktop file explorer to ensure it is empty first. The Passport will alert you to insert the microSD card if you have not already done so.
- Select the cycle symbol if necessary and then the Passport will write the backup to the microSD card.
- Then you will receive a notification that the backup is complete.
Now you have an encrypted backup of your seed phrase to keep safe and secure in case you need to recover your wallet on another Passport in the future. Ensure you keep the backup code safe and secure as well because it is required to decrypt your backup. The encrypted backup also includes all device settings, accounts, account labels, etc. You can see all the details here. Storing the microSD card and the backup code in the same location kind of defeats the purpose since if they are found then an adversary could steal your bitcoin. If you want to save a plain text copy of your seed phrase so that you have the option to recover your wallet using the BIP39 word entry on a number of other wallets, you can fill these in on the included note-card as well. From the Passport home screen, navigate to the left for the Settings menu. Then navigate to Advanced > View Seed Words, and then acknowledge the warning prompt that you are about to display sensitive information.
Connecting to Envoy
Having your Passport connected to your Envoy app enables you to retrieve the latest firmware, watch your account balances, connect to your own instance of an Electrum server, communicate over Tor, and more. Your private key information never leaves the Passport, only the public information is shared with the Envoy app so that it can calculate receive addresses and monitor balances.
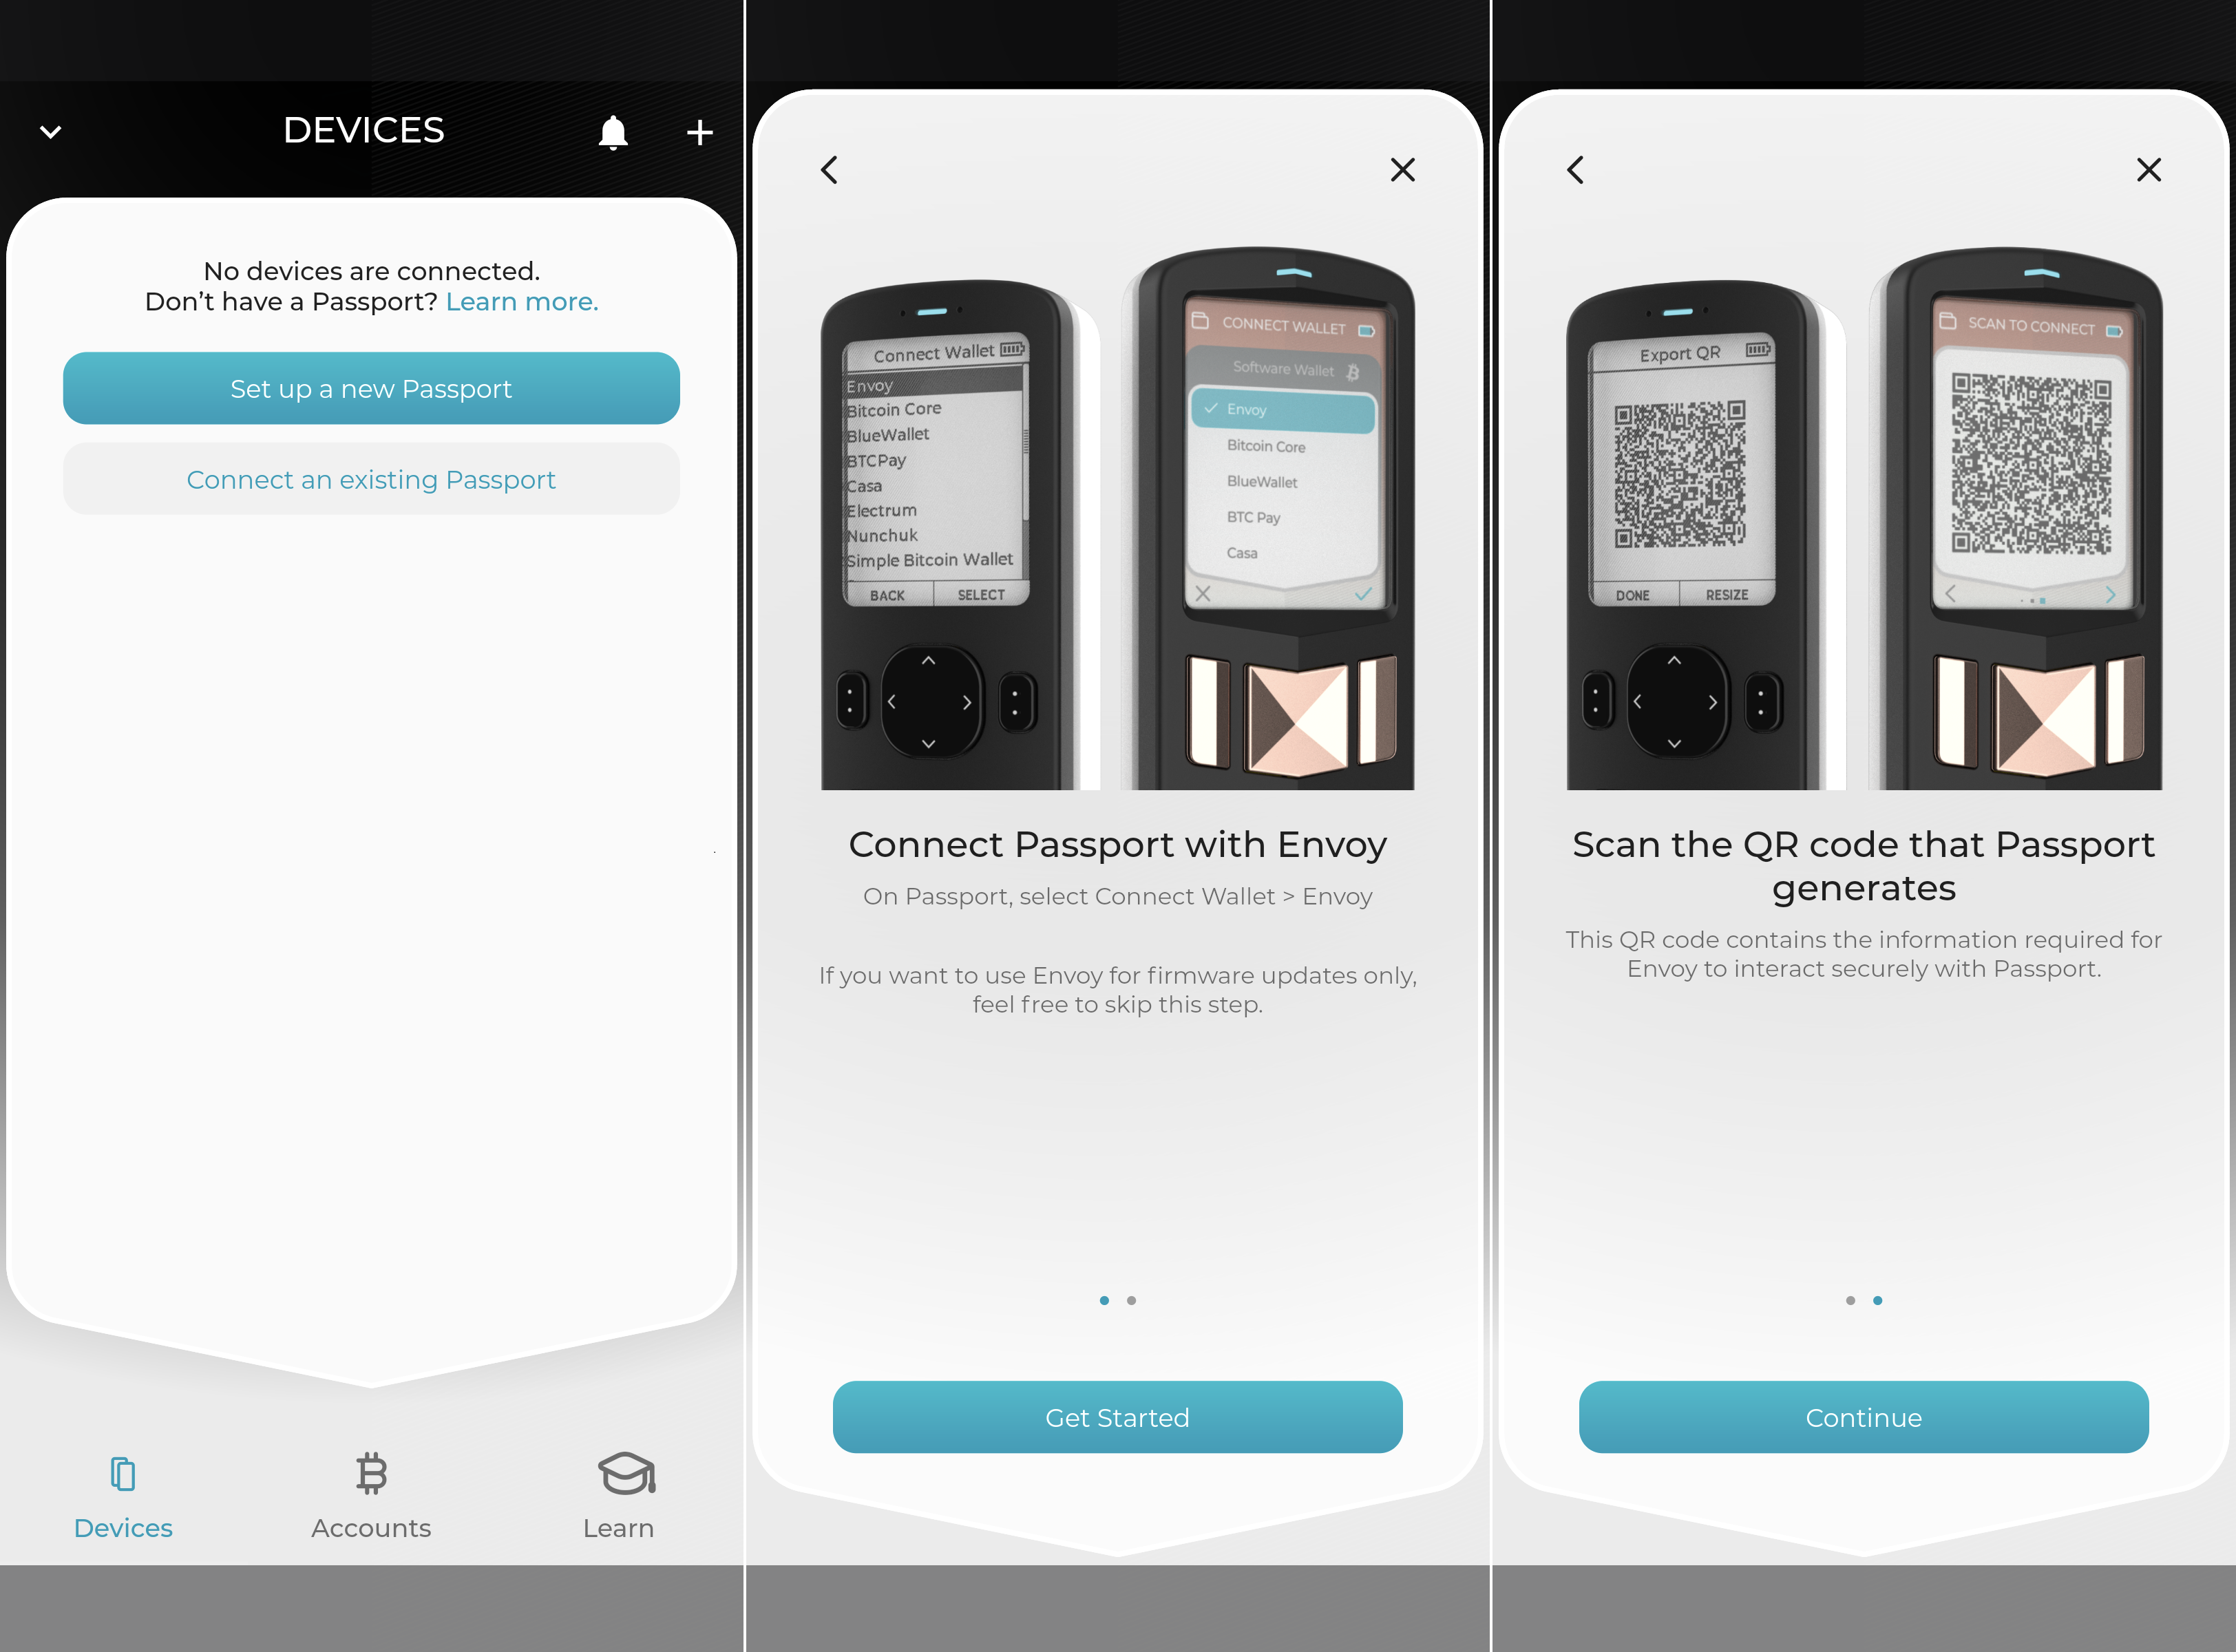
- On your mobile device, in the Envoy app, select
Connect an existing Passport. - On the next screen, select
Get Started. - On the next screen, select
Continueand then your mobile device's camera should be initiated.
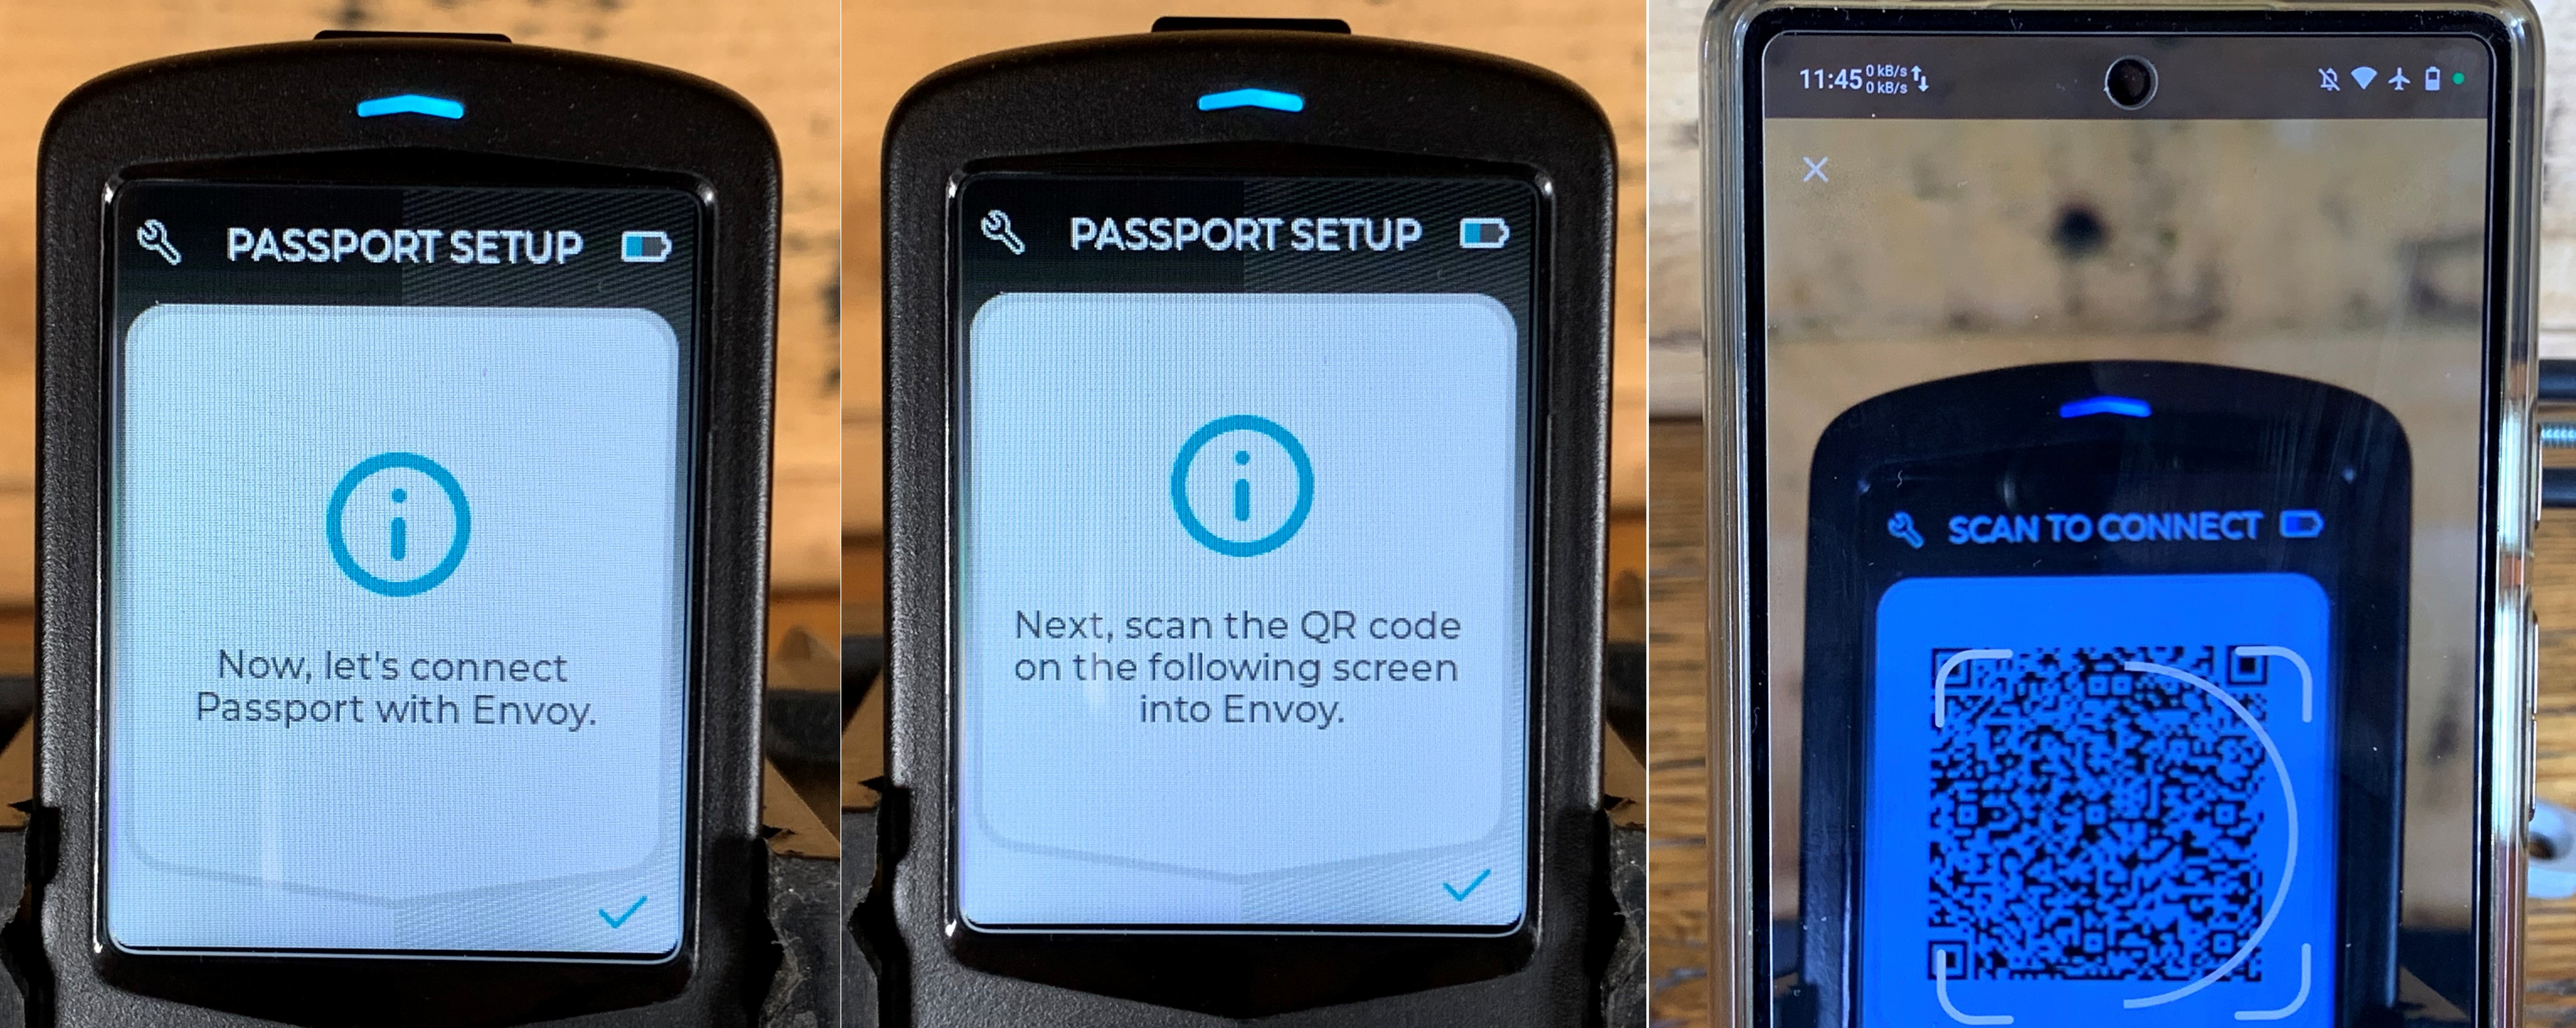
- On the Passport, you should be at the prompt that says
Now, let's connect Passport with Envoyafter saving your backup. Select the check mark. - On the next screen, select the check-mark to generate the QR code.
- Then scan the QR code using your mobile device.
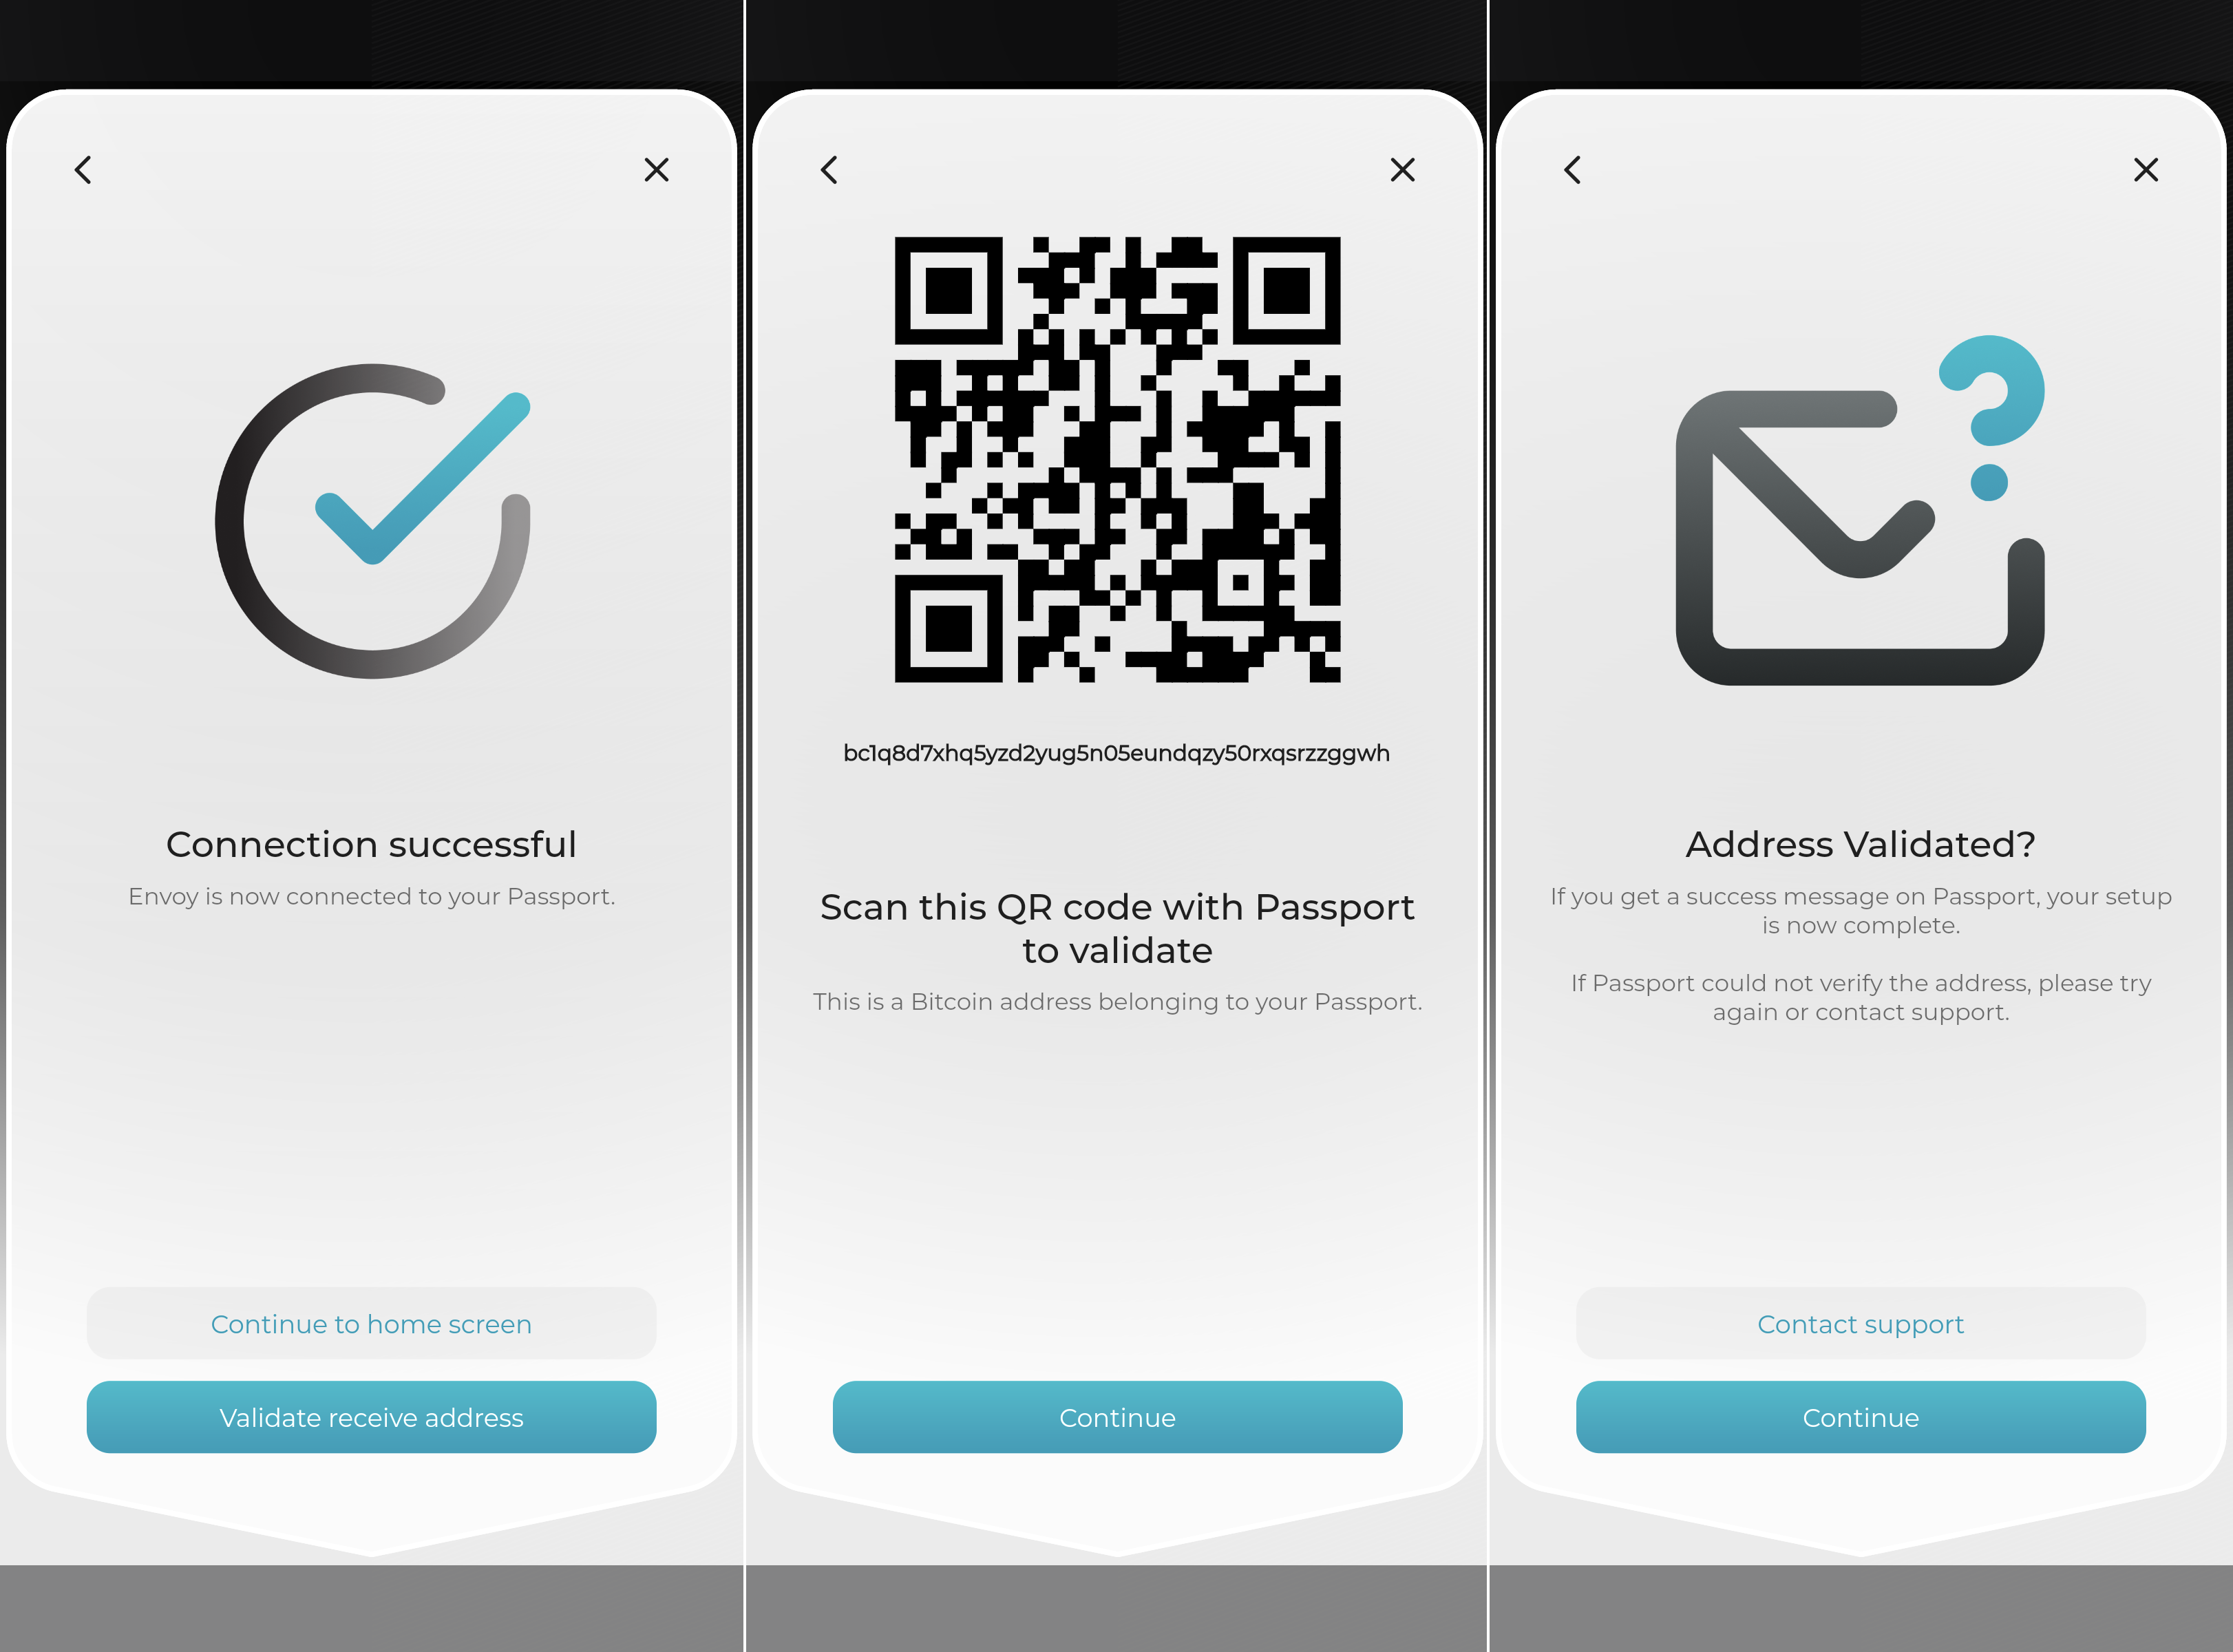
- In the Envoy app, you should receive a confirmation that the connection was made successfully. Select
Validate receive address. - Then the Envoy app will display the first Bitcoin receive address so that you can confirm everything worked. Once scanned with the Passport and confirmed, select
Continue. - When finished with the steps below on the Passport, you can select
Continuein the Envoy app to confirm the address is valid and return to the home screen.
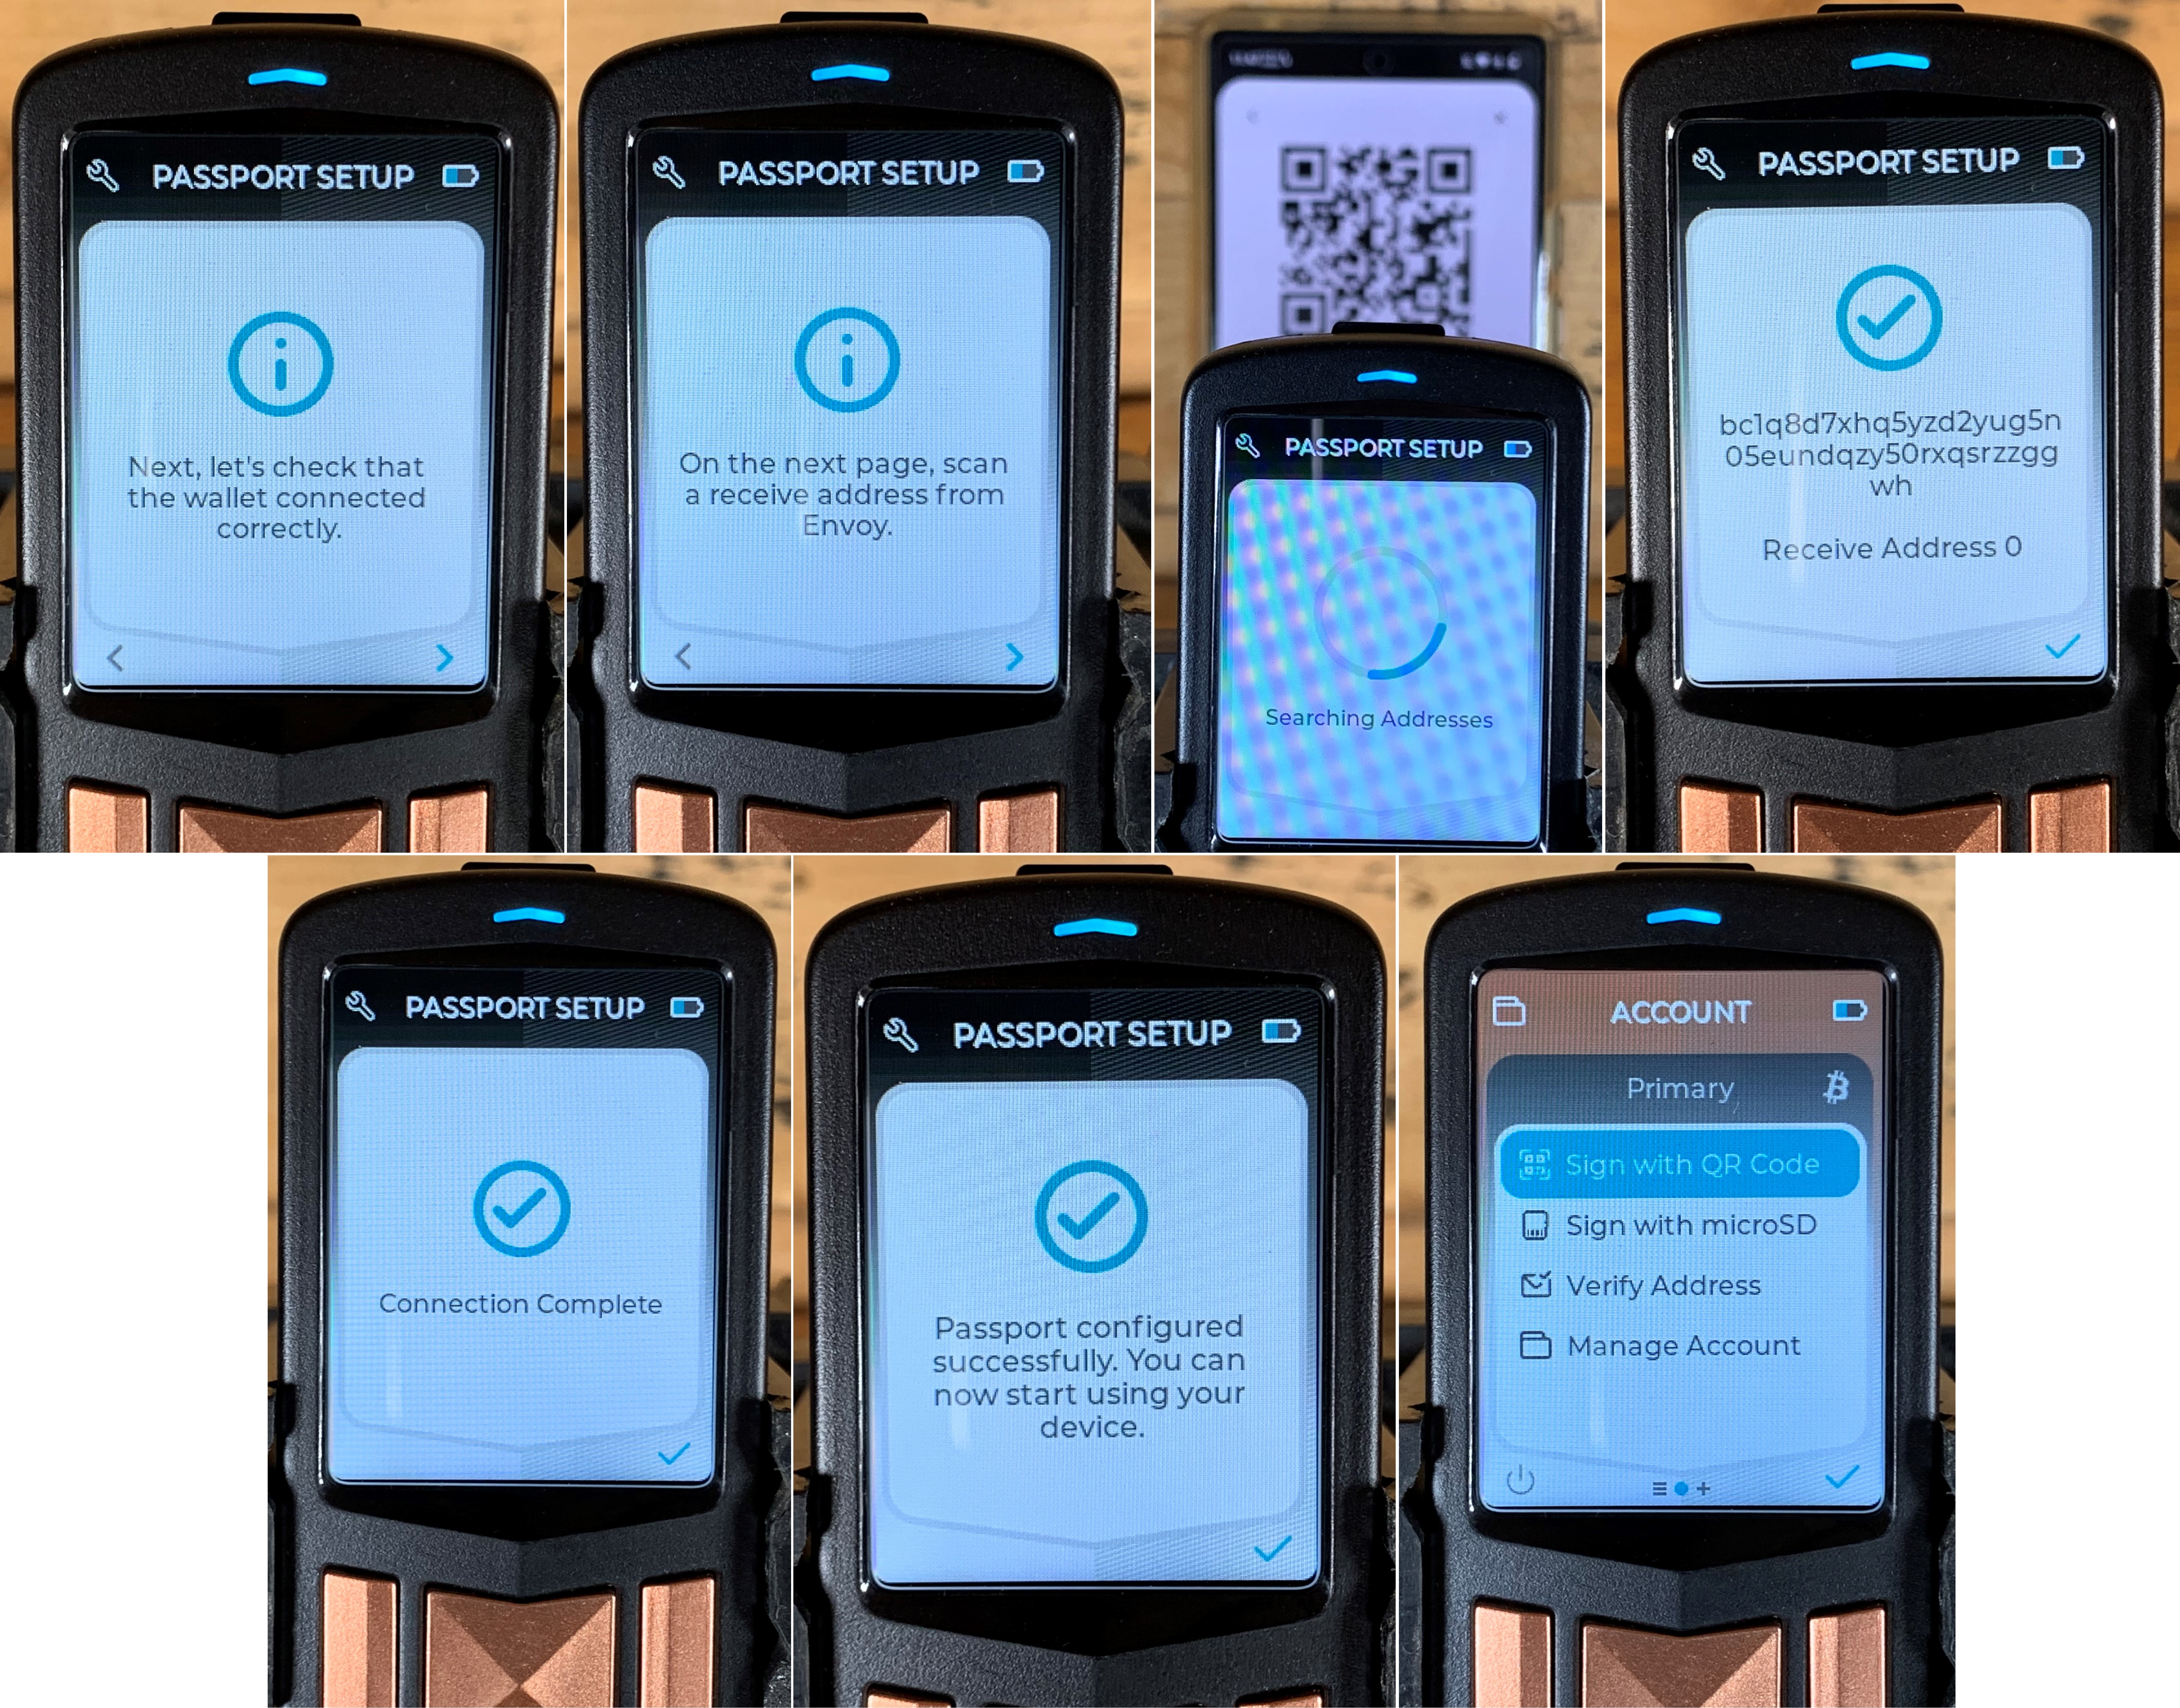
- On the Passport, select the
>arrow to continue. - On the next screen, select the
>arrow to display the receive address. - Using the Passport, scan the address QR code displayed on your mobile device.
- The Passport will search for the address and check if it is one that belongs to your seed. You should receive the large check mark symbol indicating that this is an address belonging to you. Select the small check mark.
- This completes the connection. Select the check mark.
- Next you will receive a notification that the Passport has been configured successfully. Select the check mark to be brought to the home screen.
Firmware
Keeping the firmware up to date ensures that your Passport has the latest bug fixes, improvements, features, and security patches. However, updating the firmware is not mandatory, your Passport will still work but just won't have any updates. There are a few different ways to get the latest firmware, from the Foundation website, from their GitHub repo, or from the Envoy app. This guide will demonstrate the Envoy app method. As a security precaution, the Passport will only install firmware signed by 2 out of 4 possible Foundation developer keys. Whichever method you choose, you will be saving the firmware file to the microSD card and loading the update onto your Passport from there. This helps keep the device air-gapped.
Make sure you have your microSD card and included adaptor ready to plug into your mobile device. Also, you can always double check which firmware version your Passport has currently installed when you power the device on, it will show the firmware version number at the bottom of the screen during boot up.
- Insert the microSD card into the appropriate adaptor for your mobile device.
- Insert the adaptor into your mobile device.
- A blue light should start flashing on the adaptor.
- Open the Envoy app, you should see the latest firmware version number in the lower right-hand corner of the Passport card on the home screen. Press that firmware version number.
- On the next screen, press
Continueto confirm you want to update the firmware. - On the next screen press
Continueto confirm you have connected the microSD card. - Then Envoy will ask you where you would like to save the firmware. Navigate to the microSD card folder location.
- Then press
Save. Be sure to give your Android device a moment to finish writing to the microSD card. If you have issues with the firmware file not being written in it's entirety, delete the damaged file from the microSD card, save the firmware file again, then after pressingSavemanually eject the microSD card from the notifications drop-down to force Android to flush to disk. - That should save the firmware file to your microSD card and bring you back to the Envoy app. Press
Finishedto return to the home page.
- Next, power on your Passport. Enter your PIN to unlock it.
- Insert the microSD card.
- Navigate to the settings page and scroll down to
Firmware. - On the next screen, select
Update Firmware. - On the next screen, scroll down to the firmware
.binfile and select the check mark. - Passport Batch 2 will ask you to confirm you want to install the firmware update and display the version number. Confirm by selecting the check mark.
- Passport Batch 2 will cycle through the update and then reboot itself.
This completes the initial set up for your Passport. From here, there are a number of features and configurations you can make that suit your unique needs best. The following section will compare the differences between Passport Founders Edition and Passport Batch 2. Then the final section will demonstrate a select advanced feature.