Passport and Whirlpool
Whirlpool is a zero-link CoinJoin implementation supported by Samourai Wallet on Android mobile devices and by Sparrow Wallet on Linux, Mac, & Windows desktops. Zero-link CoinJoin means that there are no deterministic links between the inputs and outputs of the CoinJoin transaction. Because multiple entities are involved with each CoinJoin, there cannot be any certainty as to which entity owns which transaction output. CoinJoins can be used as a technique to gain anonymity on a public blockchain, putting the decision to selectively reveal details about yourself back in your hands thus giving you a layer of privacy separating your real-world identity from the transactions on a public ledger.
Passport supports Whirlpool accounts and this section will demonstrate how to setup and use this feature on Bitcoin Testnet. All the steps are the same for Bitcoin Mainnet. There will be two wallets used in this demonstration; the first is Sparrow Wallet acting as the hot wallet which is the wallet where the CoinJoin transactions will originate from, the second is Passport acting as the cold wallet where the outputs from the hot wallet CoinJoins will be deposited.
Using this technique offers a couple benefits. First, each deposit to the Passport will look like every other CoinJoin output to external observers on-chain and therefore no one except for you will know those UTXOs are now in cold storage. So as other CoinJoin participants continue mixing the other UTXOs from your CoinJoin transactions, the forward-looking anonymity set of your UTXOs in cold storage continues to grow. Another benefit is that the Whirlpool account on Passport was designed in such a way that you can import it to a hot wallet at anytime in the future and continue mixing those UTXOs as free-riders in Whirlpool thus saving yourself from paying the coordinator fees a second time. Additionally, you won't pay any additional miners fees when importing this account to a hot wallet in the future as opposed to sweeping UTXOs. Understand though that importing the Whirlpool account to a hot wallet exposes the seed to an internet connected device and therefore it is recommended to use a separate seed on your Passport for any accounts you plan on doing this with.
Hot Wallet
This guide assumes you have already installed Sparrow Wallet on your preferred desktop. If you haven't done so already, navigate to the Sparrow Download page for detailed instructions. Consider your options for connecting to a public node, your own Bitcoin Core node, or your own private Electrum server carefully.
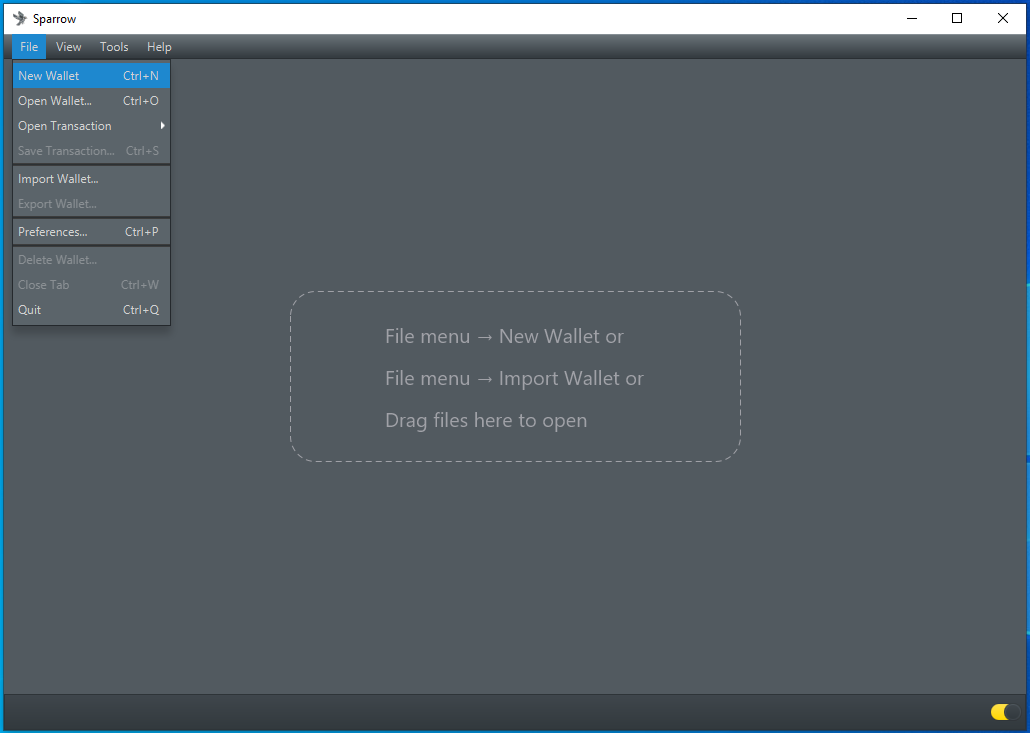
Once you have your Sparrow Wallet application installed, open it and navigate to File > New Wallet:
Then name your new wallet and click on Create Wallet:

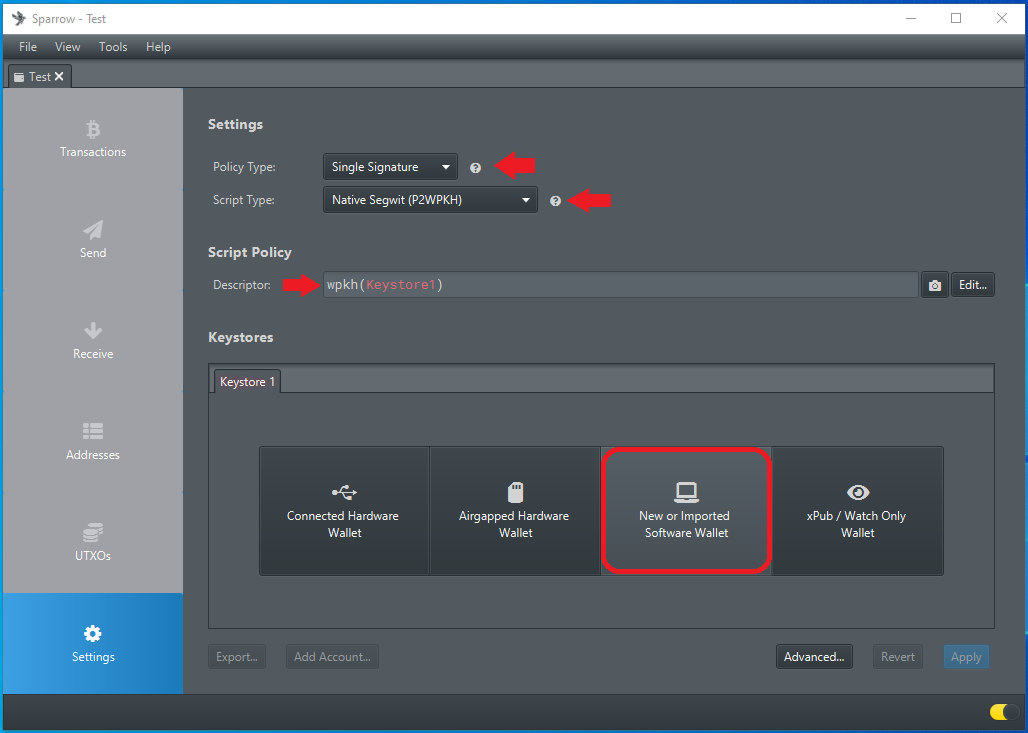
Next you will have the opportunity to adjust a few settings. Unless you have a good reason to change these settings and you know exactly what you are doing then it is probably a good idea to just leave the Policy Type and Script Type and Script Policy Descriptor in their defaults as demonstrated here. Then click on New or Imported Software Wallet:
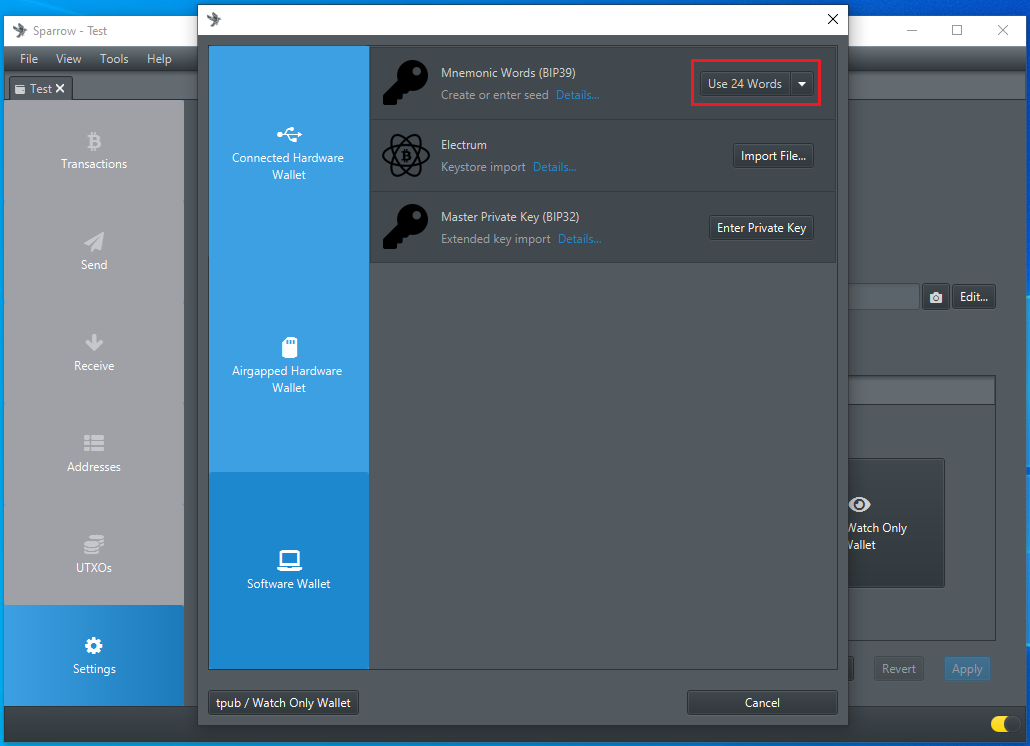
A window will pop-up, click on the drop down menu in the upper right-hand corner to select the number of words you want to use for your hot wallet's seed phrase (also known as mnemonic phrase):
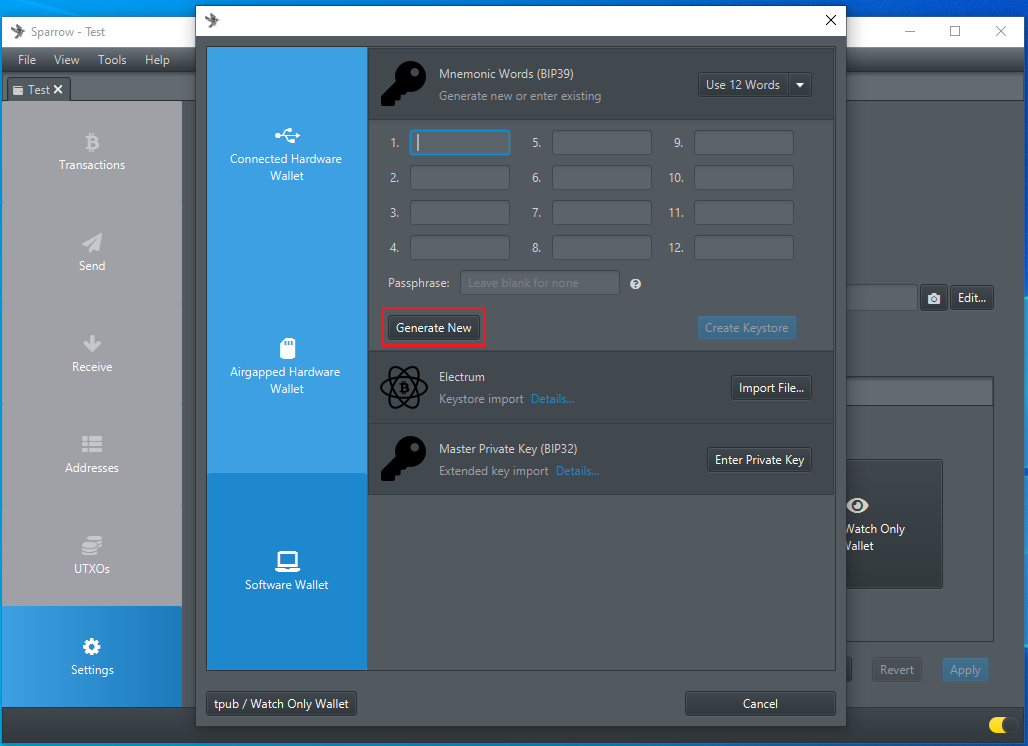
A 12-word seed phrase was chosen for this demonstration. Once you have made your selection, the corresponding number of blank boxes will appear in the pop-up window. Click on Generate New and Sparrow Wallet will generate a random seed phrase:
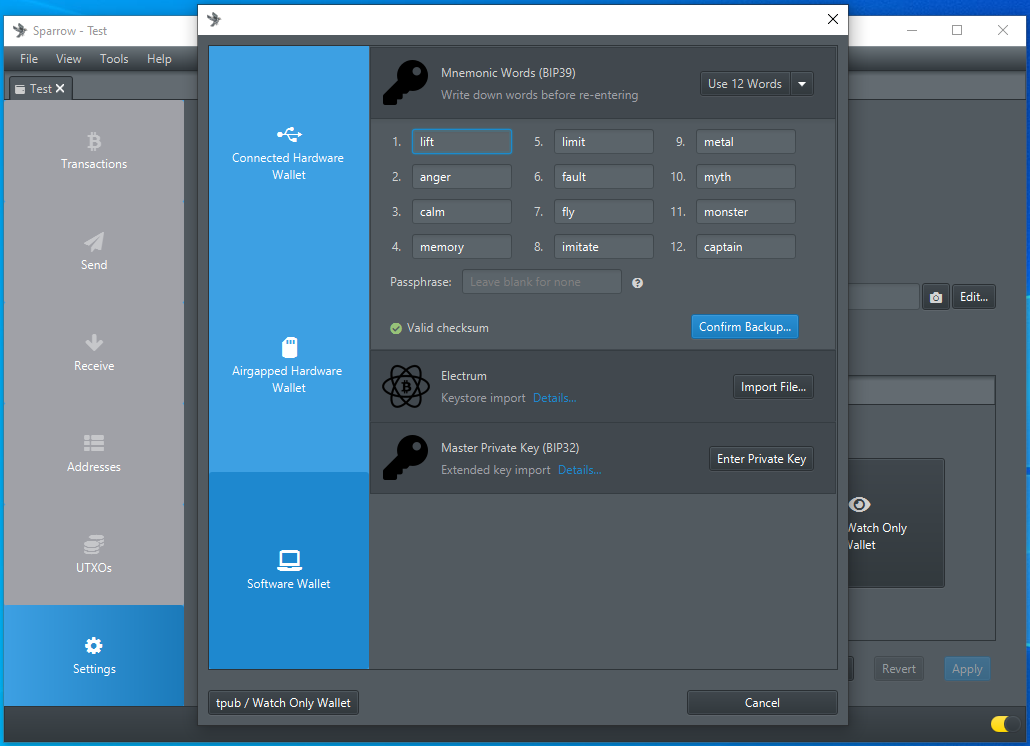
You can add a passphrase or leave that field blank. This is kind of like having a 13th or 25th word added to your seed phrase that only you know. There is no way to recover a lost or forgotten passphrase and this will be necessary to access your bitcoin going forward if you decide to use it. Make sure to write down your seed phrase words in order and keep them safe. Also write down your passphrase if you decided to use one. Consider keeping your seed phrase and passphrase separate from each other to help prevent loss of funds in the event your secrets are discovered. Writing this information down in a notebook or stamping it into metal to protect it against environmental hazards are common ways Bitcoiners keep their backups safe and secure. Anyone who gains access to this information will be able to steal your bitcoin, so make sure you keep it safe. Double checking your back information is a good way to ensure you have copied it all down correctly.
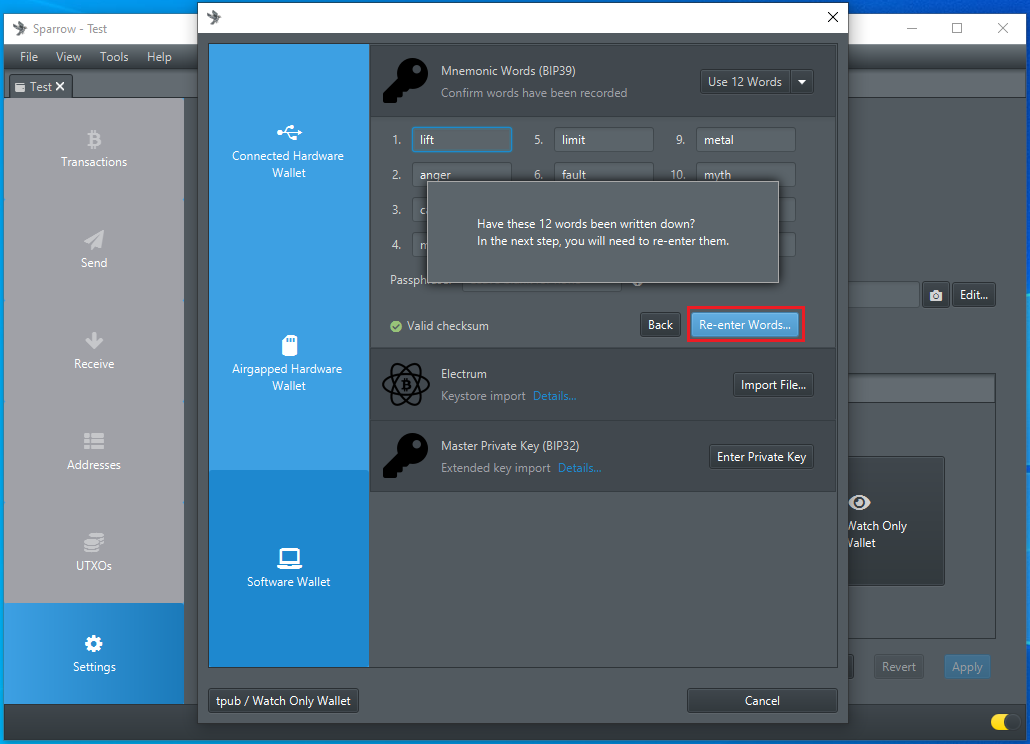
Once you are ready, click on Confirm Backup..., then you will be asked if you have written this information down. When you click on Re-enter Words... you will then prove you have written your seed phrase down correctly by entering the words in order.
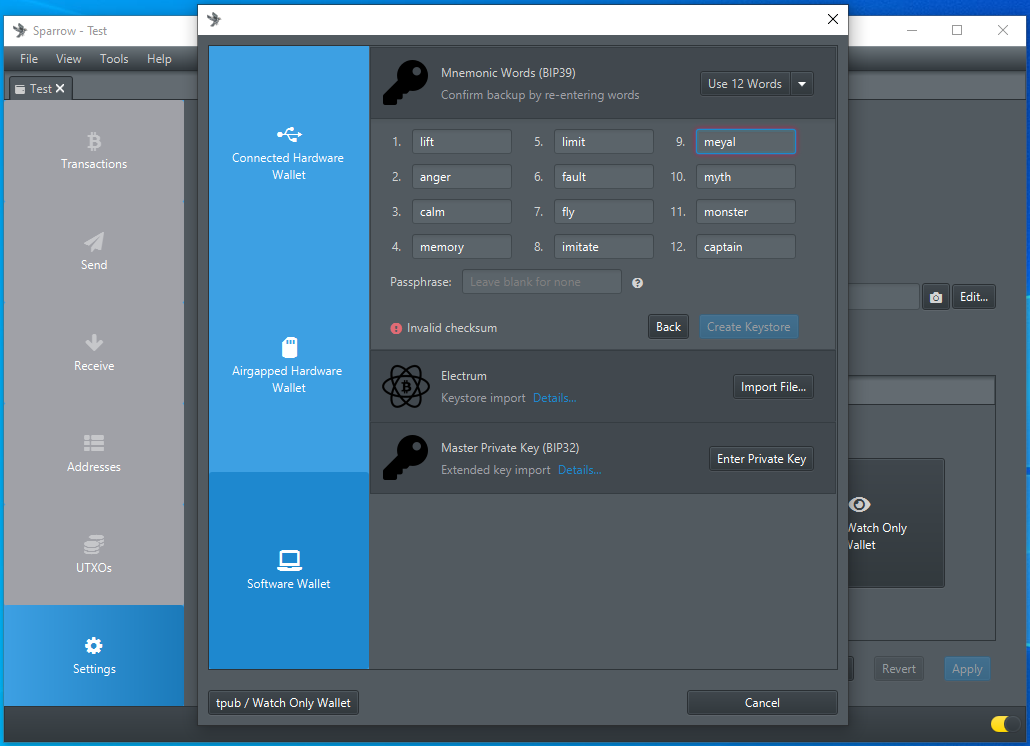
If you make a spelling mistake while entering your words, the dialog box will turn red to get your attention, for example, word #9 below should be "metal":
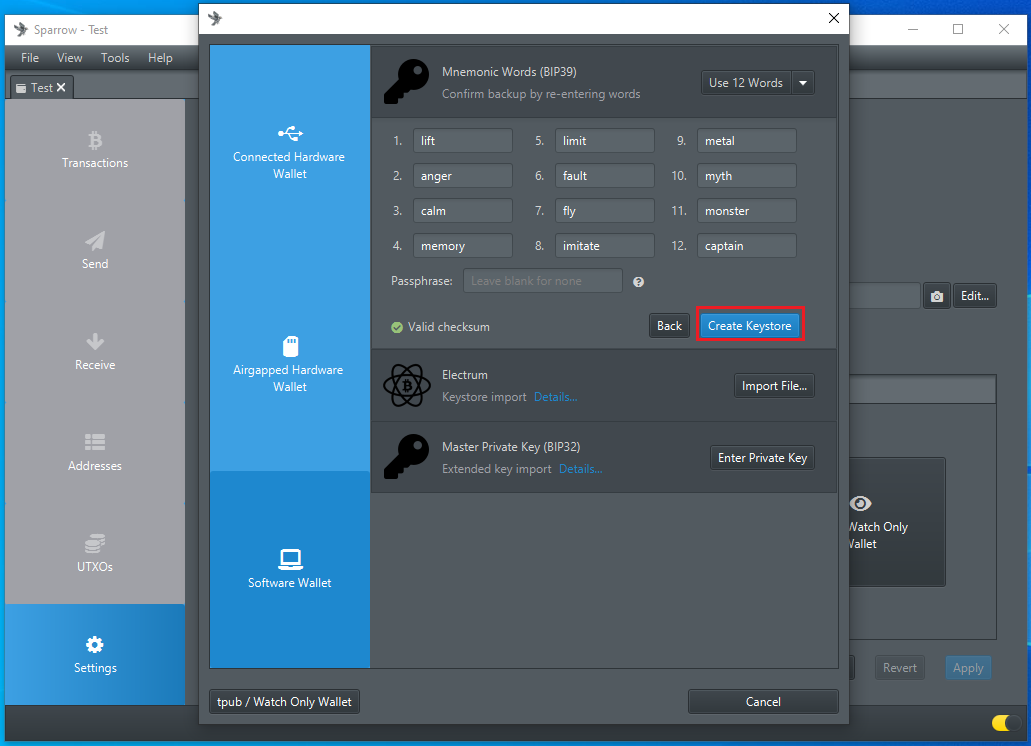
Once everything looks good and you see the green check mark indicating a valid checksum, then click on Create Keystore:
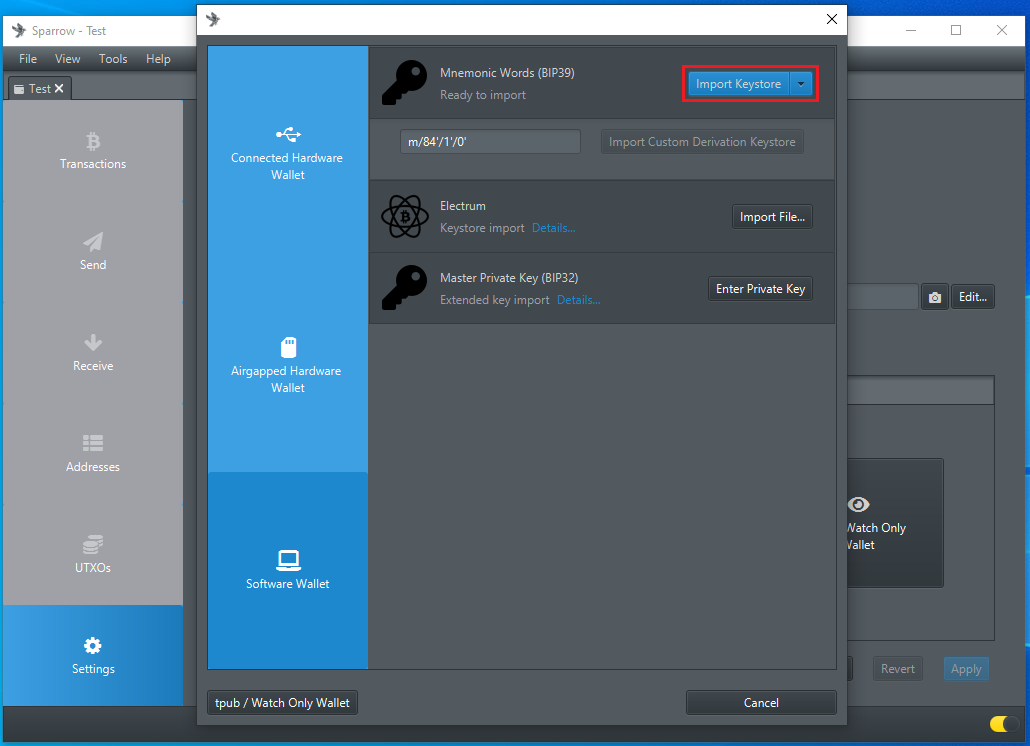
Then click on Import Keystore in the upper right-hand corner:
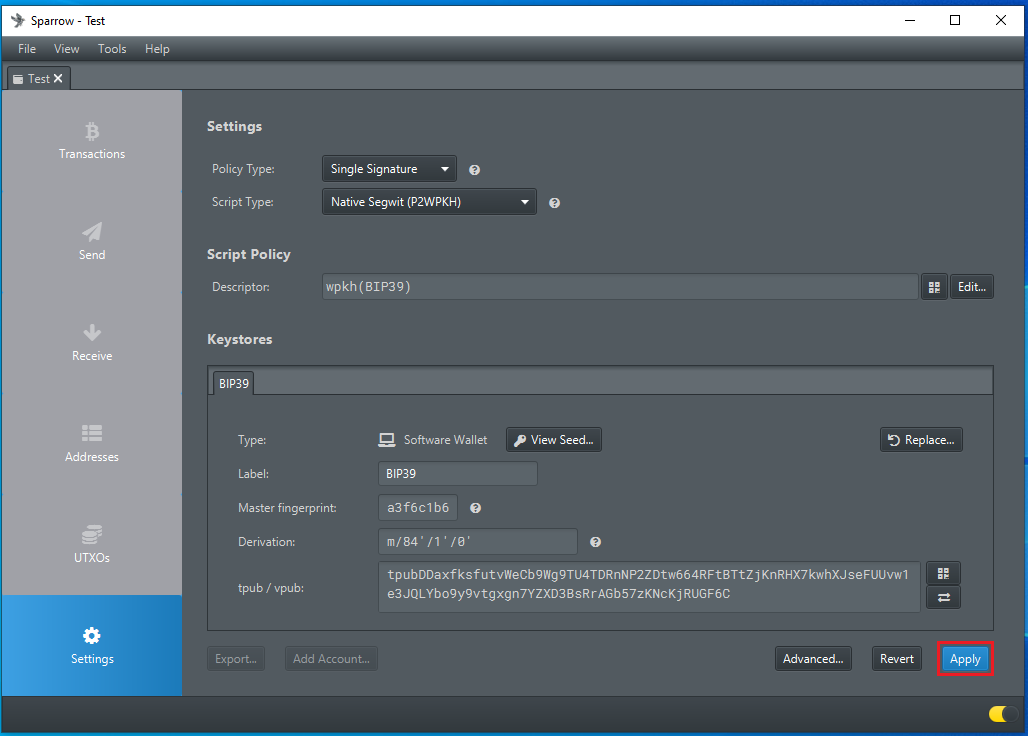
Then you will be presented with a summary of your new wallet's settings. If you used a passphrase, make sure you write down the Master Finger print along with your passphrase so you can confirm you entered it correctly in the future. If everything looks good then click on Apply.
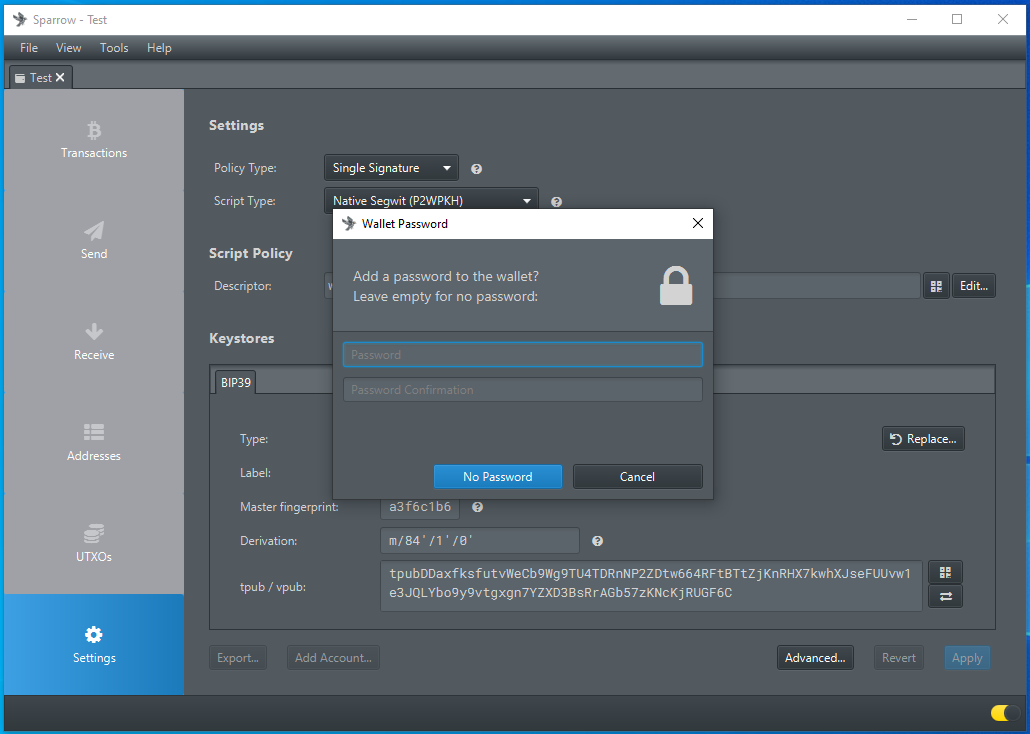
You will then be asked if you want to add a password. This password is optional but it will encrypt your wallet file so that if anyone gains access to your desktop computer and they attempt to open your wallet file, then they will need this password.
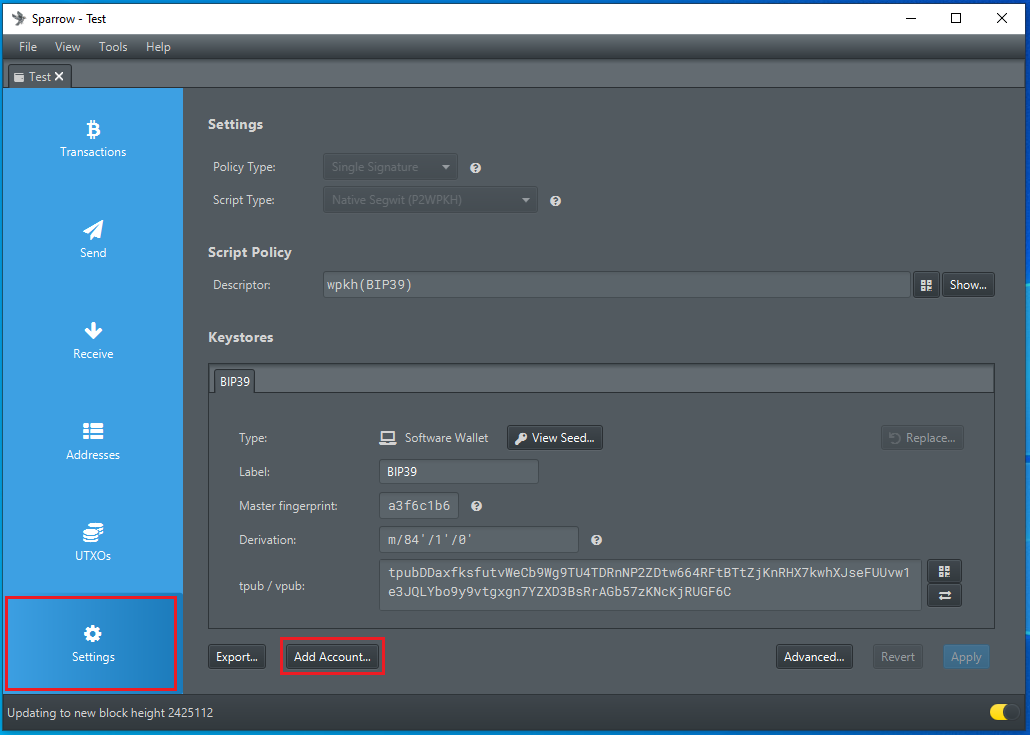
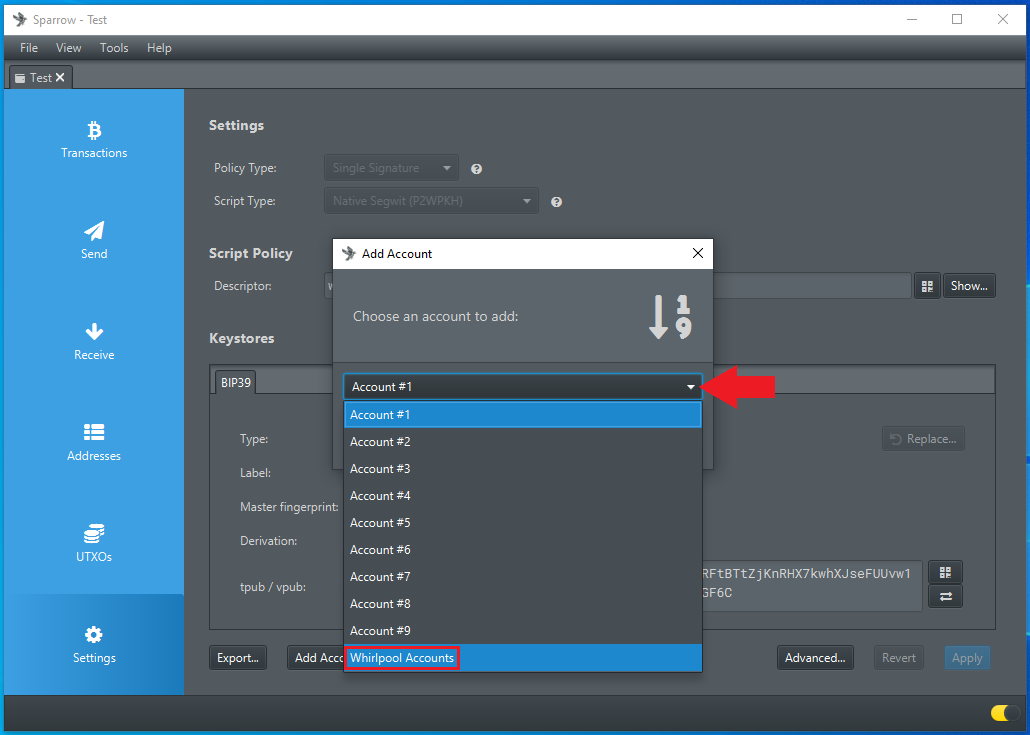
Now that you have your hot wallet created, the Whirlpool accounts will automatically be added once you initiate your first CoinJoin. Alternatively, you can initiate the Whirlpool accounts manually from the Settings tab where it says Add Account...:
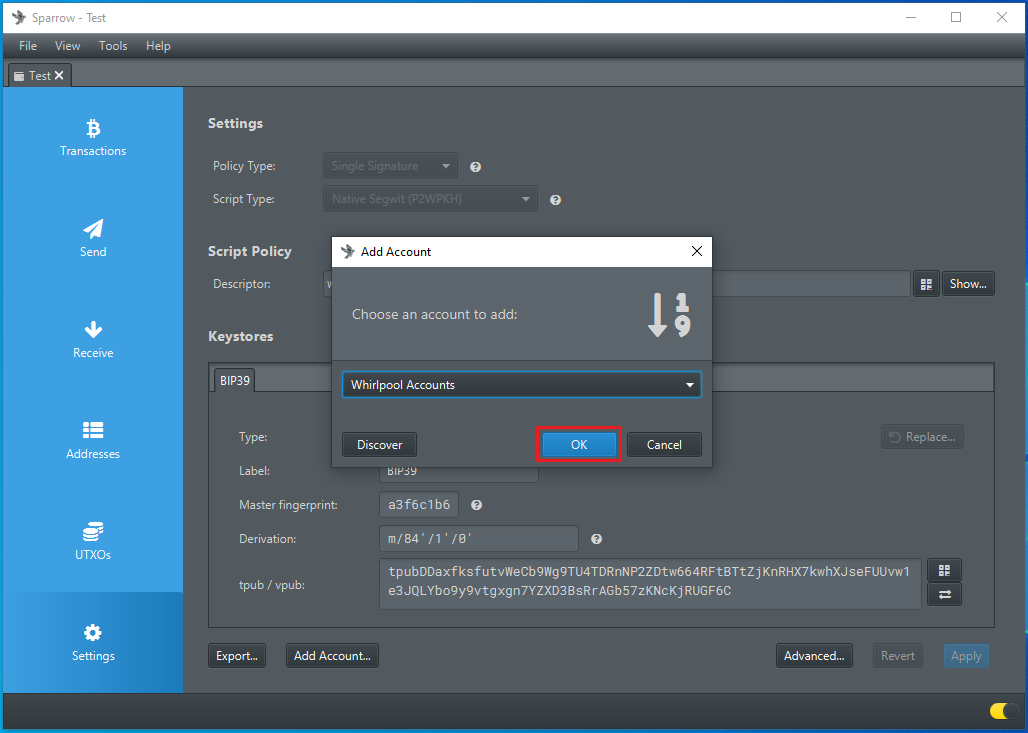
You will be presented with a list of accounts you can add; at the bottom of that list select Whirlpool Accounts:
Then select OK:
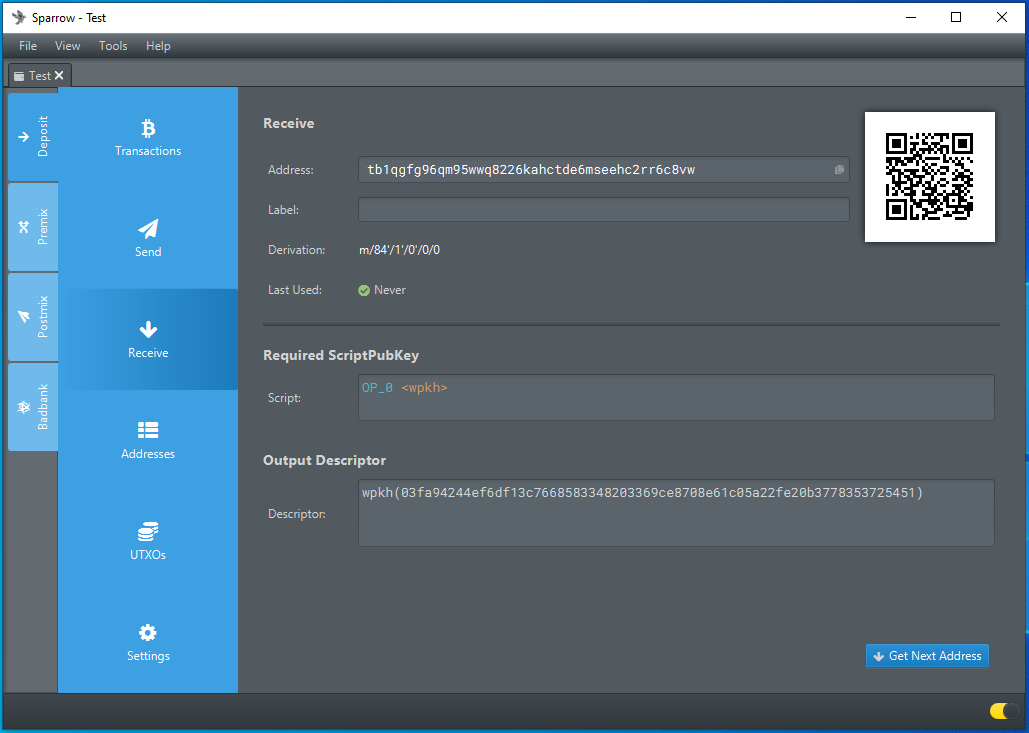
You will notice now that several tabs have appeared along the left-hand side of the user interface. These are the four accounts used to make Whirlpool work. The first one is the deposit account where you will want to send bitcoin that you want to CoinJoin. From the Deposit tab you can click on the Receive sub-tab to display a QR code for one of your receiving addresses and you can send bitcoin to it.
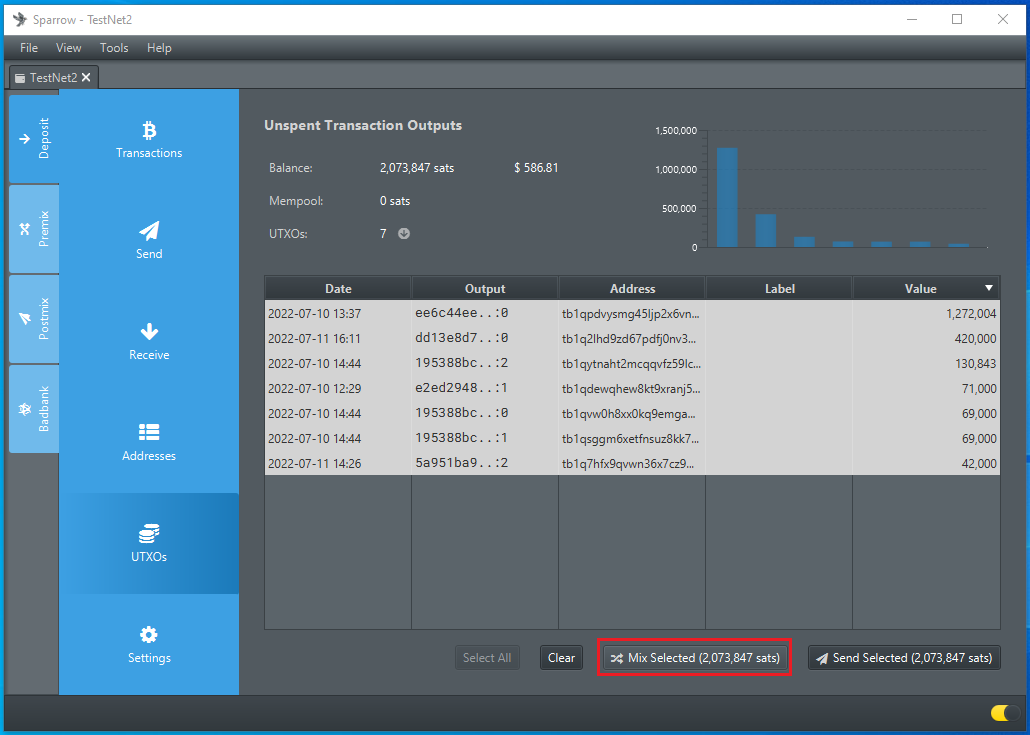
Once you have made one or more deposits to your hot wallet, you can click on the UTXOs sub-tab to see your available outputs. Select the ones you want to CoinJoin or use the Select All option to use them all. Just keep in mind that selecting all will link all of these UTXOs together on-chain in the next step prior to them being CoinJoined, if you don't want them linked on-chain then just mix one at a time.
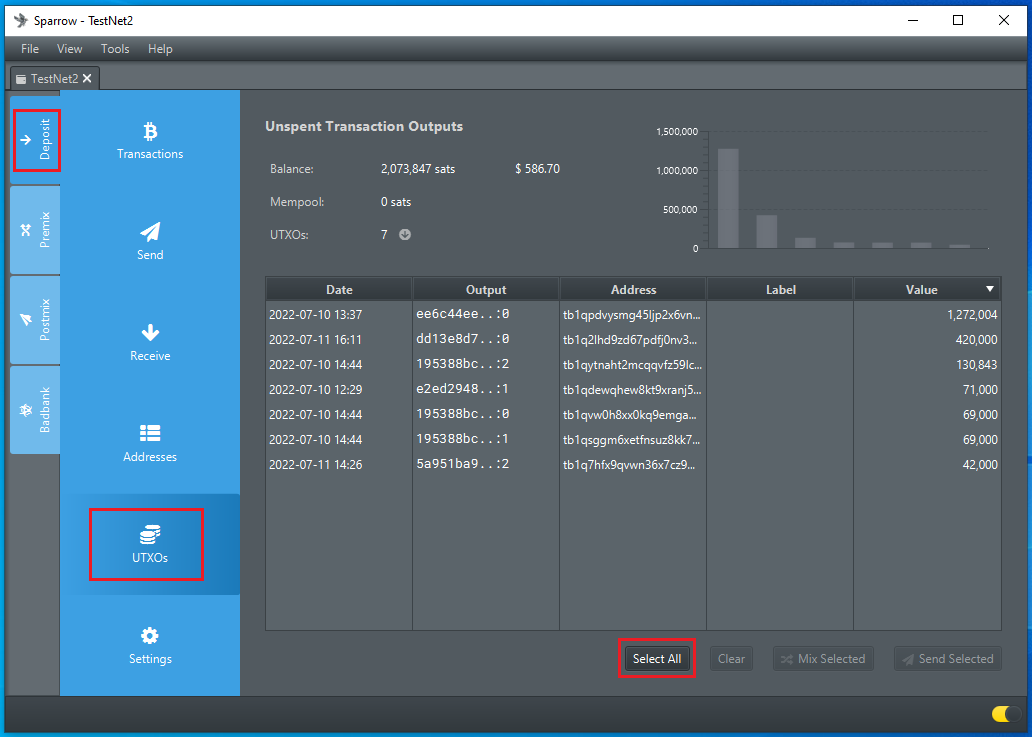
Once you have your selection made, click on Mix Selected:
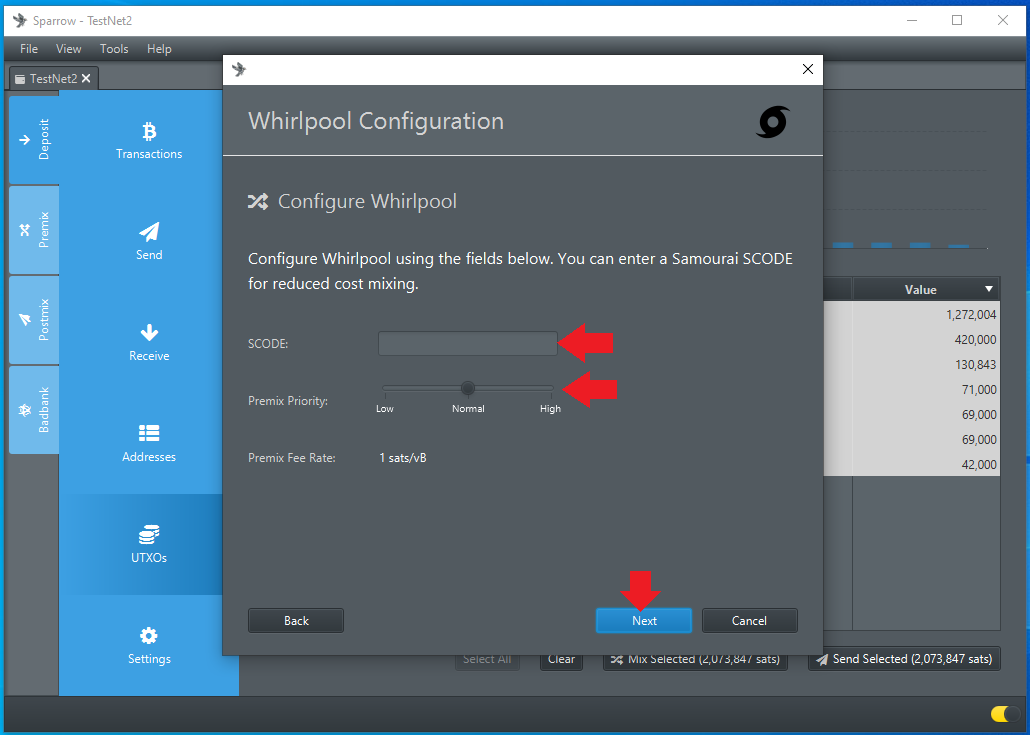
A window will pop-up and if you have an SCODE for reduced coordinator fees then you can enter it here. Then you can select your transaction priority or in other words the amount you are willing to spend on mining fees. Once you have these options set, click on Next:
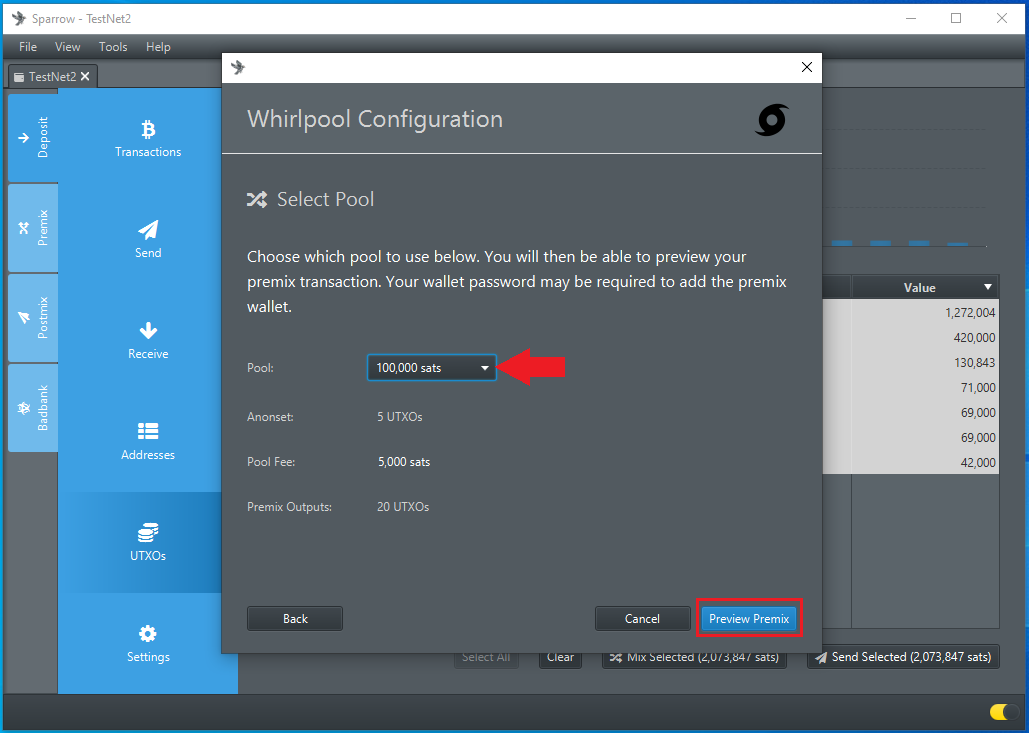
Then you can choose the pool size you want to join. There are four sizes to choose from, the 100,000 sat pool size was used in this demonstration which will create 20 UTXOs that are all 100,000 sats each. The coordinator fee for this is 5,000 sats. Click on Preview Premix once ready:
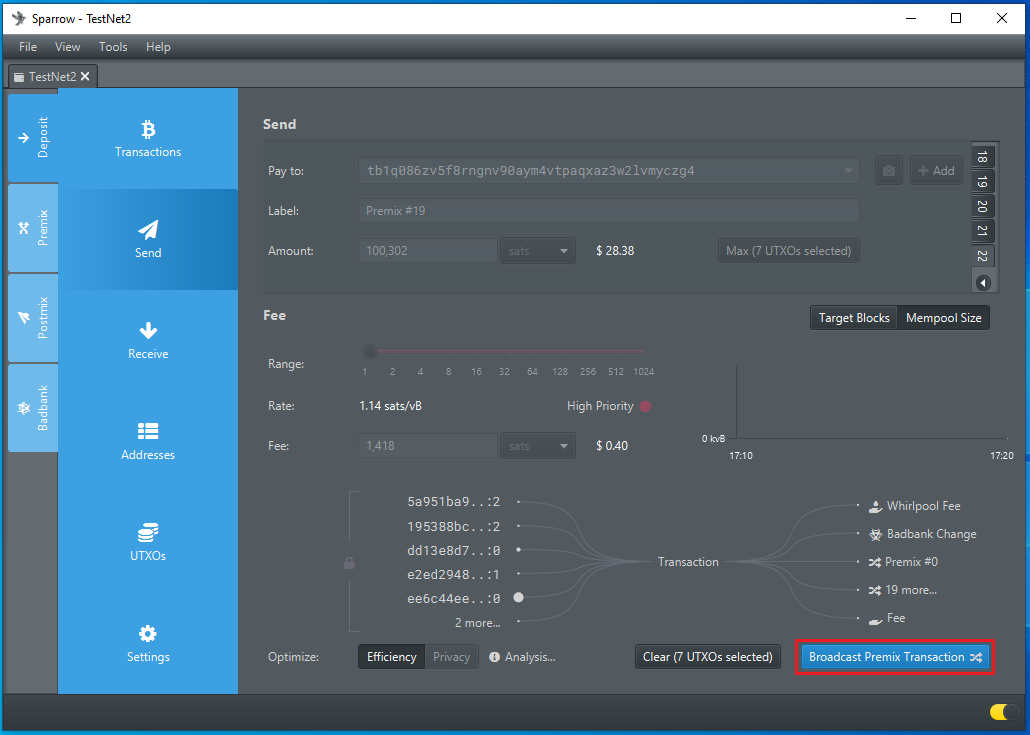
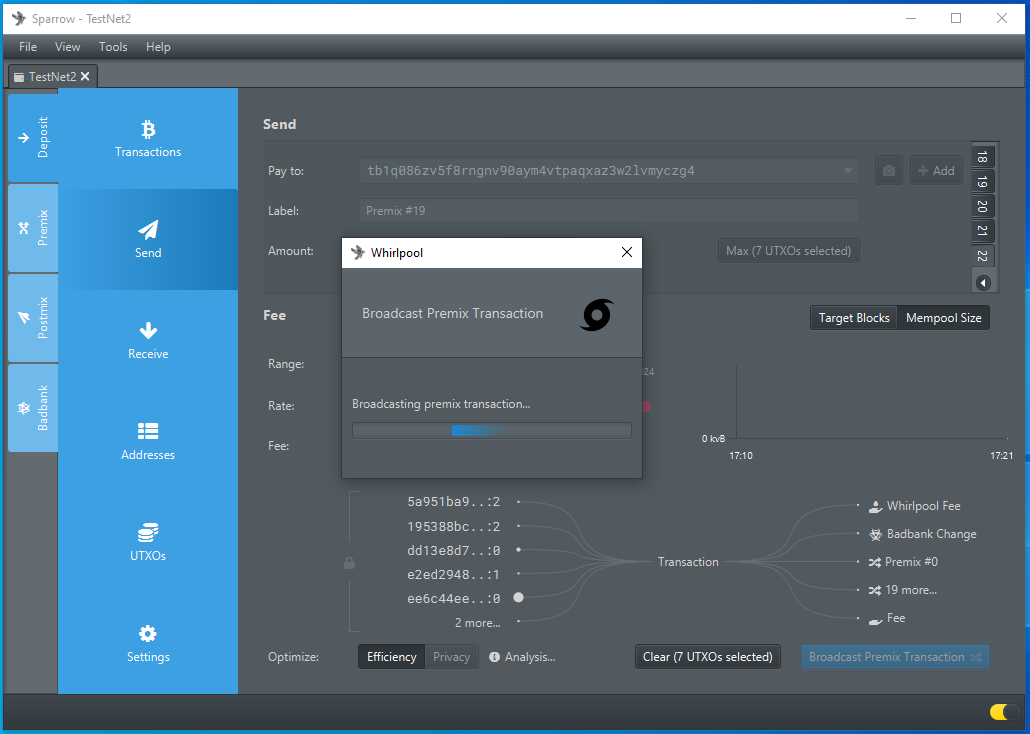
Then you will see a summary of the transaction you just constructed. This transaction is called "tx0", you will notice that all of the selected inputs of various sizes and from various addresses are consumed in this transaction and 20 like-sized outputs are created. These like-sized outputs from tx0 will be used as eligible inputs to Whirlpool CoinJoin transactions. There are three other outputs in a tx0 as well; the coordinator fee, the toxic change, and the miners fee. If everything looks good then click on Broadcast Premix Transaction:
Then your wallet will send your transaction to the Bitcoin network:
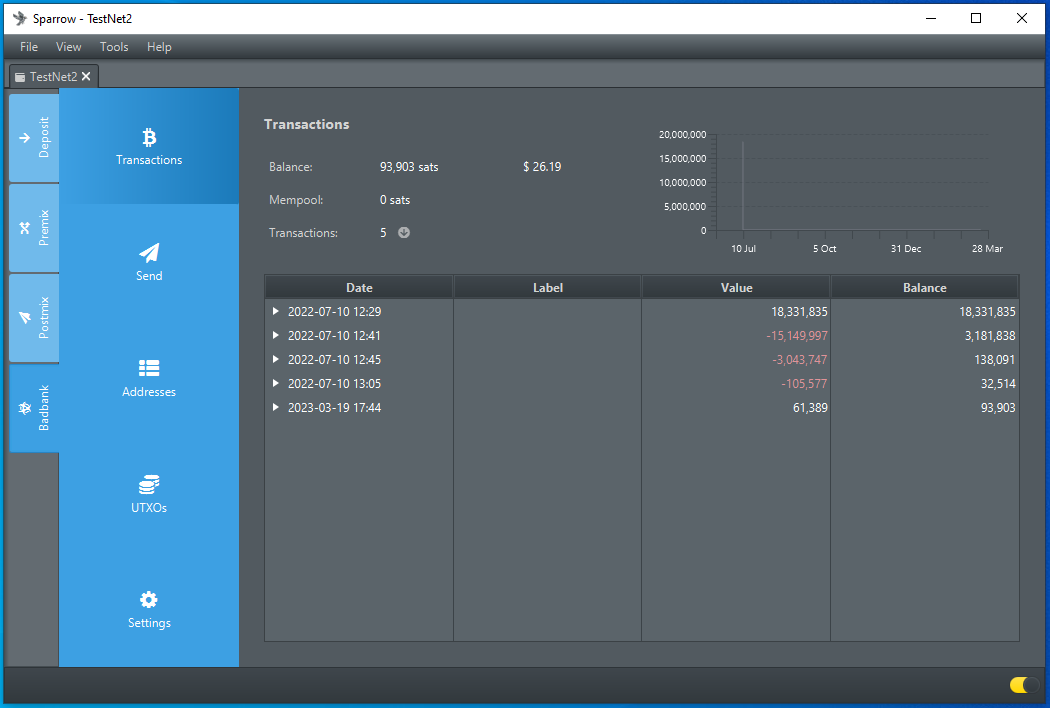
From the Deposit tab and the Transactions sub-tab, you will be able to see that the bitcoin you deposited to this account has been sent out:

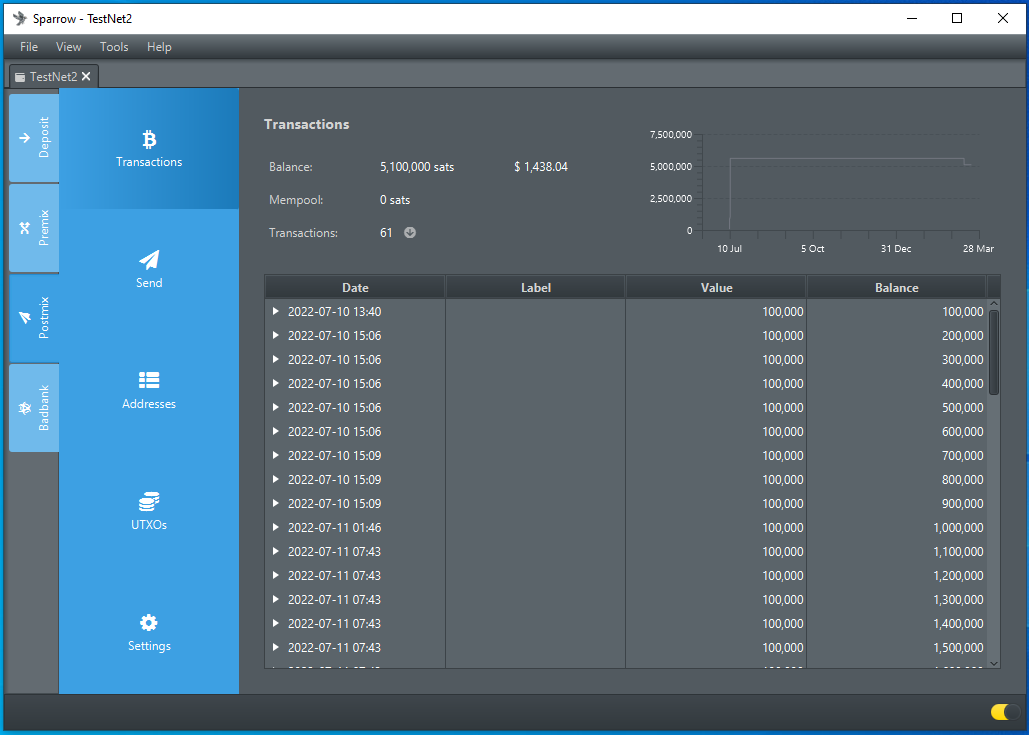
Then if you click on the Premix tab and the Transactions sub-tab you will see the bitcoin from your Deposit account is now in your Premix account:

So long as your wallet is connected to the internet then your available like-sized outputs in your Premix account will be registered as eligible inputs for the coordinator to use in CoinJoin rounds. As more participants add liquidity, more of your Premix outputs will be CoinJoined. After going through a CoinJoin round, each UTXO will appear in your Postmix account, which you can view from the Postmix tab and Transactions sub-tab. So long as you leave your wallet open and connected, the UTXOs in your Postmix account will remain available as eligible inputs to CoinJoin rounds as free-riders where they get mixed again and again with no added fees to you:
The Toxic Change from tx0 is sent to your Badbank account which you can view from the Badbank tab and transactions sub-tab. You want to be cautious about how you handle these outputs because they are linked on-chain to any inputs used in the related tx0 they came from. For example, don't send some Whirlpool outputs and some toxic change to the same address because that would undo the anonymity benefits gained by using Whirlpool.
Cold Wallet
Now that you have your hot wallet established and some bitcoin being CoinJoined in Whirlpool, you can set up the cold wallet extension on your Passport. This will be the account you are sending your CoinJoined outputs to for long term cold storage. Using a separate seed from your primary cold storage seed for this process is recommended. If you want to import it to a hot wallet at anytime in the future and continue mixing those UTXOs as free-riders it will expose the seed to an internet connected device.
- Power on your Passport and log into it.
- From the main menu navigate to
Extensions. - Then toggle on
Postmix. - With the right arrow control, navigate over to the newly added Postmix account and scroll down to
Connect Wallet.
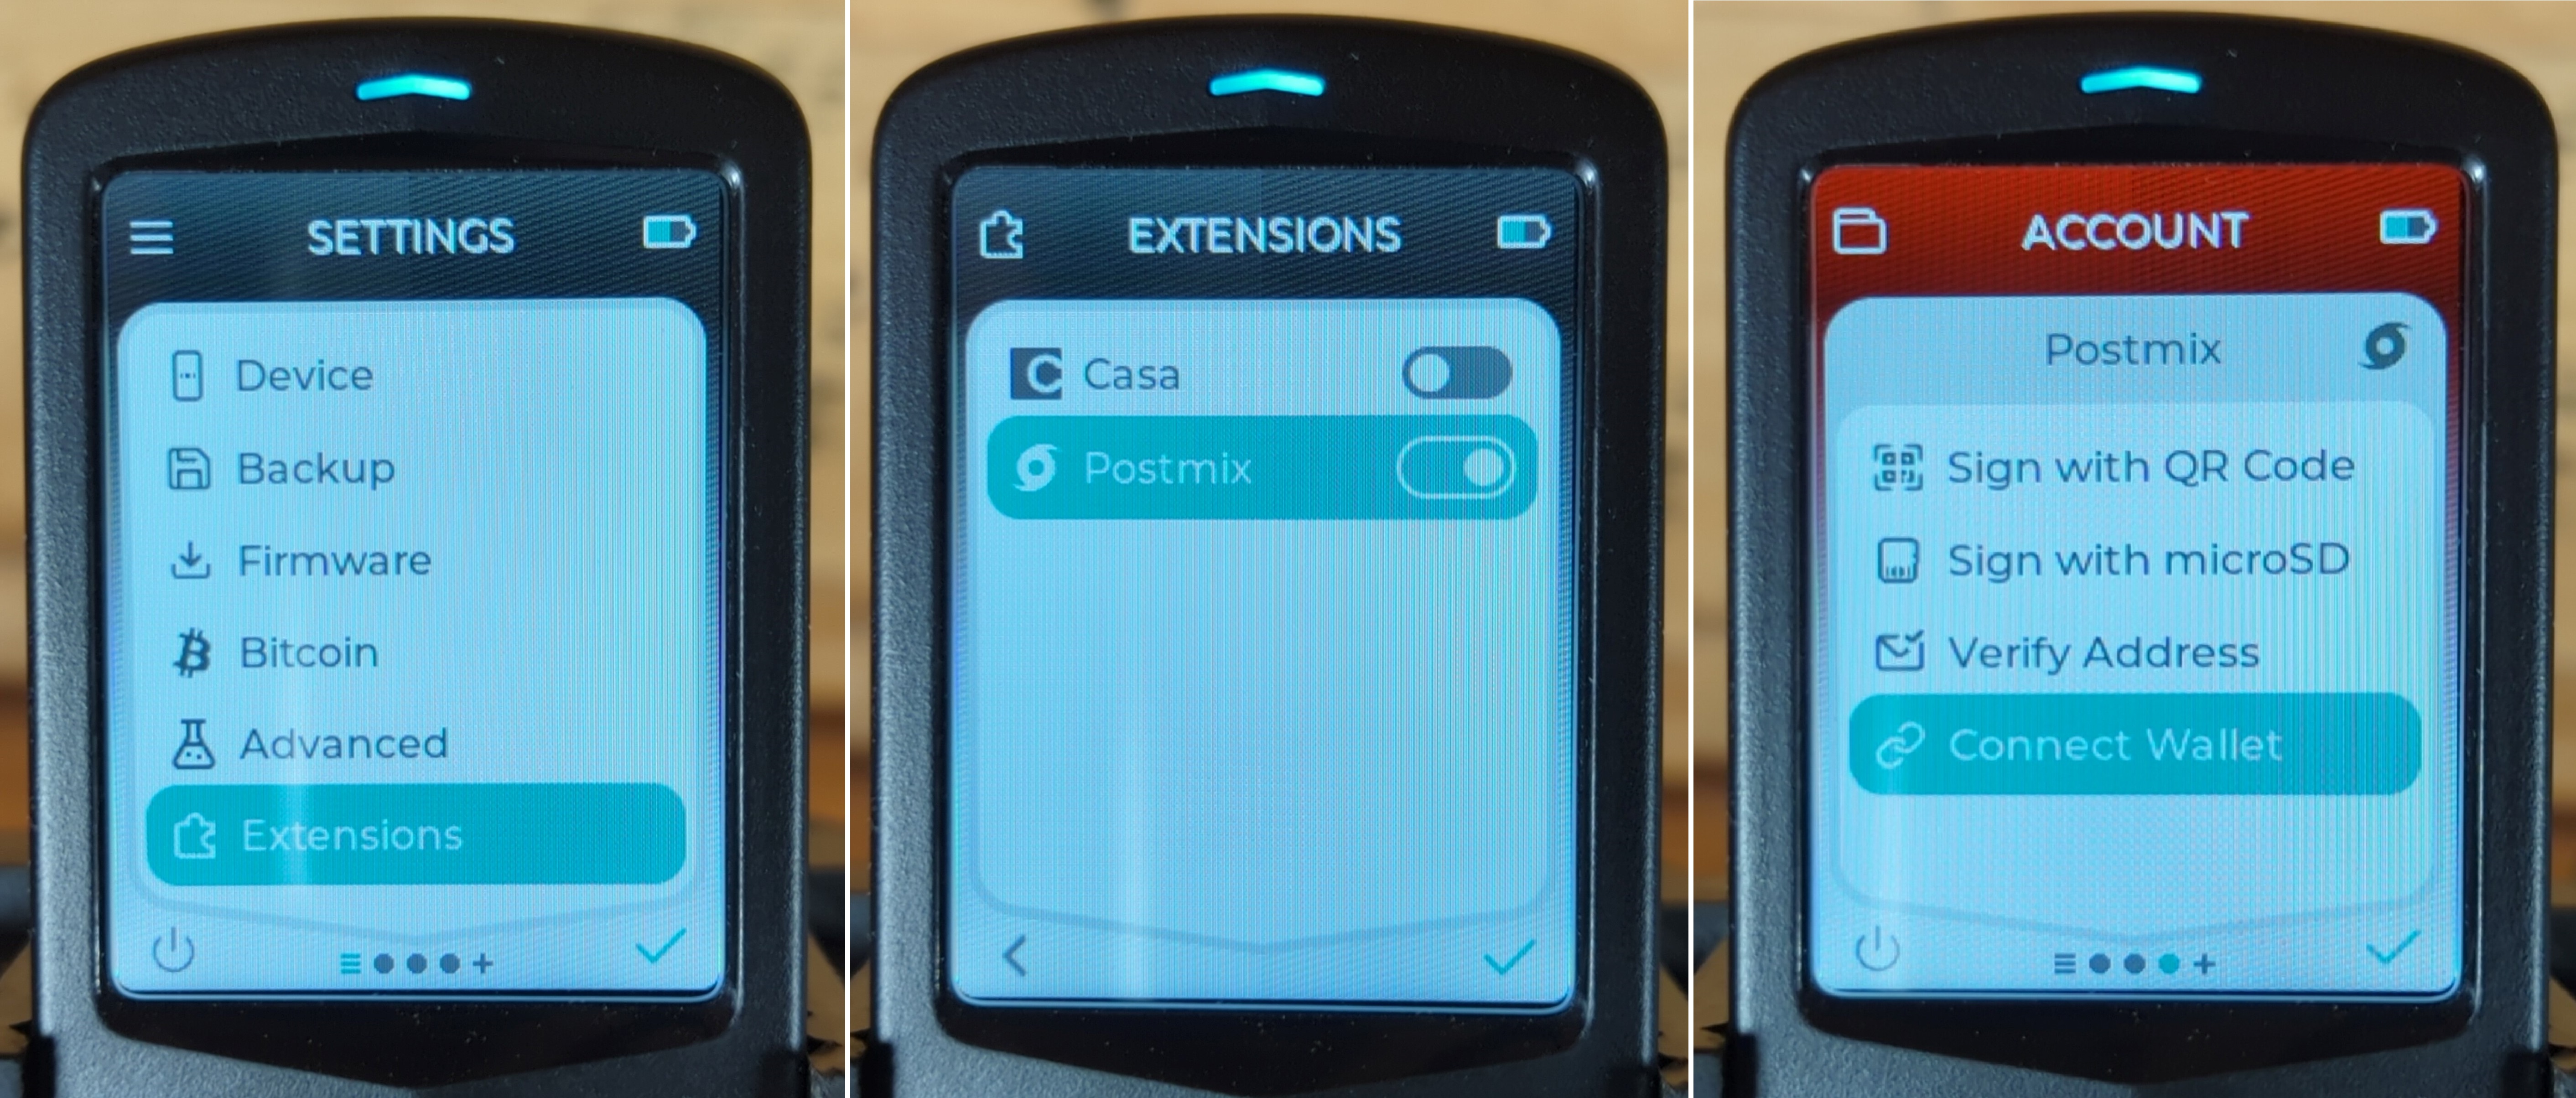
- From the list of available wallets, select your choice (Sparrow Wallet in this case).
- Select the
Single-sigsignature type. - Select
QR Code. - Follow the prompt telling you this is going to display a QR code by selecting the
>arrow. - Then an animated QR code will start flashing.
Now you are ready to initiate the connection process in Sparrow Wallet.
- Select
File>New Wallet:
- Then name your new wallet and click on
Create Wallet:
- Next, you can leave the defaults for the policy type and script type but select
Airgapped Hardware Walletfor theKeystore 1selection:
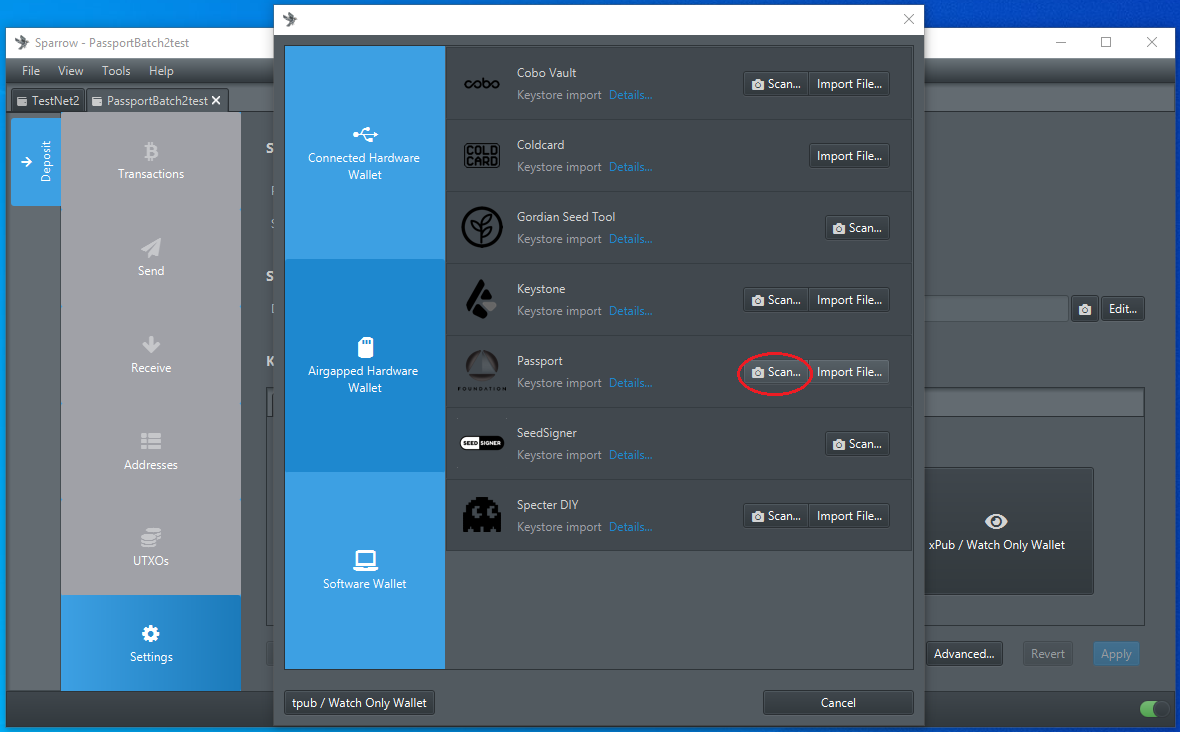
A pop-up window will appear, select the Scan... option on the Passport line:
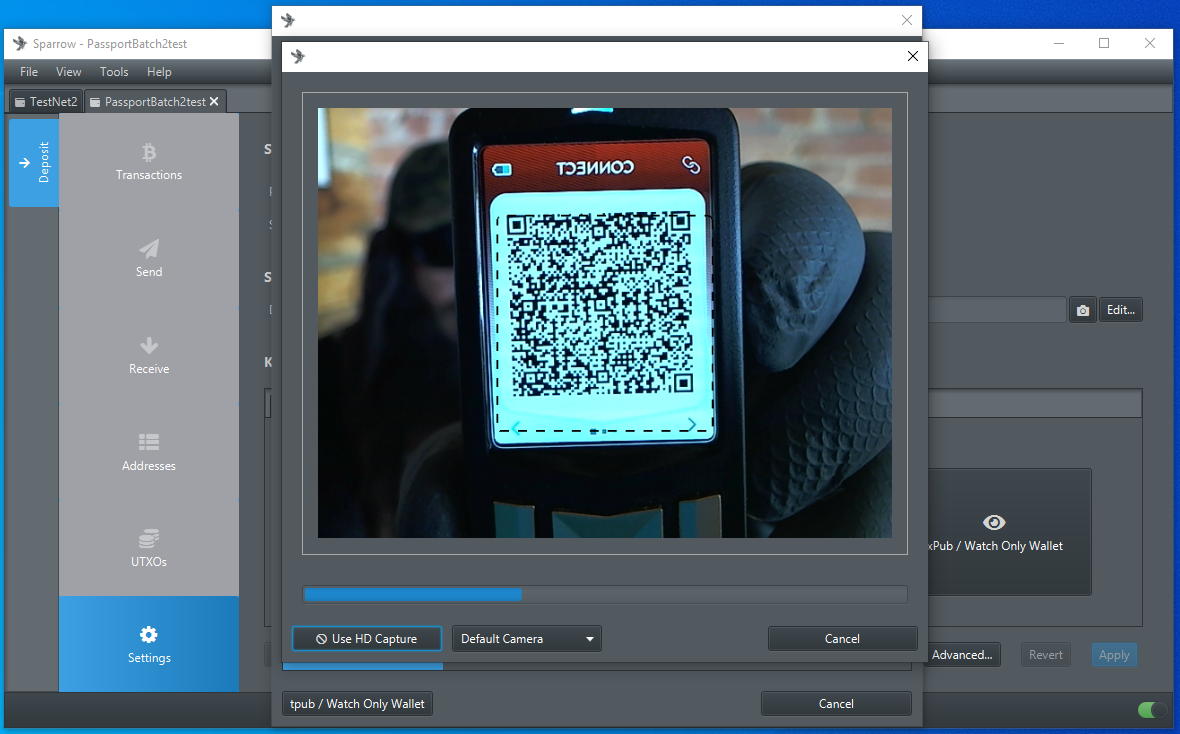
Sparrow Wallet will launch your webcam then hold the animated QR code from your Passport in front of your webcam:
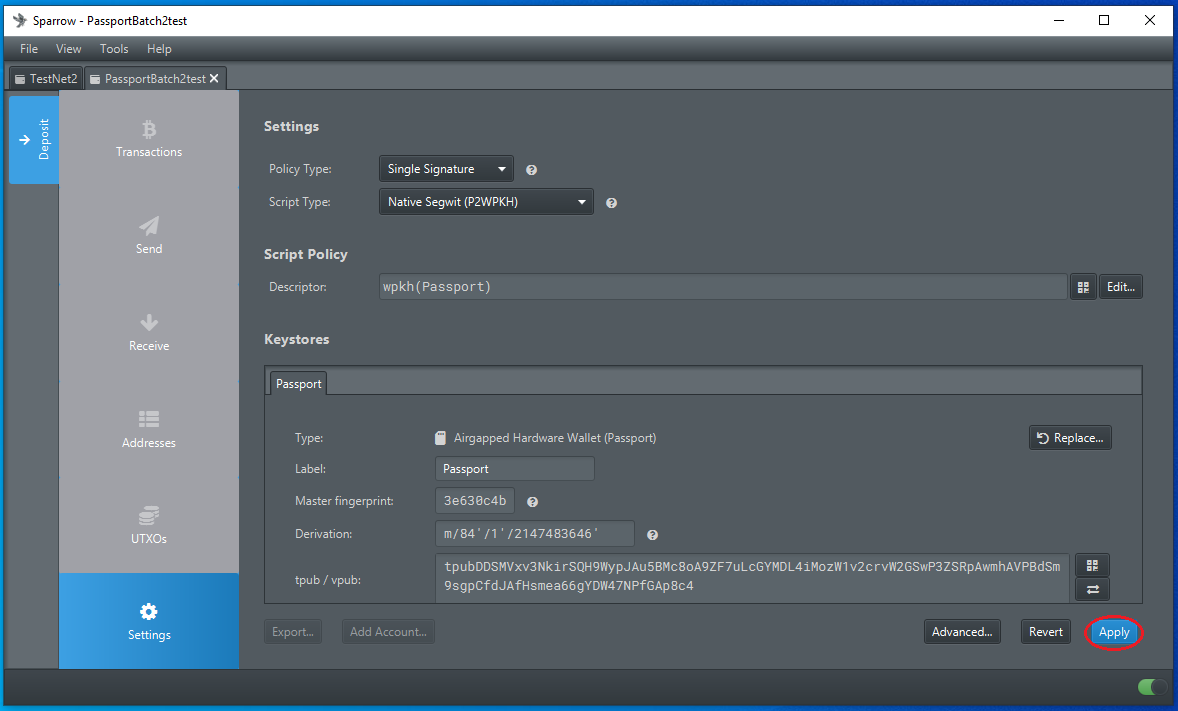
Once all the information is captured, Sparrow Wallet will display a summary of the watch-only wallet you are importing. If all the details look correct, then select Apply. You will be prompted for a password if you want to optionally encrypt this wallet file on your computer. You have the option to verify an address with your Passport for extra assurance.
Now, with both your hot wallet and watch-only wallet open in Sparrow Wallet, you can navigate back over to your hot wallet tab and point it to your watch-only wallet so it sends Whirlpool outputs there.
- In your hot wallet, navigate to the
Postmixtab andUTXOssubtab. - At the bottom of the screen, select
Mix to...:

A pop-up dialog will appear, select your watch-only wallet as the mix-to wallet and then set the minimum number of mixes you desire each UTXO to receive before it is sent to cold storage:

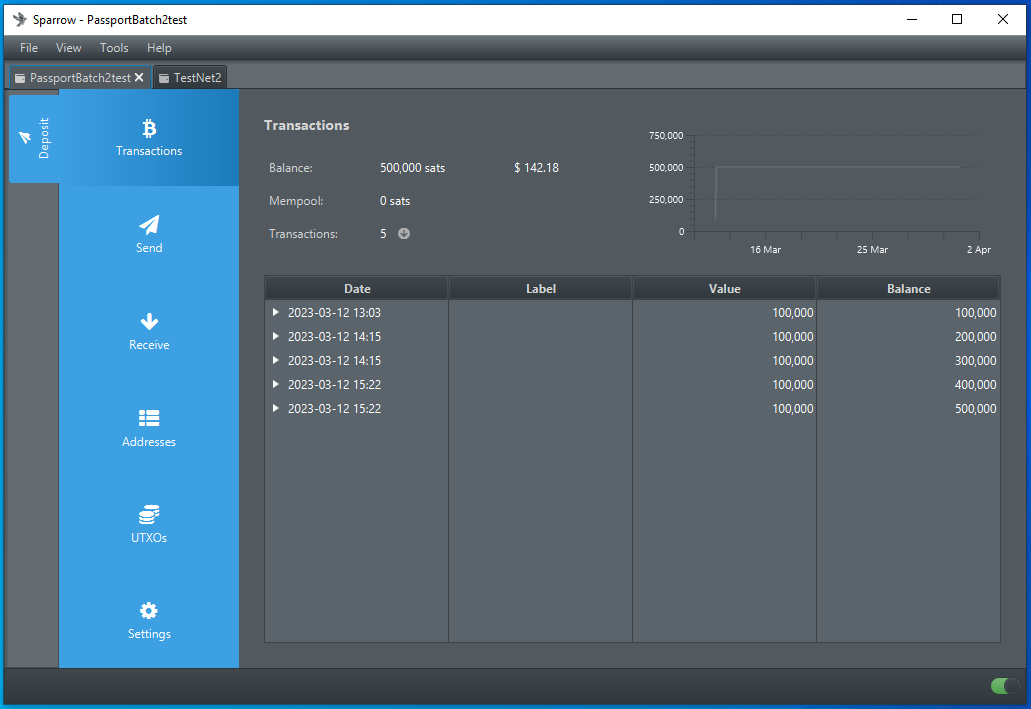
Once your UTXOs have gon through some CoinJoin rounds, they will start showing up in your watch-only wallet as they are deposited to cold storage. Make sure to leave your hot wallet open and connected to the internet to get continuous CoinJoin rounds.
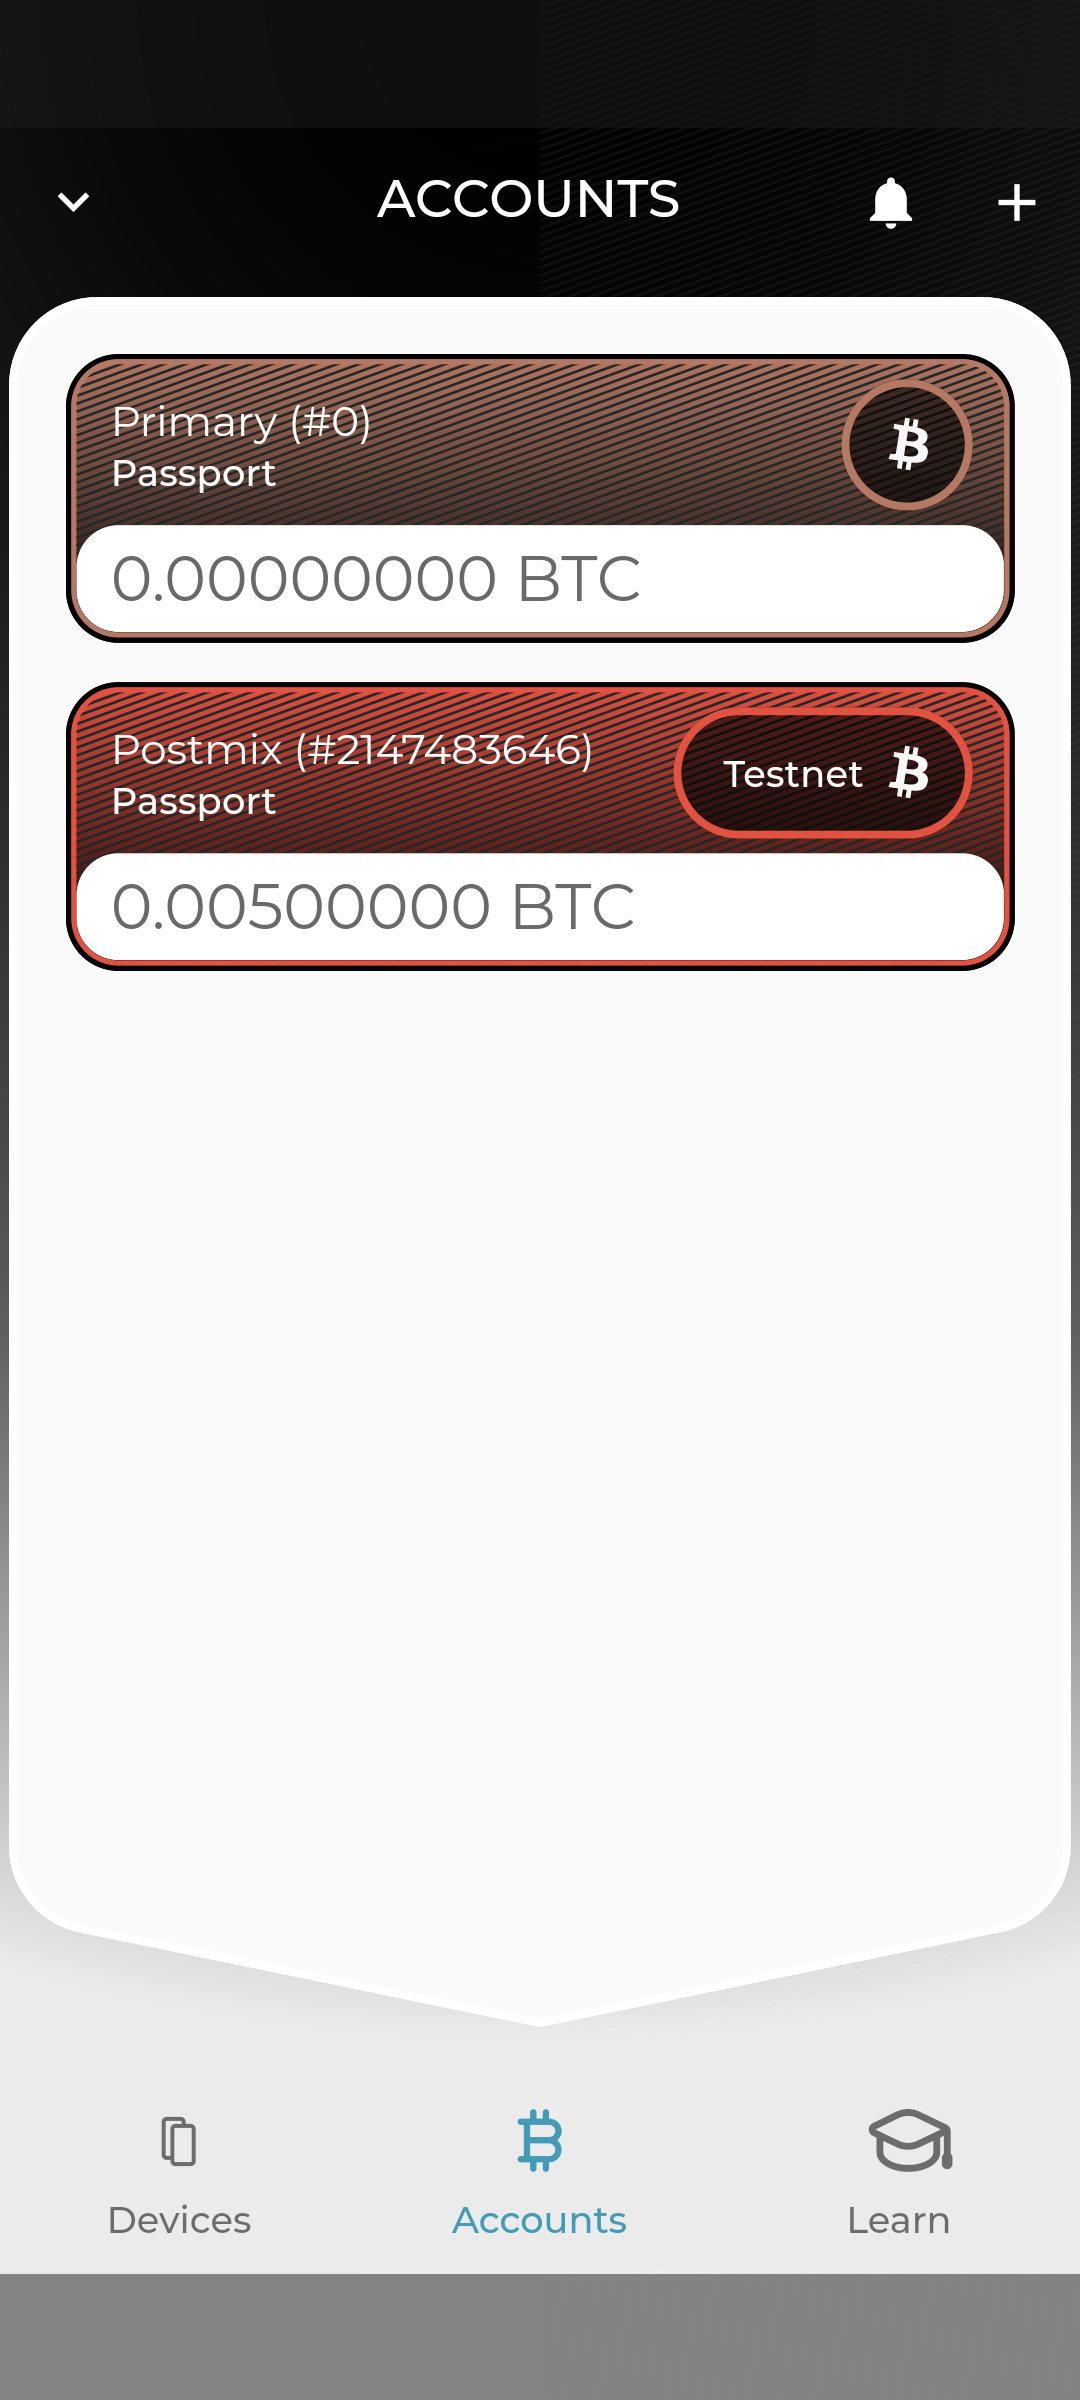
You can also monitor your Passport Postmix account from the Envoy app. Just like with connecting your primary wallet, simply select Connect Wallet from the Postmix account page on your Passport and then go through the animated QR code connection process using your Envoy app.
You can create transactions to spend from your Postmix account using the Envoy app and then you can sign those transactions using the QR code method.
This concludes the select feature section. In this guide you were introduced to Passport and shown the unboxing, supply chain validation, how to download the Envoy companion app, how to update the firmware, initial setup of your Passport, comparisons between Passport Founders Edition and Passport Batch 2, and how to use the Whirlpool feature to CoinJoin directly to your cold storage device.